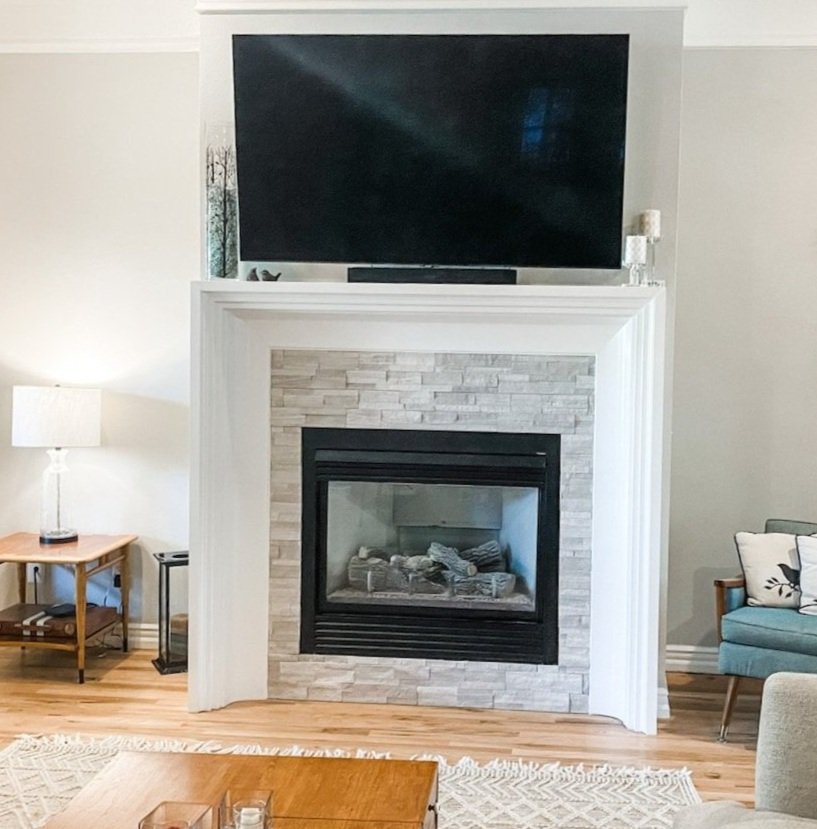
The living room fireplace reveal....

FIREPLACE MAKEOVER!

I have known from day one that I wanted to give each of the fireplaces a little makeover.

HERE I shared the den fireplace….

Now it was time for the living room fireplace.

The original fireplace wasn’t totally offensive. It just wasn’t “my thing.” Whatever that is! A little dated…just blah.

My original plan was something like this…

SOURCE

I really loved this “cove molding” look but this surround is stone…and SUPER expensive. I decided to try to recreate the look with wood.

First thing I had to find was the “cove crown.”

I found it HERE. The only issue I had with it was the fact that it is a “polyurethane” material…basically styrofoam with a plasticish shell…hum. I did some research and it is SUPPOSE to withstand heat up to 200 degrees. That should hold up to the heat put off by my fireplace….should. I guess I’ll find out next year!

So as I mention HERE, I found my inspiration, took measurements and made a tentative plan.

What is the old saying about “best laid plans?”

No matter how carefully we plan, not all will go right.

Case in point.

So I started by removing the old surround….

TIP! When you remove wood trim from a wall, first score the joint between the wood and the wall with a utility knife. It should have caulk between the wood and the wall and if you don’t score it, you may tear the paint finish. If there is still caulk on the wall, just take a chisel or putty knife and gently scrape it off. Also use a board behind the pry bar so you don’t bust through the sheetrock…I did it just for demonstration purposes…NOT!

When I removed the old surround, I discovered this….

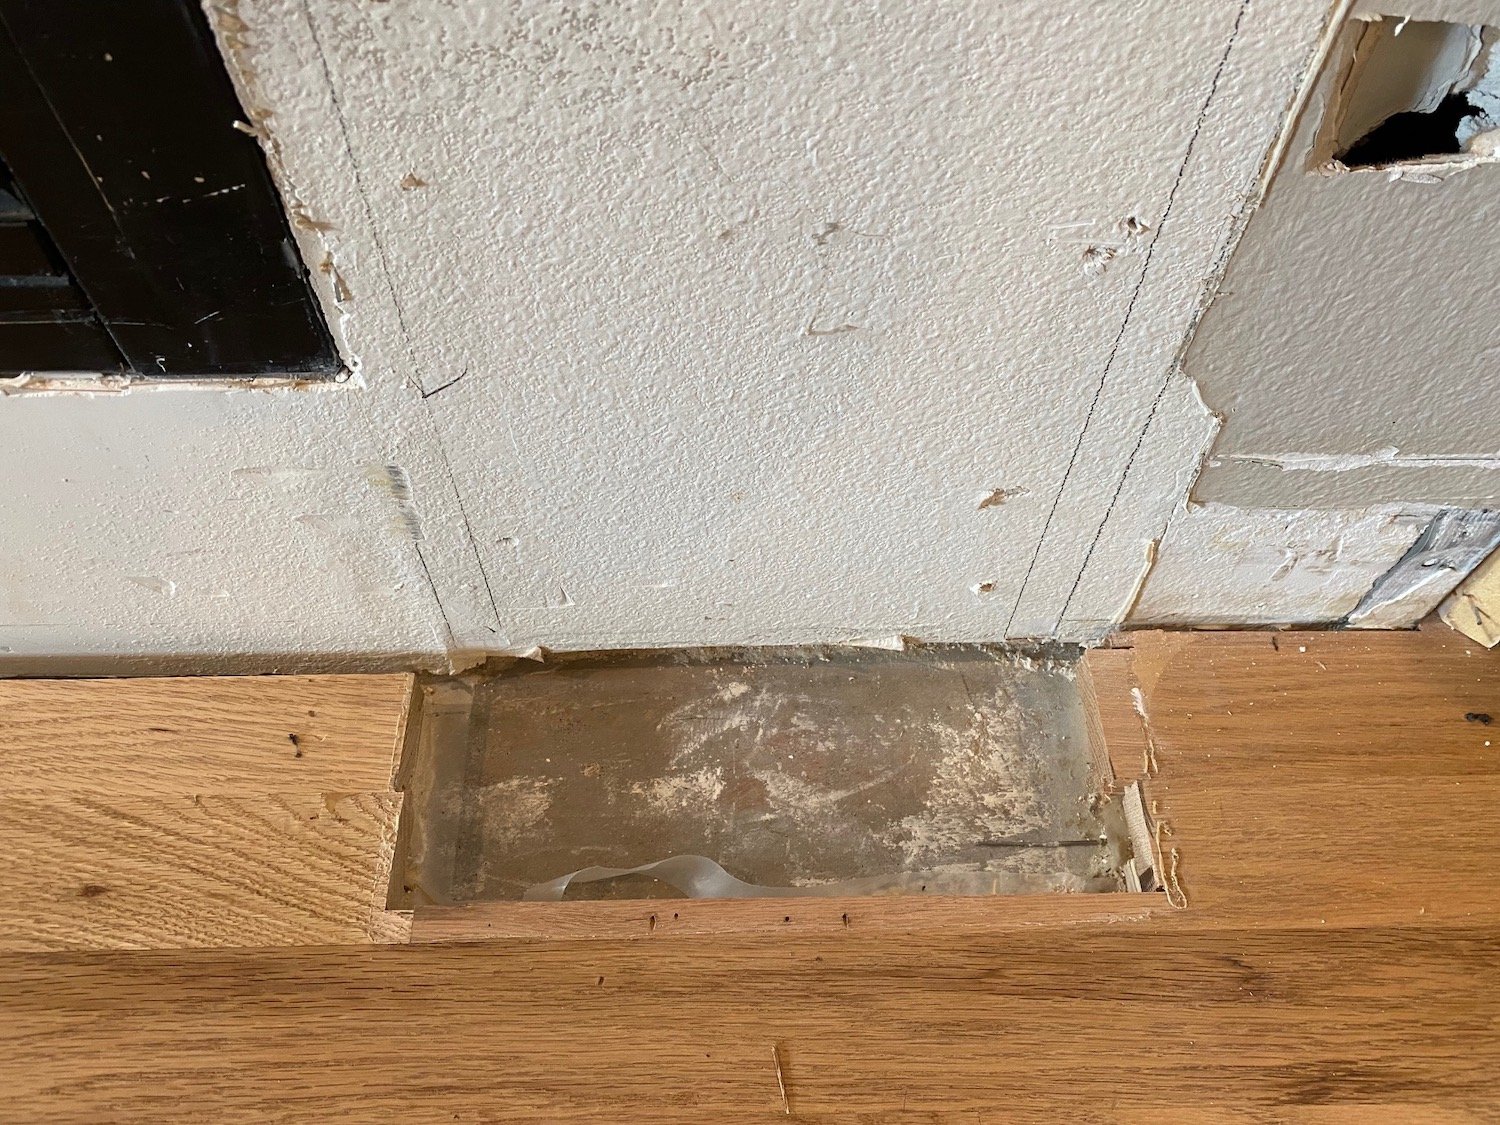
I forgot this room originally had carpet. When they added the hardwood, they had to work around the existing fireplace surround which sat on the slab, so of course when I removed it there was a gaping hole in the hardwood flooring.

“Best laid plan” #1….

Not a big deal for me. First, I always keep “spare.” The problem was remembering where I put the spare pieces of hardwood. Once I dug it out from behind all the stored Christmas decorations I went to work patching these floors. Since much of it was going to be covered by the new surround, I didn’t worry about “lacing” it in like you would a prominent area. I glued and laid some 3/4” material as a subfloor, then cut a few pieces of the oak and glued them to the subfloor with construction adhesive, using wedges between the wood and the wall to fit them tight until the glue set up. I sanded and applied one coat of polycrylic before installing it. After installing it, I used wood filler to fill the gaps, gave it a light sanding, then applied another coat of polycrylic.

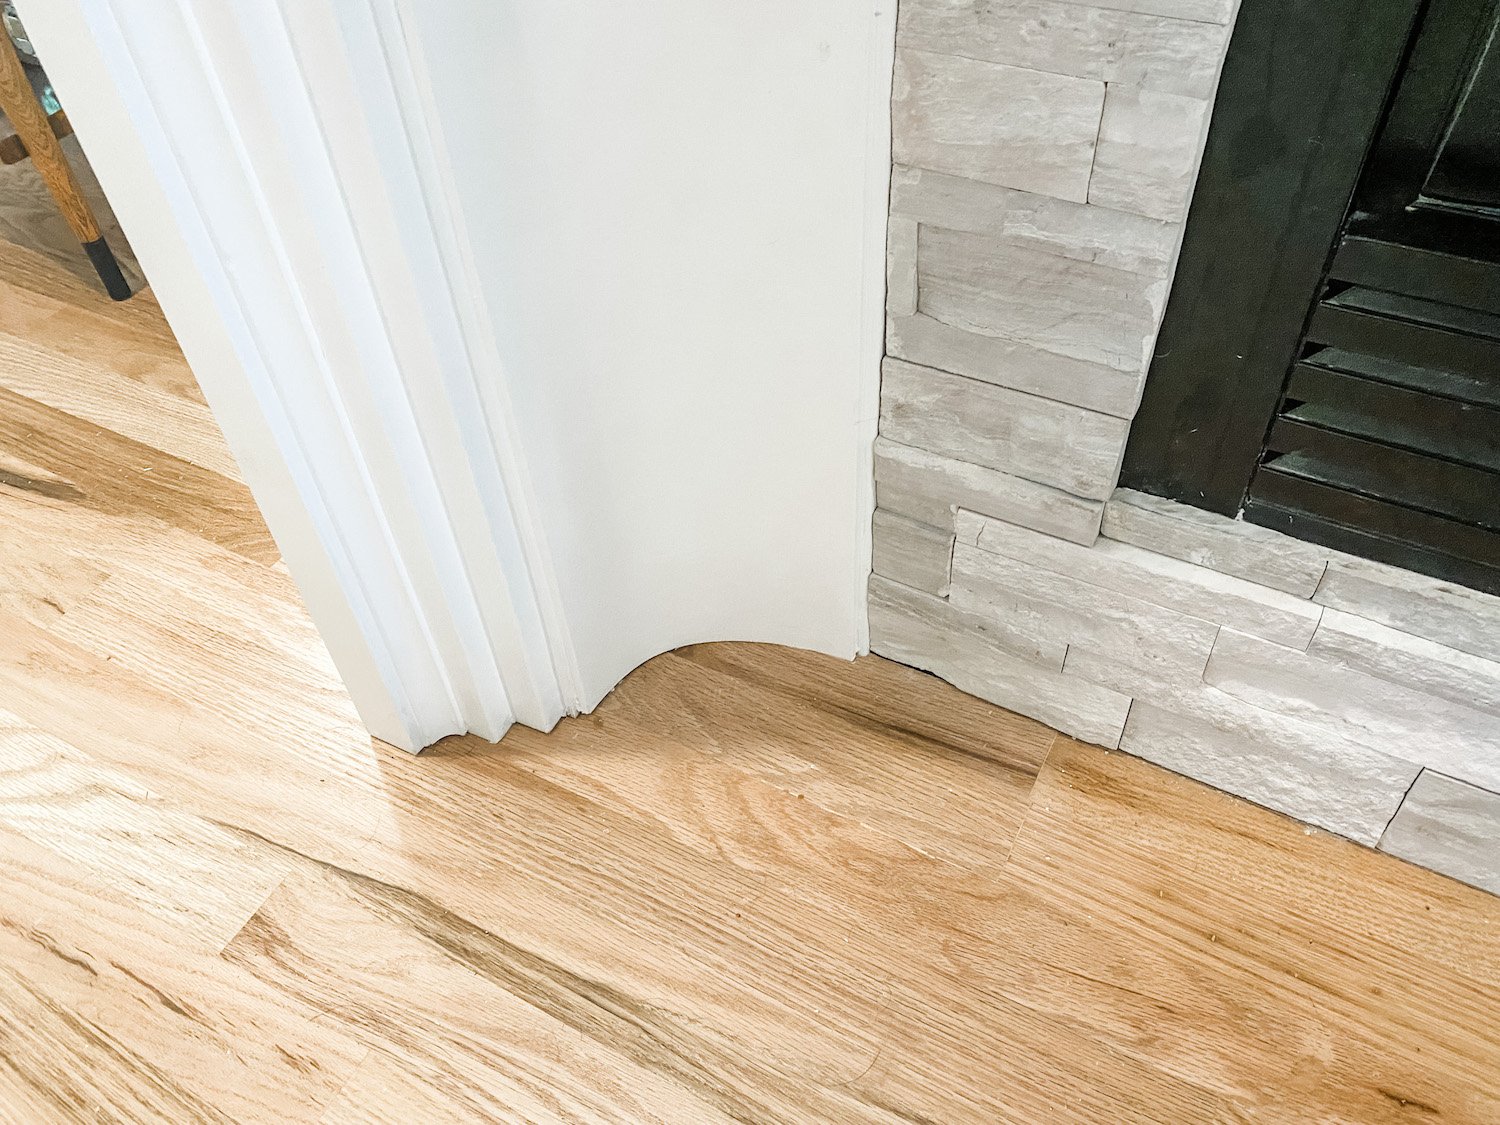
Hardly noticeable…or as my daddy use to say, “You’ll never notice it on a passing train!”

I decided to build the surround on the wall vs. building it as a unit and then attaching it to the wall. Just personal preference honestly.

I used a stud finder to find all the studs and marked them on the wall.

I put up 2 x 4 “bracing/supports” on the wall using THIS construction adhesive and deck screws. I was able to hit a few studs, but not as many as I would have liked…hence, the adhesive. I like this construction adhesive better than most because I have found it is tackier and less likely to “slide” before it dries.

Since these were the “supports” that all else would be attached to, I made sure they were perfectly straight and level.

I strongly suggest priming and sanding all your materials before installing it…this will save you from a serious dust storm IN the house! First course of business.

I began building the surround by attaching 1x material to the supports I had secured to the wall, using adhesive and nails. I used 1 x 8” poplar material on the outside and faced the edge with 1 x 2 poplar. I attached a 1 x 4 pine on the inside of the supports. Then I added spacers between the two to provide additional support and nailer for the trim.

(At this point the cove crown is just “propped up”…not attached.)

My “best laid plan” was to use crown between the outside board and the inside board….

Okay, here is the problem and where my “plan” completely fell apart.

I was THINKING I would just take plan ole’ crown and “cope” the inside corners. Works on a ceiling, right?

Right…but on the inside corners of a wall/ceiling, you have two pieces of crown joining in the corner, both laying “horizontal.” On the inside corner of this fireplace, you have one piece laying horizontal and one piece laying vertical.

Now, you might not think that is a big issue.

Well it evidently is. I googled, I cut, I made mock ups…I spent an entire day trying to make this work. Evidently this is not a “doable” thing…at least not what I could find.

This might explain why ALL my inspiration pictures were stone or masonry.

I think the reason it worked a bit with the cove crown ( I say a bit, because there were still gaps I had to sculpt with putty and caulk) was because it didn’t have the “fancy” profile of a crown. Smaller cove molding will cut on a 45 on inside corners without coping. The larger cove molding had minimal “gaping.”

If you know anything about cutting trim and coping you know exactly what I am talking about. If you do not, do a TON of research before attempting to trim inside corners…or you too will learn the hard way!

Soooooo….best laid plans.

I rarely just give up, but…..

Time to punt.

I found another “inspiration” that appeared to be “less decorative.” I decided to give this look a shot since it would entail using basic 1x material vs. crown.

Truth is, this is one of those “happy accidents.”

I like the look more than I did the original plan!!!!

I used a 1 x 4 material, then stacked on a 1 x 3 material, then a small cove molding…LOVE.

Moving forward….it was time to attach the large cove crown.

First issue. In all my inspiration photos, I really like the “one piece” look. Since again, they were all stone, the material adjacent to the fire box was the same as the surround. If I recreated that look I would have to use painted wood adjacent to the fire box, and I just didn’t feel comfortable with that. Not that this box gets terribly hot, but it does get a tad warm.

Soooo….what to do. I really wasn’t loving the look of high contrast tile between the box and the surround.

When I was looking at tile, I found a split face travertine tile I really liked.

If you remember the Lankford house den fireplace I installed split face travertine…and I LOVED it. I still do…so I went with it.

Now, travertine is not “all the rage.” So this is a prime example of doing something I LOVE vs. doing the in thing.

Since I decided to go with tile, I used a 1x material for the inside of the cove crown to sit on…just to give it some lift so that the tile wasn’t butting up against it’s 1/4” edge. I glued and nailed 1 x 4s on the wall, then installed the cove crown on top of that.

Second issue…since the cove crown is “polyurethane” and not wood, I couldn’t attach it using a trim nailer. Trust me, I tried. I had to use construction adhesive, then tape it and constantly “press” it until the mastic finally set up. Pain.

Once all that was done, I caulked all the joints, puttied holes, gave it a little sand and then painted it BEFORE I installed the tile surround.

I used a latex paint because my research said that latex is a better product to use in areas where “heat” might be a factor…I guess it has a tad more flexibility. Makes sense.

Don’t forget the Floetrol…makes a world of difference in your paint finish.

After the paint had cured, I installed the tile. Again, there are amazing tutorials out there for installing tile…find one that makes sense to you! Installing tile around a fire box is NOT a difficult DIY project. But you want to make sure you have the right tools (wet saw, properly sized trowel, etc) and that you use a thin set or mastic that works with the type of tile you are using and is heat resistant. RESEARCH!!!!!!

There were a couple of scuffs and marks on the black fire box from scraping the old mastic off. I used a black Sharpie to cover those…works like a charm.

And presto, bingo….a new fireplace surround.

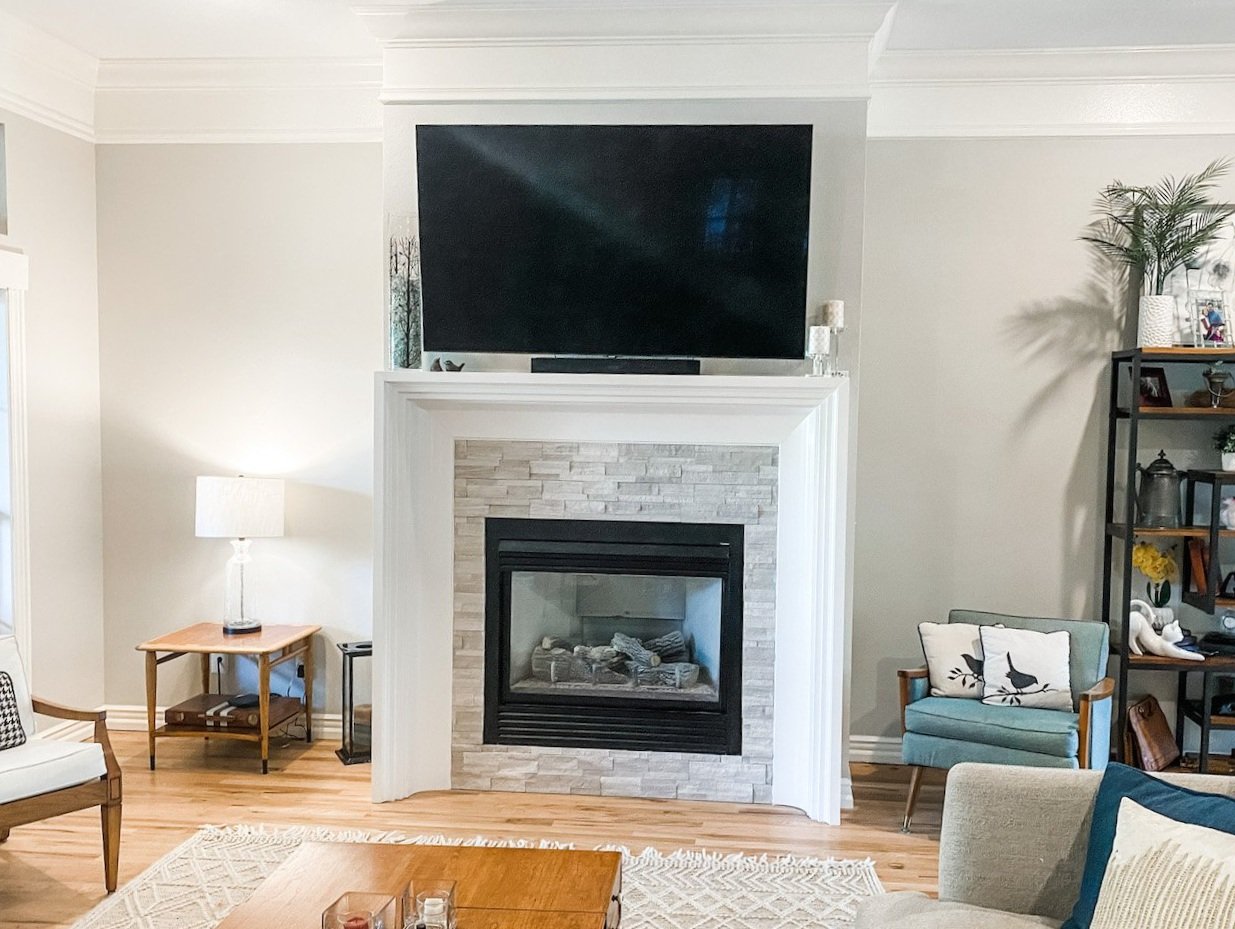
I like it much better than the old one. Bigger but simpler. Not quite so “traditional” looking. Again, I like it much better with the “stacked edge” than I would have with the crown. See, no mistakes, just learning as I go. A lifetime of doing this stuff and I am still learning!

I am EXHAUSTED (just look back at all the projects in the last few months) so I doubt I will be starting any new major projects anytime soon. Course I say that and I am already eyeballing and sketching a few things I have been thinking about starting. Hum….

So until next time…

The newest swing pergola....

One of the first things I did before moving in was paint all my doors black. It just made our new house feel like “home.”

One thing about my old house I have aways missed…the swing pergolas.

I had one in my front yard and one in the back. I loved them and I used them all the time!

Working on my neighbor’s deck gave me a “bug.” I have wanted another swing pergola and now I want to do a little manual labor outside.

Okay, so I didn’t REALLY want to do manual labor. My poor old body was still recovering from the deck build. But like everything else, I want what I want and I know to get it I have to put in a little time and labor…and sweat and tears and pain and agony.

HERE I posted a pretty good tutorial for building a swing pergola. And as I said HERE, if you want one, JUST DO IT!!!

I have built a few of these so for me it was a labor intensive breeze. I will say I use to be able to build these for around $200…thanks to inflation, this one cost upwards of $350 (not including the swing). And it was 8x4 vs the 8x6 I usually build.

But again, I wanted it, so I built it.

And if you want one, I know you can build it!

So a few pictures…..

I just love it…THIS is a link to the swing. Super comfy, perfect for napping!

One major change from my other swings.

Usually I put flagstone under the swing. Quite an expense…roughly $150-200 just for this little space.

Last year the City of Lowell tore out an old one-lane bridge near a house I built and we lived in when my boys were young. They removed HUGE 2” thick 16’ wood planks. My son managed to wrangle a few of them, cut them down to manageable (relative term) 8’ lengths and brought me a few. They have been stacked behind my shop…just waiting on inspiration.

And “inspired” I was. I used the planks to create a “deck” beneath the swing.

I put it down just like I would rock. I excavated about 4” of soil, put down a 2” sand base, then cut and laid the boards just like I would rock. I filled the gaps with sand and soil.. The boards are “rough” and that is okay…gives it character.

The flower pots are ones I have had for eons…they use to be “teal” when teal was all the rage. I spray painted them black and filled them with flowers. Lovely.

i am contemplating staining the pergola black. I have seen a few pictures of black pergolas and I really like the look. Fortunately treated wood needs time to “dry out” before you stain or seal, so I have a few months to mull that over.

In the meantime I have a perfect spot to sit and ponder!

That was last week’s project…this week’s was my living room fireplace. I mention HERE that I wanted to make changes. The changes are made and I am very happy with it. I had to make a few “design changes” due to issues I’ll discuss in the reveal.

So until next week when I HOPE to have the fireplace reveal….

YOU CAN DO IT!!!

This is not a “feature.”

This is not a “tutorial.”

This is to encourage you…IF YOU WANT IT, JUST DO IT!

Wow…that should be a product motto…lol!

But seriously, if there is something you envy…a beautifully painted room or piece of furniture, (this blog is FULL of painted furniture!) a flagstone walk, a swing pergola…JUST DO IT.

I know you can!

A few weeks ago my neighbor asked if she though it was possible to put new boards on her deck…her’s was pretty old and rotted and the railing was a hazard waiting to happen.


The deck is off her bedroom…she likes to sit out there in the morning and drink her coffee. The original plan was to tear off the existing 2x4 deck boards and replace them.

She and her husband decided they wanted to drop the deck a bit, add a step and add steps to the back yard. That was a whole nuther project…and required some serious planning and rebuilding.

Probably a good thing we decided to redesign and rebuilt the entire deck because even the frame was pretty rotted. It ALL needed to go.

The hitch…the only “muscle” we had were 5 housewives/retirees…myself being the youngest…everyone else was over 60.

But by goshy, WE DID IT!!!!!

We demoed the original deck (man was it showing its age!) and replaced it with a brand new one with access to the back yard!

The only thing left to finish is the railing and she decided she wanted black iron railing…so that is on order. When she gets it finished I’ll post some better pictures!

For now, she has a beautiful new deck!

We are not young. We are not strong and we are certainly not “deck design” experts.

I have a little construction knowledge but I have never actually designed and built a deck.

We have the internet.

Between the five of us we managed to work together to lift the heaviest boards.

And we were able to “tag team” so when one got tired, another jumped in.

Two construction dudes could have knocked it out in a day…it took us a week. But by goshy WE DID IT!

It was a labor of neighborly love.

This was certainly the result of a bunch of “old women” giving what we have.

This week I am building ANOTHER swing pergola….I guess working on the deck gave me “the bug.” When I get it finished I’ll post pics. For now, if you want a swing pergola, HERE is a great tutorial. YOU CAN DO IT!!!

WHY DO I DO THIS TO MYSELF!!!

If you have ever checked out my “About Me” page you may note the annual pictures of our family in our Christmas PJs. No pictures of the last two years because Brian and I had Covid in 2020 and then Sarah had it this past year…so no family Christmas celebration for two years in a row. I still got everyone matching PJs but no family picture…poooo!

Anywho, I have always wanted to make a quit out of all the different plaid PJs. I have put it off because, well, I hate sewing. Hate is not a word I use often, but I really hate sewing. I wasn’t really sure why. I’m pretty good at it. I love the end results…whether it be a decorative pillow, reupholstered chair, or a custom formal dress.

I just know that every time I sew, I find myself growling and gritting my teeth.

I finally realized why I hate it so much after two weeks of working on this latest project!

It hurts…my back hurts, my neck hurts, my teeth hurt, my head hurts. Most likely the result of my horrible posture and hours of sitting.

The latest project? A PJ quilt…or rather quiltS! As in, I am up to three quilts and two throws.

Why…well, we have a full and twin bed upstairs in the bunk room and I really want some cute Christmasy quilts. Then I decided if I was going to make two for upstairs, I need to make a queen size one for the guest room. And of course the grandsons had different PJs than the adults so I thought it would be neat to make throws for them out of their little PJs.

And then of course I need to make something for the daughter-in-laws…they both want throws…and Sarah wants pillows…

AND BEFORE I KNOW IT ONE TINY SEWING PROJECT HAS TURNED INTO A FRICKING NIGHTMARE!!!

So be it…like I always say, the best way to eat an elephant is one bite at a time. So every morning I take 4 ibuprofen and start chomping away.

As with any DIY project I first had to find my “inspiration.” I knew I wanted quilts, but I also know I don’t want to do a tedious piece mill quilt. When I was in college, I worked for a lady who made applique’ baby quilts…so I know how to do that.

So I went searching and found this….

…I love it and it is something I can do with my skill set…applique’ trees made out of the flannel PJ’s on flannel panels.

I am not going to go into a long tutorial on “how to make a quilt”…as I have said time and again, I am not good at tutorials and there are THOUSANDS of tutorials out there on how to make all kinds of different quilts. Find one that makes sense to YOU!!!! I’m just here to “inspire” you!

So my next step was to gather up all the PJs we have. I sent out a message to all the family to gather up their old PJs and send them to me….

These are just a handful!

We have had this tradition for over 20 years but most of the older ones are long gone. I was able to gather about 15 different plaids from years past. The little guys (my two grandsons) had to wear different PJs up until about 4 years ago and my daughter actually had some of their older PJs stored away….SCORE!!!

I decided (based on some complicated math and chintzy fabric widths) to make the panels 10 1/2” x 10 1/2”. For the little guy’s throws the panels are 9 1/2” x 9 1/2”.

Easy peasy, right?

OH MY GOSH!!!! WHAT HAVE I DONE TO MYSELF!

The queen size quilt requires 72 panels, the full size 56 and the twin 48. The two throws will take 24 each…and each panel has THREE trees! That is a total of 672 trees…so not only did I have to cut out 224 panels, but then I had to cut out 672 trees and 672 tree stumps…and then I had to applique’ three trees and stumps on each panel.

THIS product has been an absolute life saver for me!!!!

Back in the day you would have to iron on a fusible backing. With this stuff, I just cut out the trees on the webbing, peeled one side, stick it on the fabric, then cut it out. Then I peeled the other side, and stuck the tree onto the panel. This stuff allowed me to peel the tree off and reposition it if needed. Not easy to do with iron on fusible backing.

I did use an iron on fusible webbing on the back of each panel…flannel is “stretchy” and this made sewing the trees on a bit easier. It is a “tear away” webbing so when I am done I can just tear away the backing and have a nice soft panel!

Actually, I stuck all the little trunks on the panels, sewed those on with a satin stitch, then went back and added the trees.

Again, it is waaaay more complicated than I make it sound, but this is the end result….

A total of 176 big panels and 48 panels for the little guys.

It only took me two weeks and a big bottle of ibuprofen.

Soooo, now I wait for the flannel I ordered for the stripes that will go between each panel. I got the cute white flannel with little stars for the panels from a local craft store but I read reviews on their flannel and it didn’t score high marks. So I decided to buy a different brand from a different source for the stripes and backing. It was a bit more expensive, but if you are going to put in this kind of time and money, I say go with the best. I want these quilts to last a looooong time!!!!

I decided to go with plain ole’ red…very Christmasy. My plan is to connect each panel with 1 1/2” red stripes and back the quilt with red or maybe another plaid flannel…then bind it with a red and white striped fabric…kind of “candy canish.”

Truthfully, I am grateful for the time off while waiting on the flannel. I need the break!

I am very fortunate. My daughter’s boyfriend’s mother quilts and he knows how to do the top stitch quilting…so he has agreed to do that for me. That is an expensive part of this project so I am grateful he is willing to do it!

AGAIN….find a tutorial that makes sense to you for the type of quilt you want to make. My quilt is a tad more complicated because of the applique’ work, but you can do a simple patch work quilt if you have no other skill than the ability to sew a straight stitch! Don’t let the complicated and beautiful quilt projects intimidate you…they are amazing and I envy the women who have that ability, but you can make a simple keepsake without all the fuss!

I have seen keepsake quilts made out of baby cloths, old jeans and athletic tshirts. My neighbor saw this and decided it would be a great way to preserve a bunch of her father’s old flannel shirts she kept.

This is definitely a “labor of love.”

It is also a prime example of doing something I dislike because I know I will love the end result!

The "new" Drexel server....

I shared my plan for this wonderful vintage piece HERE….

I know purists cringe when people even talk about painting vintage pieces.

This is a prime example of “doing what you love.” If a piece will be more loved and treasured in a different state then go for it.

I painted the first one I found years ago and have had it in my dining/breakfast room…

…I recently swapped it out for the china hutch (featured HERE) and sold it.

Now this piece, a Drexel Accolade, has some value as is….if you do a little research you will find they sell for hundreds. But for me “hundreds” is not a value that will keep me from giving a piece a little makeover. If we were talking tens of thousands, yeah, no.

I also have a Drexel nightstand I refinished and shared HERE.

I planned to sell this piece after it’s makeover but I have moved it into my dining room and now I am kind of liking it…hum…guess we will see.

So…what did I do to give this thing a little more appeal?

First, I removed all the old hardware and brightened it up.

The hardware on these pieces are solid brass but after a few decades of neglect it is hard to tell. You can tell if something is solid brass with a magnet. A magnet WILL NOT stick to solid brass.

If the hardware is solid brass, the only way I have found to really brighten it up and get the decades of grime off is with Brasso and SOS pads.

Coat each piece with Brasso. I use a little chip brush to coat the pieces. After that sits for awhile, take an SOS pad and scrub away. You may need to repeat this process a time or two. I also use an old toothbrush to get in all the nooks and crannies.

After all the pieces are really clean, I scrub them with “Never Dull.” It seems to get the last layer of grunge off and gives them a little bit more “brightness.”

Not the easiest or fastest way to clean brass hardware but I just don’t think you can beat beautiful brass hardware.

Now, if the hardware is NOT brass and you want to spruce it up (without the cost of replacing) you can always give it a good scrubbing, prime it with metal primer and then paint it with spray paint. (TIP: put the screws back into the screw holes so that you don’t get paint in the threads.)

I shared another brass hardware restoration project HERE.

So, the hardware is done. If you find a Drexel piece and it is missing any of it’s original hardware, you can find replacements on Ebay…but be prepared to pay dearly for it! Each pull can range from $30 to $110 EACH!!!

I decided to strip and oil the drawer and door fronts. On the last Drexel makeovers (the bedside table and server) I painted the entire piece. This time I decided to shake things up a bit.

While I like wood grain, I am not a huge fan of oak. No biggy since, again, my original plan was to sell this piece. To highlight the pretty wood grain, I stripped the drawer fronts and doors using my trusty 1/2 and 1/2 mixture. 1/2 acetone, 1/2 lacquer thinner. HERE I posted a pretty lengthy tutorial on how to use this mixture to strip even the most stubborn finishes!

After stripping off the old finish I gave the drawers and doors a little mineral spirit wash, lightly sanded, wiped with tack cloth, then applied 3 coats of tung oil finish…my current favorite being Waterlox.

After that had dried and cured well, I taped and papered the doors and began prepping the cabinet for paint. (I removed the drawers to strip and oil them!)

I didn’t need to paint the inside of the cabinet so I taped that off, along with the black laminate under the flip top. I primed with Bullseye primer, then sanded smooth with 220 grit paper and wiped it all down with tack cloth.

I decided to paint the cabinet with high gloss black lacquer spray paint. I am obsessed with the high glass finish on these pieces. I just think it really makes a huge impact, especially with the bright brass hardware.

(You may notice I am all decked out for Easter…that is my new thing…decorating for each holiday/season. Next up will be Memorial Day/4th…patriotic stuff…then “summery”…then fall…then Christmas…then Valentine’s and back to Easter. See what happens when you “retire.”)

The trick to a flawless spray paint finish is LIGHT COATS…lightly spray, let it dry, spray again. It may take 3-4-5 coats but it dries quickly and in the end you will have a beautiful finish. If you go heavy handed you will have drips and runs and will be hugely disappointed!!!

Also pay attention to the temperatures and humidity. If it is too hot or too cold, or if the humidity is really high, you may have issues!

HERE you will find some additional tips on how to property paint furniture…very helpful!

After the paint had properly cured (gave it a good day or two) I replaced the hardware and OH. MY. GOSH!!! I seriously love this piece. Even though I am not a huge oak fan I am really loving it!!!

So the past few weeks I have been tackling a MAMMOTH project. Maybe next week I can share it. Hint, in entails A LOT of the thing I hate most….but man will it be worth it…I think…I hope….

Sheetrock repair.

I posted a very helpful tutorial on repairing sheetrock HERE almost 9 years ago.

I decided to post another tutorial because I have two small sheetrock repairs…the result of removing security system control panels. (And a son who pointed out that I spent a fortune remodeling this house and left the worthless control panels)

Yes, I am removing a security system. It is the original hardwired system that was probably installed when the house was built 22 years ago and we have never even attempted to use it.

Why? Well, first we have a HUGE dog, an Anatolian Shepherd, that is quick to alert us to all boggy persons, delivery people, squirrels, unfamiliar cars, etc…day or night. And God help you if you tried to enter this house. She is the sweetest dog in the world…if she knows you or I am here to tell her all is okay. But I have no doubt she would make a meal out of you if she didn’t know you or she thought I was afraid.

No worries…we have a precious lab puppy who would be quick to clean up any mess Cleo makes…or give you puppy kisses if you are distressed. Typical lab. Not the best guard dog.

Second, everything is wireless these days. Our current security system is wireless. So an old hardwired security system is kind of useless.

I have found very little evidence of a hardcore security system. Basically there were two control panels, one in the bedroom, one in the laundry room…

…and two motion sensors in the ceiling. I removed those and covered the small holes with new smoke detectors…you can never have too many of those! (I also just noticed the doo-dads on a few doors…will have to deal with those eventually.)

When I removed the control panels in the bedroom and laundry room I found 2” x 2” holes in the sheetrock.

Curses.

So, here is another tutorial for repairing sheetrock without having to install backer boards or tape. I have used this method to repair 2” x 2” holes, door knob holes and even large sections when I removed walls (HERE)

Here are the supplies you will need to repair sheetrock….

*Scrap piece of sheetrock (you can buy this at Lowes or “repurpose” scraps from a new construction job site)

*Sheetrock mud

*Spray texture (my walls are orange peel texture…buy the texture appropriate for your wall texture)

*Broad knife

*Utility knife with a sharp blade

*Measuring tape

*Pencil

First, use a utility knife and make the hole square/rectangular. My holes were 2 x 2 inch squares so no worries.

After you have cut a decent "square" around any damage, measure the width and the height.

Then mark the scrap sheetrock, adding about 3" to that measurement! My sheetrock piece was 5” x 5”…that will leave about 1 1/2” on each side for “tape.”

Sheetrock has a paper backing on each side so it is very easy to cut...basically all you have to do is "score" the back side (usually the side that is brown) with your utility knife then just "snap" it. Then take your knife and cut through the paper on the other side.

After cutting a piece 3" larger than your opening, you will want to mark the actually opening size on the back side of the sheetrock, leaving 1 1/2" on all four sides. (This is where a little "square" tool or ruler will come in handy!) I always make my mark and cut about 1/4" smaller than my actual measurements just to give myself some wiggle room!

After scoring, "snap" one side at a time and carefully peel the "core" (the chalky inside) of the sheetrock and backing off the paper on the front side. You will do this on all four sides.

(Yes, I know I need a manicure.)

After you are all done, it should look like this.....

I also take my utility knife and make a "miter" cut at each corner...just a little slit from the corner of the board to the corner of the paper.  

Basically, what you have done here is create a patch with built in sheetrock tape...so there is no need to tape the gap around the patch and no need to try to put backing behind the board where you are patching...it is "ALL IN ONE!"  Nifty, huh? 

Before putting joint compound in and around the hole, "dry fit" your cut piece and make sure it will fit in the hole. If it seems to stick, you can shave a little off the edges with a utility knife. If you cut the piece about 1/4" smaller than the hole, it should fit right in.

After you make sure your cut piece will fit properly, mud the edges of the hole and the wall about 2" around the hole.

Set your cut piece into the hole and use your broad knife to smooth out the paper and push the excess mud out from underneath the paper edging with your broad knife so the paper lies flat. Then put more mud on your broad knife and lightly coat the entire piece.  "Feather" the edges where the new mud meets the wall. Coat the new mud a few inches onto the wall.  The less mud you leave on the patch and the wall, the less you have to sand! It is okay if you can still see the paper and board through the first coat...no biggy!

HINT:  Some mud can be pretty thick.  You can mix it with a little water and thin it down a bit...makes it easier to work with...but don't make it too runny! 

I usually let this first application dry overnight.  Remember, there is a bunch of mud along the edges that is basically "glueing" the patch in place.  You want to let that dry well before you start sanding. 

After this first coat of mud dries, sand it as smooth as possible.  Don't panic if you sand into the paper coating the sheetrock...it happens!   It really doesn’t matter what the sandpaper grit is at this point.

I always wrap my paper around a sponge sanding block...it helps you sand flat. Sand it as smooth as possible and make sure you "feather" the edges so that you don't have any heavy mud lines showing. Don't panic if you feel like you have sanded "too much"...you really can't.

FEEL the area with your bare hands...if you can feel the lumps and bumps and lines, you are going to be able to see them...so sand away!! (I can not stress this enough...SAND IT SMOOTH...CLOSE YOUR EYES AND FEEL!!!!)

After sanding it REAL smooth, put another coat of mud over the area.  Again, the smoother you coat it, the less sanding you have to do!   Be sure to feather the edges by mudding 2-3" around the repair area.  This is where a wider broad knife really comes in hand!

After this second coat dries, sand again....sand it as smooth as you can.  Again...if you can FEEL lumps, bumps and lines, you are going to be able to see them...so sand it smooth and make sure you feather the edges. This really is the "trick" to getting a good repair!

I can usually get by with two coats of mud...and that should be plenty.  If you feel you have had to sand down too much and need to add a light third coat, go for it.   Just make sure you let it dry well and sand BEFORE moving on to the next step.

After the patch and the surrounding area is really smooth, it is time to put on the spray texture.  

If needed, I usually wait to tape off the surrounding area until AFTER I sand the patch.  Joint compound will clean off easily with a wet towel but the spray texture is pretty tough stuff. So lay down a drop cloth (or newspaper) under the patch and tape off any trim BEFORE applying the spray texture.  

Most wall textures these days are what we call "orange peel."  But you might also have "knock down."  If the texture on your walls is just kind of bumpy, you probably have "orange peel."  If you have heavy blotches, you have knock down.  

You can buy cans of texture at Lowe's and they come in both orange peel and knock down. FOLLOW THE DIRECTIONS ON THE CAN CAREFULLY! And make sure you shake the can well!

(If you have never used spray texture before, I would suggest experimenting on a scrap piece of board or drywall…play with it a bit until you feel confident your application matches your wall texture. )

 If you have orange peel you will just spray it on the patch and surrounding area (using a circular motion to eliminate "lines" and spray "outside" the patch area)  If you have "knock down" texture, you will have to spray it on the patch and surrounding area, let it sit per the cans instructions and then take your broad knife and "knock down" the new texture after it has dried a bit.   Follow the directions on the can for proper application and dry times for both!   

Lighter is better....this stuff dries rather quickly, so if you think the texture is too light, go back over it AFTER the first coat has dried.  It is always easier to add a little texture than to deal with texture that is too heavy....so go light and reapply if necessary.

If you feel like you have totally botched it, just take a damp paper towel and wipe it off the wall while it is still wet. Then either practice a bit more on your scrap or try again.

If the spray texture appears a little "bumpier" than the wall texture, you can always take a piece of sand paper and LIGHTLY run it over the new texture AFTER IT HAS DRIED and before you paint.

ONCE YOU PAINT IT WILL BE REAL TOUGH TO MAKE ANY ADJUSTMENTS TO THE TEXTURE SO DO IT BEFORE YOU PAINT!!! Not impossible but more difficult.

DO NOT PAINT UNTIL THE SPRAY TEXTURE HAS DRIED COMPLETELY!!!!!

Now this is where that can of leftover paint you stored away will come in handy! Seriously, I can not stress enough how important it is to keep "spare" paint....store it somewhere in the house, clearly marked! You may have to match the paint color the best you can and then paint the entire wall. And this is not an issue at all if you are repairing walls before you repaint.

You will probably need 2-3 coats of paint to cover the patch since you are painting over "raw" sheetrock and texture.  I used a little 4" sponge roller and brush.

If you sand well and applied the texture properly, you shouldn't even be able to tell where the patch is!   

This does take a little practice.  After owning apartments and raising teens, I've had a LOT of practice.  But if you take your time, use the proper tools and really pay attention to details you should be able to do this little DIY project yourself!

I hope this gives you the confidence to finally tackle that sheetrock repair that has been bugging the heck out of you.

china hutch makeover...

I originally bought this piece to makeover and sell…

When I gave my breakfast room a little makeover (featured HERE last week) I decided I kind of like the look and it gives me a place to display my heirloom china….

I didn’t take pictures while I was giving it a makeover because, well, I just didn’t….

But the process was pretty straight-forward.

I removed all the hardware. The drawer hardware was not the original so I ordered hardware that would have come with the piece originally. Fortunately the door hardware was still there so I just cleaned it up a bit with Brasso and SOS pads to highlight the engravings.

Before you go scrubbing on hardware with Brasso and SOS pads, make sure it is real brass. A magnet will NOT stick to real brass…if one doesn’t, scrub away.

I removed the shelving. I also removed the glass and decorative glass inserts. Not difficult because it was just held in place by some strips of tiny molding and nails…I just popped those right out and set them aside to paint and reuse.

The shelving was pretty warped and I tried my trick of laying them on the floor and placing weights on them…no go. So I ordered glass shelves to replace them. Honestly, I like the glass better.

The glass shelves where a lot heavier than the wood shelves. Originally the piece just had two little supports on each side for the wood shelving (no supports along the back for the span which might explain why the shelves bowed.) I didn’t feel comfortable with that so I added 1x3 support boards along the back, securing them with glue and staples. Now I feel confident that the shelving is properly supported and can handle the weight of dishes. (If you have ever had a glass shelf come crashing down on your china you would understand my concerns. Yeah, it happened!)

There were a few other minor repairs that had to be made…since I was painting the piece, I did them before primer and paint.

Remember, if you are staining, stain first then repair. If you are painting, repair first then paint.

I cleaned the piece well then I caulked all the “joints.” Remember if you are painting a stained piece you have to caulk all the places where wood meets wood…and you may even have to putty nail holes. If you miss anything it will show up when you prime the piece…just caulk and putty and spritz it with a little primer.

I sprayed the entire cabinet with Bullseye primer. Primer is MUST on mahogany pieces because it will bleed through the paint! If you paint a piece and see “red” or “shadows,” that is the mahogany bleeding through…or water stains, oils, etc…more layers of paint WILL NOT cover it. Prime it then repaint it. Or save yourself the grief and prime everything before you paint. Mahogany is not the only thing that will bleed through paint. Nail holes and “gaps” will show up and you will be able to fix them before you apply your paint.

Also, you will get a much prettier and durable finish.

I know some paints (like this one) profess to be paint and primer in one. Maybe so but I always prime with a primer. Usually Kilz or Bullseye.

I sanded it smooth then wiped it down well with tack cloth.

I decided to paint the inside white and the exterior black. I painted the inside with some satin white latex I had on hand, let it dry and cure then taped it all off to spray paint the exterior.

I painted the interior a satin finish but I wanted a flat black for the exterior. I went with Rust-Oleum Matte Farmhouse black.

After the black had cured (I usually give it a few days) I replaced the hardware, reinstalled the door glass (without the decorative doo-dads) using the small trim and silicone and moved it into the house. I gave it another few days to cure before adding the glass shelving.

I did not paint the inside of the drawers or the inside of the lower cabinets. I rarely do unless the piece has an odor or stains I can’t get rid of by cleaning. If you have a piece that has odors or stains sometimes your only recourse is to prime and paint!

I added a LED light to give the display a little glow! That entailed drilling a small hole in the top for the cord and mounting an LED light strip in the top of the cabinet….simple simon!

Lovely.

This is where I remind you that “cure time” is super important when working with painted wood. I always get annoyed when I watch those shows on HGTV and they paint and stage furniture the same day. DO NOT DO THAT!!!! Be patient…give paint time to cure. If you don’t you will scuff and scar your new paint job and will be seriously disappointed.

If you look back at this blog you will see I use to do this kind of thing all the time…I loved it.

I don’t do it much anymore and I forgot how much I love taking an old abused and neglected piece and turning it into something beautiful and useful again!!!


Accent wall tutorial...

I shared HERE how I found inspiration for the accent wall in my office.

I shared HERE the office after everything was done. (Well, everything for NOW!)

At first glance, the accent wall may seem somewhat intimidating.

This is actually a wallpaper. I like the dark wall with lighter accent stripes. I think it gives the wall “depth” and makes a room look larger.

You could easily replicate this entire look with paint…just paint the wall then paint the stripes.

I kind of did the opposite…light walls, dark stripes. I knew from day one I wanted a pink accent wall and decided to make the stripes out of walnut. My office is a big room with tall ceilings…it can take an accent wall that makes the room APPEAR smaller.

Now if you have followed this blog for any amount of time you know I have a deep love for walnut.

I made my fireplace mantel out of walnut.

My kitchen cabinets are walnut….

I made my living room shelving out of walnut…

And most of my furniture is walnut. If it is any other wood there is a good chance I will paint it if need be…but not walnut!

So, pink wall, walnut stripes.

The first thing I did in this room, after a good purge and reorganization, was paint the walls.

The accent wall was painted pink and the three other walls and trim where painted white (BM Chantilly Lace…closest I can find to a TRUE white without an undertone.)

They were ready to go….

So here is a little tutorial for doing any accent wall.

Print off a picture of your inspiration wall…as large as you can get it on a full size piece of paper. I printed off the picture above.

Measure your wall then draw the wall to scale on a piece of graph paper. For me, this is a must any time I am doing a room makeover. I need to know the scale of the space I am working with and how each element fits in that space…on paper.

Since I wanted the accent stripes to be centered between the ceiling and the top of the baseboards, I measured and graphed from the top of the baseboard to the ceiling. I did NOT measure from floor to ceiling.

Identify and mark your center point on the wall…from there you will work out from center to left and from center to right.

I had to figure out the “scale” of the stripes. I did this by making the assumption that the longest stripe in the inspiration picture (#1) was 4” from the ceiling…just a guess. When I measured that with a ruler on the printed picture, it measured 1/8”…that became my scale…1/8” = 4”. The distance between the stripes measured 1/4” on the picture, so I determined the distance between stripes would be 8” (I actually did 8” on center (OC)…which means I drew my stripes 8” apart then centered the 1” strips of wood on that mark.)

All this information gets transferred to my scaled drawing.

I counted the number of each of the different sized stripes. The inspiration wall had 4 different sized stripes…so I assigned each size a number, 1-4. There were 5 #1s (the longest)….4 #2s…5 #3s…3 #4s (the shortest) that would fit on my wall, spacing 8” OC apart.

By using my 1/8” = 4” scale, I determined that each stripe was 24” shorter than the next (12” from the top, 12” from the bottom).

So #1 is 107” (top of baseboard to ceiling is 115” - 8” (4” from ceiling and 4” from baseboard)…#2 is 83” (107” - 24”)…#3 is 59” (83” - 24”) and #4 is 35”. (59” - 24”)

If #1 is 4” from the ceiling, then #2 would be 16” (4” + 12”) from the ceiling, #3 would be 28” from the ceiling and #4 was 40” from the ceiling.

All this was drawn, to scale, on the graph paper.

Man, this sounds confusing….but it really is not. If you draw it all out on a graph paper to scale, it makes perfect sense…I promise.

Then it was all transferred, in pencil, to the wall.

It is so much easier to erase something that is wrong than it is to tear glued and nailed boards off a wall.

So, now I have the entire plan drawn out on paper, to scale, and I have the measurements of each stripe.

I decided to make my walnut stripes 1” wide. I also decided to give them a “3-D” affect by placing them on 1/2” furring strips. Walnut is a pretty expensive wood so I made the furring strips out of plain ole’ poplar and stained the sides to match the oiled walnut.

Matt and I used his table saw to cut the walnut in 1” strips. We cut the poplar into 1/2” strips.

Using the graph paper with the accent drawn to scale as my guide, I used a pencil and level to mark the wall where each stripe would go. After marking the wall, I attached the furring strips using Gorilla Construction Adhesive and my nail gun. I let that dry overnight since the nails did not hit a stud (impossible!!) so the construction adhesive is what really holds the furring strips to the wall.

While that was drying, I prepped the walnut strips.

After cutting each piece the length needed, I sanded, then applied Waterlox. I LOVE this oil. It is a clear oil. It is my “go-to” wood finish these days. I first used it on my kitchen cabinets a year and a half ago and it has held up beautifully!!!! So I used it on the mantel and shelving. No stain…just 3-4 coats of this stuff will make any wood shine!!!

I applied two coats…steel wool and tack cloth between coats…and then applied a third coat after I had installed the strips on the wall and puttied the nail holes.

I applied the walnut strips directly onto the furring strips. Again, I used the construction adhesive and nails.

MAKE SURE EVERYTHING IS LEVEL AS YOU GO!!!! I made sure each furring strip was perfectly level and then I made sure each walnut strip was level. I worked top to bottom…wood, especially narrow strips, will bend…so make sure each strip stays level all the way down.

After I puttied the nail holes with wood filler mixed with stain to match the oiled walnut, I wiped on one more coat of oil.

After all this is done, go back and do wall paint touch up. You will scuff up the walls with the wood strips and the level.

Beautiful!

Now, this may seem like a really tough project. It really is not. It is like any other DIY project…it all hinges on the “prep.” In this case, laying it all out on paper BEFORE you start buying materials and cutting wood.

Changes I would make? I wanted a “3D affect”…in other words I wanted the walnut strips to “stand out”…which is why I added the solid furring strips. I think if I did this again (which I won’t) I would want to use spacers to make the walnut strips stand out. The only downside to that would be that wood has a tendency to “move”…twist, bend, warp. By attaching the walnut strips to solid furring strips, the walnut will not bend or warp! So maybe the way I did it is best…who knows…I just think I would have liked the look of “floating stripes” better.

Other than that, I am pretty happy with the results.

I have some leftover walnut so I THINK, when it warms up a bit (we got 8'“ of snow last night and it is still snowing), I may make some floating shelves for this wall…

Again, I eventually want to make a few other changes to the room (rug, chair, credenza) but I love this accent wall.

As with all DIY projects, the key to success is the prep and planning.

This week I planned, prepped and prepared for board and batten in the breakfast room….

My plan is to install board and batten at chair rail height and paint it white.

I also finished this nasty china hutch…

I know this looks pretty ratty but I painted it and did a little tweeking on it and it turned out super cute. My plan was to sell it, but I think I will move it into this room and style it first…I may even like it well enough to keep it. We’ll see.

Hopefully next week I will have the breakfast room done and in order and I can share that as well.

Until then….

Home office makeover reveal...

Last week I shared the need to give my home office a little “character and design appeal.” (You can go to the link to see the “before.”)

This week I will share a few changes I made…not huge changes but enough to give it a little be more appeal.

It wasn’t until I was working on my “Bogey Home Tour” page that I realized I had done absolutely nothing to this room. Not a huge deal but, as I mentioned, you can see this room from the main living area and it is right off the entry…so it really needed a little something.

The first step was to purge and organize. The closet is great for storing my small seasonal decor (Valentine’s, Easter, the 4th, etc.) and office supplies but it could stand a little purge and organization.

It had a mismash of boxes and baskets and binders so this is one of the few things I splurged on…matching boxes for receipts and such and new binders. Then it was just a matter of organizing everything else…mostly the small seasonal stuff. I even organized all the decorative candles I switch out for every season on my dining table….

After purging I painted the walls and trim. Three of the walls and all the trim were painted white…just plain ole’ white. The wall I decided to do an accent feature on was painted pink. Yep, pink.

This mess of a wall and credenza had become a dumping ground. I removed all the “unnecessaries,” changed up the pictures on the wall and organized the laptops in THIS little gem.

Eventually I will get another piece to put here but for now, this works.

I also have some leftover walnut and may make some floating shelves or a picture ledge for this wall…maybe…we’ll see.

I still like this shelving/cabinet….

…it just desperately needed to be purged and organized. I debated putting the printer inside the cabinet, but we really do use it a lot. All the paper, business checks and cartridges are stored in the bottom. I may eventually add a little more greenery (aka fake plants) but for now this will suffice.

I really wanted to put a glass top desk in front of the window, but as you can see, this is Cleo’s lookout chair…she spends most of her day in this chair guarding the house. Okay, she spends most of the day SLEEPING…but still…

The only real change in this little window space (besides paint) was the removal of the blinds. The window had blinds when we moved in that have never been closed…so I just took them down. I rehung the curtains…they never get closed but they “dress” the window.

I may eventually change out the big ugly brown leather chair for something a little more sleek and modern, but for now Cleo seems perfectly comfortable and content.

I will also eventually change out the rug but for now it matches the chair. This is one of those times when I would love to do a whole room makeover…new chair, new rug, new credenza…but I am doing what needs to be done with as little expense as possible…baby steps!

As I have said time and again, sometimes our design “wants” are dictated by pets and kids…and of course finances. You may WANT a white couch but that’s probably not a good idea if you have a toddler running around with a sippy cup of juice or a large black dog that likes to run around in the mud. (BTW, if you think you will finally be able to get that beautiful white couch after the toddler becomes a kid or the kid becomes an adult, forget it. )

Now, the desk and accent wall….

The top of the desk needed a good purge. There really was nothing on there that couldn’t be put in a drawer or filed away…out of sight. I did buy one acrylic organizer for the top just to put bills and such in. The rest got cleared off and stored away. (Remember, I open my mail by the trash can…trash goes in the trash, mail for the kids goes in the mail holder by the front door and anything that needs my attention goes on my desk. No piles of mail laying around screaming for my attention…I take a few minutes EVERY day to deal with the mail as it comes in. )

I recovered the seat of the office chair with some pink velvet I had on hand.

Now, the pièce de résistance. The accent wall. HERE I talked about “finding my inspiration” for this room. After weeks of cruising the internet, I finally decided that this was the look I love.

And I do love it!

Next week I will share a full tutorial on this wall. Tutorials are usually not my forte’ but hopefully I can make sense out of how I created this “visual interest.”

As with all DIY projects, I firmly believe it all comes down to confidence. No, I had never created a wall like this…but I had no doubt I could give it the old college try. Succeed or fail, I would learn something. I think I succeeded although I will admit there are a few things I might do differently if I did it again (which I probably won’t!) But that is the great thing about sharing what I do…you can learn from my challenges (never say mistakes!)

Until then….

Laundry room floor tile reveal....

 One of the first rooms I shared in our home is the laundry room….I absolutely love it.

I love the storage…I love the window…I love the coffee bar. I just love this space.

I’m sure when I had a house full of kids and piles of laundry I wouldn’t have loved it as much but with just the two of us it is relatively easy to keep it in order.

I love it so much that I really haven’t minded the outdated floor tile!

Much.

Truth is, the stuff kind of gives me the willies. I know this tile is the original tile from 1998 because it is identical to the tile I personally installed in the apartments I built in 1998, 1999, 2000, and 2001. Yes, personally…THOUSANDS of square feet of this stuff. And then for over 20 years I had to scrub it and repair it and look at it covered in nastiness…auuuuggghhhh!

So yes, while I love the space, the floor tile did kinda make me growl occasionally. I knew I eventually wanted to replace it. I think the last time I shared this room I showed you the flooring issue that would need to be dealt with after removing a portion of a wall.

Let’s be honest…it’s just plain ugly.

But oh the work. Tearing out old tile is NOT for the faint of heart or weak in the back.

When we demoed the master bath in my last house we busted up the old floor tile. I have never been one to paint over wallpaper or tile over tile. Take it out and start fresh.

I have only “tiled over tile” one time and it was on a backsplash in a kitchen. Never a floor.

Busting out the old floor tile just didn’t seem like something I wanted to tackle. Tasha at Kaleidoscope Living recently updated one of her girl’s bathrooms and actually tiled over existing tile in a shower.

Hum….dare I?

Yes, I dared. After a TON of additional research. I googled “tiling over existing tile” and read every article and watched every video I could find on the subject. The general consensus was that it is certainly doable as long as the tile you are tiling over is solid.

Mine was.

One thing I could not get a firm consensus on is whether to prime the existing tile. Some articles and videos said prime, others didn’t even mention it.

I decided it couldn’t hurt and might even help…so I primed. I used this product…

… and after a whole three weeks of walking on the new tile I can attest that it works (three weeks people…this is not an endorsement for longevity!!!)

I will say it went on VERY easily…just rolled it on with a paint roller. It also dries quickly and has a low odor. It has kind of a “gritty” feel to it and I felt confident it would give a good base to the new thin set and tile.

Choosing the tile….I did what I always do. I went on Pinterest and looked for “inspiration.” (This is important because sometimes I THINK I want one thing but when I see it in other's spaces I realize I really don’t like it.)

Then I went to the tile store, picked up 4-5 samples, brought them home, laid them on the floor and easily made my decision. This is important when choosing ANY element in a room…tile, paint, curtains…because the lighting in your room may alter what you see in the store.

Here you can see I first moved out the washer and drier, removed the base trim, tiled, grouted, reset and painted the trim, them moved the washer and dryer back and proceeded with the rest of the floor. Much easier than trying to wrangle two big appliances into another room!

I love the new tile!!! Now I don’t growl at the floor anymore!

I did small grout lines (I think that is the “in” thing now and so much more practical) and dark grout. It will make it easier to keep the floor “clean looking.” Except dark floors show fuzzies which is common in a laundry room…but oh well.

Tiling, whether it be a floor or a backsplash, is not a terribly difficult DIY project. A wet saw is a must so if you don’t have one, borrow one or rent one. Watch TONS of how-to videos and make sure you follow EVERY manufacturer’s instructions, even if it doesn’t make sense.

Personally I would leave wet areas like tubs and showers to the professionals. There are special “water proofing” products and techniques that will prevent future leaks…and trust me you don’t want water issues around a tub or shower. If you feel like you want to tackle a tub or shower area, make sure you do a TON of research!

TIPS!!! Pay attention to transitions between the new tile and other flooring and the bottom of the doors. Will adding an additional 3/8” make you have to cut down a door or add a transition piece?

Neither is difficult but you need to plan! I was fortunate in this space. Adding the additional tile did not affect those things. The existing tile actually sat a good 1” below the wood floors in the breakfast room and the new tile butted up to the existing transition piece nicely.

I always carefully remove the existing base trim, repair if necessary, prime and then reinstall it on top of the new tile after I have grouted. Some people add base shoe. If that is the plan make sure it will work with the existing trim BEFORE you install the tile.

I use an oscillating saw (or you can use a special trim saw like THIS one) to cut the casing around the doors at the floor. I lay the new tile down on the floor and use it as a guide to cut the trim. Do this BEFORE you start tiling because it will make a mess and you will want to vacuum or sweep well after cutting the trim. Then when you are installing the new tile you can just slip it under the casing and not have to worry about making tedious cuts!

Which reminds me…always do all your prep work (removing trim, cutting casings, etc) and then vacuum and clean the floors well before starting. I also keep a little hand broom handy just incase I need to sweep a bit while installing. DON’T TILE OVER CRUD!!!!

Remove any doors that swing into the space you are tiling…makes it sooooo much easier to move around!

Prime…I know I could not find a consensus on whether to prime, but I am going to say one should error on the side of caution. I don’t think it is necessary if you are tiling over concrete, but definitely over existing tile.

And again, ALWAYS make sure the floor you are laying it on is sound and solid. If it is not, fix it! DO NOT lay ceramic tile on a wonky floor.

If you are laying on a wood subfloor, I personally would lay down durrock, tape and mud the joints (with a mesh tape and thin set) and add the water proofing products (something like THIS). Again, maybe overkill but better safe than sorry!

Research what size trowel to use with the tile you are installing. It matters!

Research whether to use thin set or mastic with your new tile. My personal rule of thumb is regardless of the size of the tile, I always use thin set on the floor. I only use mastic on wall tiles (like backsplashes) and only if they are small tiles. If you are tiling around a fireplace, make sure the thin set or mastic you are using will withstand heat!

These are just a few of my personal tips. Before you tackle a DIY tile job, or ANY DIY project, do a TON of research online. Read articles, watch videos. Don’t rely on the kid at Lowes manning the flooring desk to give you advice.

So, another little project in the books. The old tile is still in my pantry and in the spare bathroom…maybe someday I will tackle those areas.

But for now, I am just going to enjoy my laundry room floor. It is pretty and makes me happy!

This week I begin tackling my home office. Stay tuned, it’s gonna be fun!