DIY and Cinderella...

At this moment I am sitting in my “all-season” room drinking my coffee and watching it rain.

IMG_0254.jpg

Heaven.

There is so much I love about this house and honestly, I can’t t think of a thing I don’t. We have spent a great deal of time the past few weeks working outdoors and many of our neighbors have stopped to tell us how wonderful it is looking. (Probably more a testament to how badly the place looked to begin with.)

Making a home beautiful after years of neglect, for me, is like the Cinderella story. Abused, neglected, mistreated…until someone who cares comes along and waves a magic wand and makes everything beautiful again.

Simple analogy…seriously, who waves a magic wand and makes a home beautiful. Truth is, it takes a lot of work to turn an abused and neglected home or piece of furniture into something beautiful and useful.

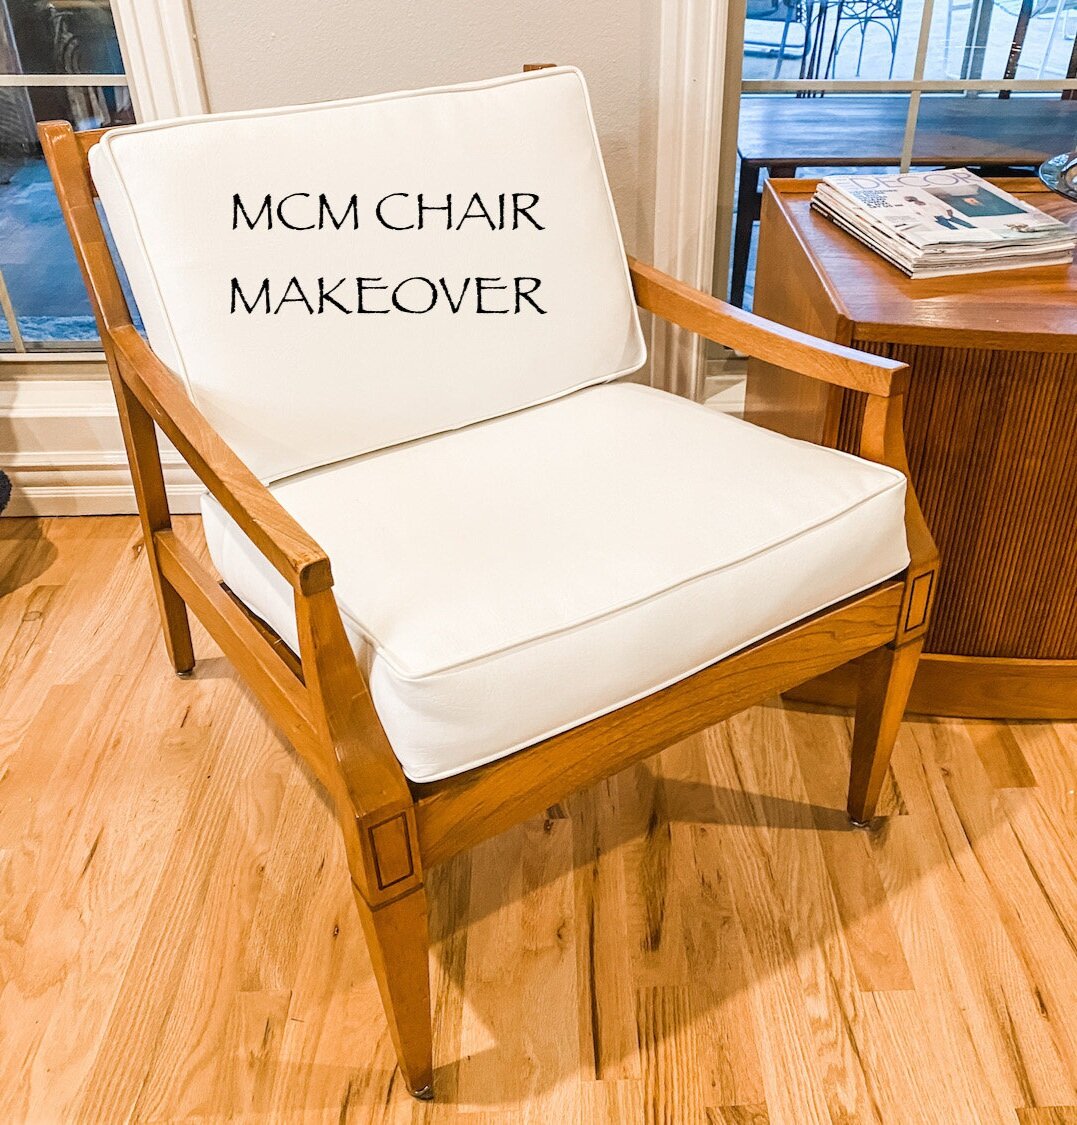
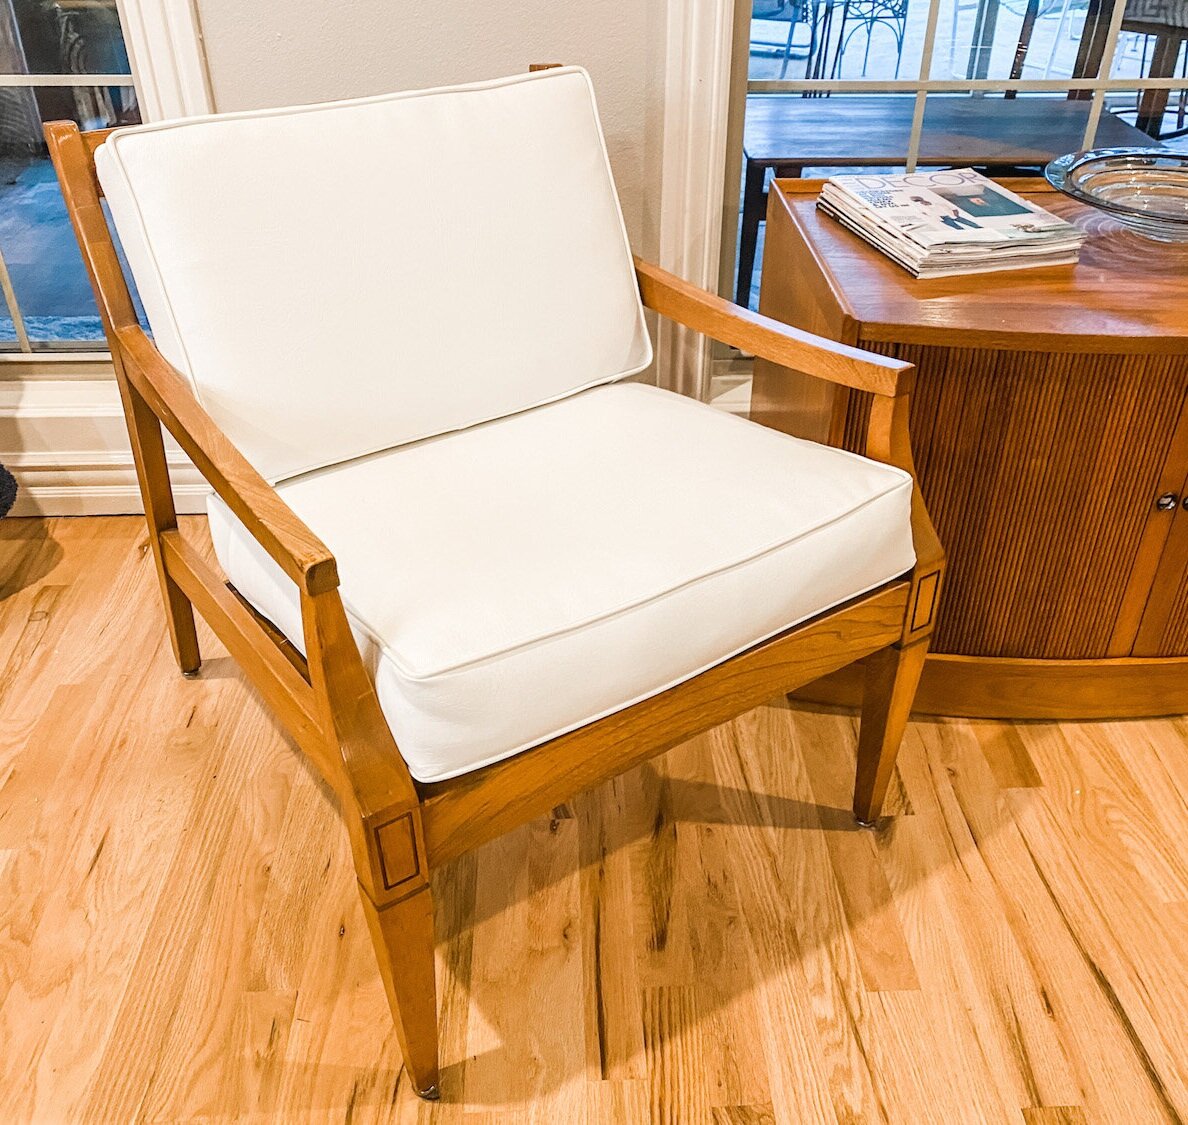
My blog friend Cristina shared a chair she recently transformed. Abused, neglected, dated and something no one really wants in their home anymore was completely transformed into a piece of furniture fit for a ball!

A super simple project for someone like her and me and not so difficult that someone with minimal DIY skills couldn’t tackle. The hardest part would be the sanding and staining, but just a simple KSTP treatment (Kilz, sand, tack, paint (search on this site for examples) would completely transform this simple chair. How cute would it be paint lavender for a little girl’s room. Or bright royal blue for a little boy’s room. (Yes I am a “gender snob”…raised 4 kids like that and they are killing it…so get over it)

After sitting and watching it rain for a few hours I finally decided to tackle the trim and cabinets in the laundry room. As I mention I am painting all the trim a whiter-white…BM Chantilly Lace. Not so “yellow”…just a pure white.

I have drug my feet on the laundry room because I really dreaded painting the cabinets. But I did and they are now done. All except the new hardware and that should be here next week. The only other thing I want to do in that room now is replace the dated ceramic tile. That chore is WAAAAY down the bottom of the list.

Still waiting on the master bath windows. Built a dining table and bench for Brandon and Taylor’s new house…just waiting on the legs we ordered. Waiting on a few final touches before I FINALLY share my shop transformation. The glass for the pantry door should be here today. In other words, lots going on to share…just nothing quite ready.

Cinderella may have transformed with the wave of a wand…unfortunately most DIY projects take a little more time and patience. But the result is often the same…magical!

static1.squarespace.png
Comment
Share

Mid century chair makeover and the dogwoods...

I originally shared the a makeover of this heirloom chair HERE.

After this little makeover it might not look much different…

IMG_1397+copy+3.jpg

…but it definitely is!

It was my grandmother’s and a “few years ago,” while gathering furniture for her college condo, Katie and I recovered the cushions and stripped and oiled the frame.

When she moved into an apartment her junior year, we found two matching mid century chairs she liked a bit better so this one came back home.

A few months ago I mentioned to Kate that I needed to recover the cushions because the dog had done a number on the white vinyl in the last few years. It was pretty ratty looking…

“Mom…you have had that chair in your house for almost 4 years now…it’s been more than a “few” years.”

Wow, time flies!

So yes, it was time to recover the cushions.

Two minor issues…one, the cushions seriously sucked. I am certain they weren’t the “original” cushions…my grandmother probably replaced the original when she recovered them with the darling blue cotton fabric that was on it when I received it. When Katie and I gave it a little makeover 5 years ago, we just added a little batting to the cushions before we recovered them.

They really weren’t sized properly and they were super uncomfortable.

Second, AS ALWAYS, I really struggled with what fabric to use. It is definitely a “mid century” style chair and so many of this style chair are indeed white and black vinyl. As much as I would have liked to “change it up” a tad, white vinyl really was the best option.

The frame is still in pretty good condition. I could have freshened it up a bit with another coat of tung oil finish, but nah…

New cushions…new fabric. That is all it really needed.

I bought 4” foam, cut it to fit properly and wrapped it in batting.

IMG_1382.jpg

TIP: The BEST way to cut foam is with an electric knife!

IMG_1181.jpg

The vinyl I used didn’t give me near the issues I had the last time we recovered the cushions. This time it went through my sewing machine just fine and I was able to easily create piping. Piping is a tedious accent to make and truthfully you could easily make cushion covers without it if you want to forgo the detail.

If you are having trouble getting vinyl to go through your machine THIS is a pretty nifty trick….

I have said it before and will say it again…and again…and again. If you do not know how to sew a straight stitch, LEARN. Take lessons from your local craft store, online or county extension. It is a skill that will open up your entire DIY world! On one hand I kind of curse my mom for making me take sewing lessons when I was a teen (because I really dislike sewing), but on the other I am so grateful I can make pillows, cushion covers, and curtains! And don’t think you need a high dollar sewing machine. Mine is a basic model and is AT LEAST 35 years old. The more basic, the easier it is to use!!!

AGAIN, I suck at tutorials so find an instructional video online that makes sense to you!!! Making cushion covers is not hard but there are tips and tricks that will make the process easier!

All in all it was time well spent. The chair now has a fresh new look!

IMG_1397+copy+2.jpg

Thank goodness the dog has now moved on to the big leather chair in the office by the front window. Fits her better and the dirt doesn’t show on the brown leather NEAR as badly!

IMG_1386.jpg

We had awesome snow showers Tuesday (seriously a blizzard Tuesday afternoon and by Tuesday evening it was ALL gone!) and a freeze Tuesday nigh.t I had to cover all the hostas with buckets and sheets. Back in the 70s by this weekend. Typical Arkansas weather. This is why I refuse to plant tender annuals even after our “freeze date.” As it is all the beautiful dogwood and azalea blooms may not survive. Sooooo frustrating.

That is one thing I discovered about this house…every single window has an amazing view of the dogwoods! Beautiful.

From the dining room window.

From the dining room window.

From the front porch.

From the front porch.

From the master bedroom window.

From the laundry room window.

From the laundry room window.

From the screened porch.

From the screened porch.

From the back of the house…this will be the view out of my new master bath windows when they FINALLY get here!

From the back of the house…this will be the view out of my new master bath windows when they FINALLY get here!

This past weekend I took a walk around our neighborhood with Cleo and every single yard has dogwoods and azaleas.

Another reason why I love my home!

static1.squarespace.png
Comment
Share

Master bedroom reveal....

When we moved into this house in September we basically moved our old bedroom into this new house. Nice fit, but zero thought put into the “design” of the room…I basically just put furniture on the floor and a few pictures on the walls.

A few weeks ago my daughter sent me a picture of a well designed bedroom similar to ours.

IMG_0694.jpg

That’s when I realized our current master bedroom has ZERO “design character.” I hadn’t even taken the time to paint all the trim the “new” white.

IMG_1317.JPG

Twenty year old lamps, white and brass paddle fan, stacks of pillows in bleach spotted pillow cases, no curtains, scuffed and dinged furniture, clutter…

IMG_1318.JPG

The picture was perfect inspiration! The push I needed to work this space to it’s potential.

So last week my goal was to to tackle the room. Paint the trim and furniture, new curtains, throw pillows, a few little touches here and there, and declutter.

I painted my bedroom furniture (HERE) almost 7 years ago and while I still love the pieces, they have gotten quite dingy looking. Remember, whites yellow over time and of course there are chips and scratches from normal wear and tear. So it was time to give them a little paint refresher! And the side table tops…holy crud they have gotten nasty. So it was time to strip and restain the tops as well.

Of course the little “room refresh” became a three day chore!

In the end, worth every minute.

New curtains (I still need to hem them), a little wall art and a plant and new throw pillows.

IMG_1315.JPG

I stuck with my tried and true white bedspread…with a big dirty dog I need something I can bleach every week. It covers a down comforter in the cold months.

I have always loved the larger throw pillows in the guest room so I bought new for that room and put the guest pillows on our bed.

IMG_1308.JPG

(The giraffes? They were made in Africa from the root of a tree…they are Brian’s…they are different…what can I say!)

I painted the high boy and bedside tables and stripped and restained the tops of the bedside tables. ..the dark java stain has pretty much run its course. New lamps (finally!!!)

I love the look of chandeliers in bedrooms but as I have said before, I HAVE to have a paddle fan above the bed. Brandon gave us a paddle fan he took out of his house and it worked perfectly in our room.

Decluttering is always a must in any room makeover so a lot of stuff was put away.

One thing I loved in the inspiration room picture was the bed bench. My trunk belonged to my grandparents so it has to stay. You can still see my granddad’s name stenciled on the side.

I love the basket and pillows on their bench but our big dog uses this trunk as a spring board so that wouldn’t have worked out well. Sometimes you have to change up a plan to fit YOUR life-style (a.k.a. accommodate animals and kids!)

I still want to do more on the “tv side” of the room. I repainted and stripped and stained the top of THIS little side table…

Maybe add a plant…a little more wall art….a wall leaning mirror.

IMG_1306.jpg

It only took me a few decades to style the master bedroom in my last house so again, already working at warp speed here.

My next big project are the master bathroom (reveal HERE) windows…

Oh, it’s happening. I cut big holes in the wall to kind of “force the issue.” Windows are on order and the brick guy is on call.

This was the one thing I neglected to do, and my BIGGEST regret, when I remodeled this house…no operable windows in the master bath. I know from my last house that an operable window in the bathroom is a must. I have ordered two casement windows (the kind that crank out) and hope to have them by the end of the month. I have some plumbing to move (WHY IS NOTHING EASY!!!) and framing to do. These windows will look out at the large flower garden out back…I CAN’T WAIT!!!!

Wait I will though…it has been warm enough to plant a few larger perennials like azaleas and Kimberly ferns, but the threat of a freeze until mid-April prevents me from going all out with the annuals. So I sit…and wait…patiently. Okay, not so patient, but I learned the hard way not to rush the early spring planting! Pay attention to your “last freeze date”….then add a few weeks. Ours is the middle of April, but a few years ago it snowed the first week of May!

Until next week…

A kitchen makeover and painting a refrigerator...YOU CAN DO IT...and sometimes should!

My friends, Tammy and BR, have lived in their home for over 20 years…and like me they are constantly “projecting.” Tammy is the designer ( a.k.a.instigator,) BR is the muscle and craftsman, and usually I am just an advisor and cheerleader.

A few months ago, they started a HUGE project…remodeling their kitchen.

It is a project they have dreamed about and we have discussed and one their 1990s house desperately needed for years!

63279344411__FAECBF4B-CD0D-4684-9D1D-C641426B6A4A.jpg

This picture was taken after they replaced the head scratching paddle fan over the bar with a thrift store upcycled light fixture. MUCH better but as you can see, there was soooo much more to do.

Remove the funky over-the-cabinet florescent lighting and add can lighting, paint the cabinets, replace dated hardware, a new venthood, new tops and backsplash and replace the ORIGINAL almond stove.

A major list on a tight budget.

During one of our “advisory sessions” (again, my advice and opinions are always free) Tammy mentioned she couldn’t wait for her black refrigerator to go out so they HAD to replace it.

With all the other “must have now” expenses, like replacing the dated almond stove with a stainless, replacing the black refrigerator just wasn’t in the budget. They had already replaced the dishwasher and like most people (including myself) the expense of replacing all our appliances at once is often cost prohibitive.

Light bulb moment.

PAINT IT!!!

I know they have “stainless” spray paint but I seemed to recall a product specifically made for painting refrigerators to look stainless. So I started googling and found this product on Amazon….

The product had good reviews. And like I told Tammy, if it doesn’t turn out great, you can still probably sell the refrigerator on Craiglist for a hundred bucks.

So this is what we started out with…a plain ole’ black refrigerator….

IMG_1096.jpg

The first thing I did was read ALL the directions but most importantly, the Amazon reviews. The people who have used the product gave some pretty solid advise.

After reading all the reviews, we went to work. I removed the handles (even if you want to paint them, remove them), cleaned the doors thoroughly, and taped off the water dispenser and inside around the rubber gaskets. One of the sagest pieces of advice was to apply THIN coats…so after the first coat this is what it looked like…

IMG_1100.jpg

While this might not instill confidence in one’s ability to do this, I know how important it is to “trust the process.”

The second coat, a tad better….

IMG_1101.jpg

By the third coat we were all amazed at how great it looked!

BR did a great job of working Tammy’s list…he removed the over head florescent lighting and capped off the cabinets with crown and installed can lights, painted the cabinets and added new hardware,…

…. removed the old venthood and cabinet above the stove and installed a new stainless vent…

IMG_1239.jpg

….and removed the old tile backsplash and installed new.

IMG_1231.jpg
IMG_1238.JPG
IMG_1236.jpg

Quartz counter tops were a little bit out of the budget but they were able to achieve a very similar look with new formica.

Beautiful!

Tammy LOVES her new kitchen and fortunately she loves her “new stainless” refrigerator.

Would she be happier with a brand new REAL stainless fridge? Wouldn’t we all!!!! But this is a prime example of changing an element in a room that will stop the growling (and the envy and frustration) until you can afford to do what you really want to do. I have done it over the years with furniture and now I can say I have successfully done it with a refrigerator.

If you don’t love it, CHANGE IT!!!!