Bathroom makeover on the cheap....

IMG_1880.JPG

I consider myself “apolitical.” In other words, I have an opinion, a personal “ideology,” but I really try to avoid all the political “fodder.” It’s just too depressing, stressful, overwhelming…

It eats into my personal happiness.

But with all that is going on, I found myself sitting on the couch mesmerized by the news ALL DAY FOR AN ENTIRE WEEK!

I was so overwhelmed.

I HAD to get moving and my little morning walk and ride wasn’t cutting it…just too much time left in my day.

So I tackled a project I could not have cared less about lifting a finger or spending a dime on…the guest bath.

It gets used MAYBE 2-3 times a year when the kids come for overnight visits. I threw down a few comfy rugs, stocked it with “guest necessities” (this stuff is important) and hung a nice curtain. I would clean it when I knew we were going to have over night company…other than that…out of sight, out of mind.

The fact that few used it or saw it on a regular bases was just fine by me.

It wasn’t completely offensive.

It was just “blah.” Beige walls, off-white cabinets, dated, boring lighting and fixtures…just blah.

Again, who cares…

But I needed to get moving and put my body in motion. And this was the perfect project. Inside in the AC but away from the TV.

Inspiration…anything “unblah.”

My plan…”unblah” it.

Budget…as little as it takes to “unblah” it.

IMG_1843.jpg
IMG_1844.jpg
IMG_1842.jpg

Usually I am all for finding an inspiration, making a plan, and working with a sound budget. In my opinion, it is the only way to attack a big project like this.

But I need to move and I didn’t have the time or patience to sit and think about this for weeks. I decided my MAIN objective was to use the materials I have on hand and try to make a few changes that would “unblah” the space without breaking the bank.

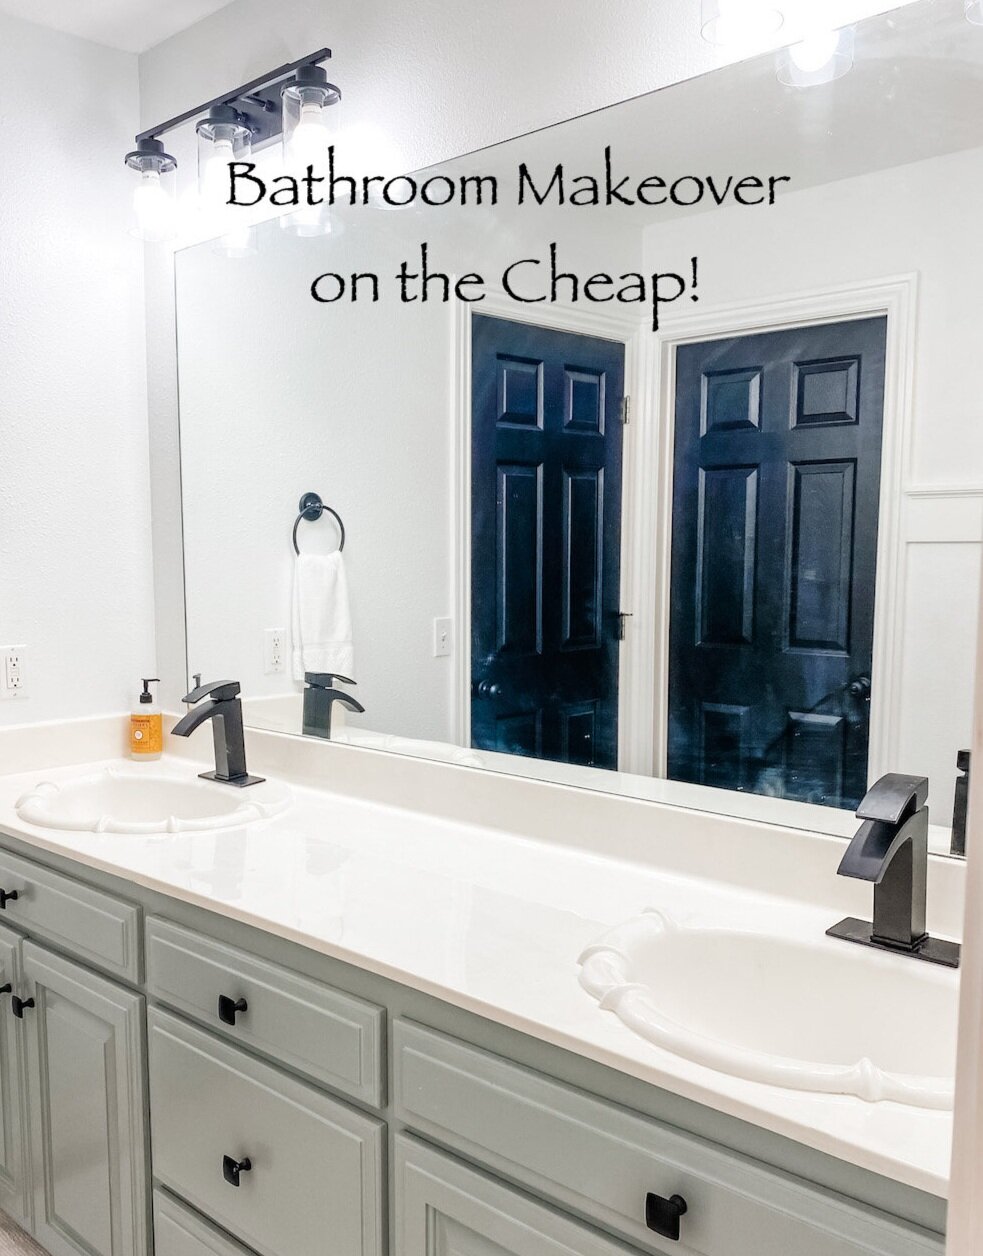
First on the list…get rid of all the gold fixtures. The style wasn’t TOTALLY offensive but they are gold…gold towel and hand towel bars and gold TP holder. I decided to “repurpose” the hand towel holders and TP holder by painting them black. A little primer, a little black paint…both in my stash. Cost…zero.

IMG_1875.JPG

I also replace the faucets…the existing weren’t totally offensive but these were pretty inexpensive on Amazon…less than $50 each.

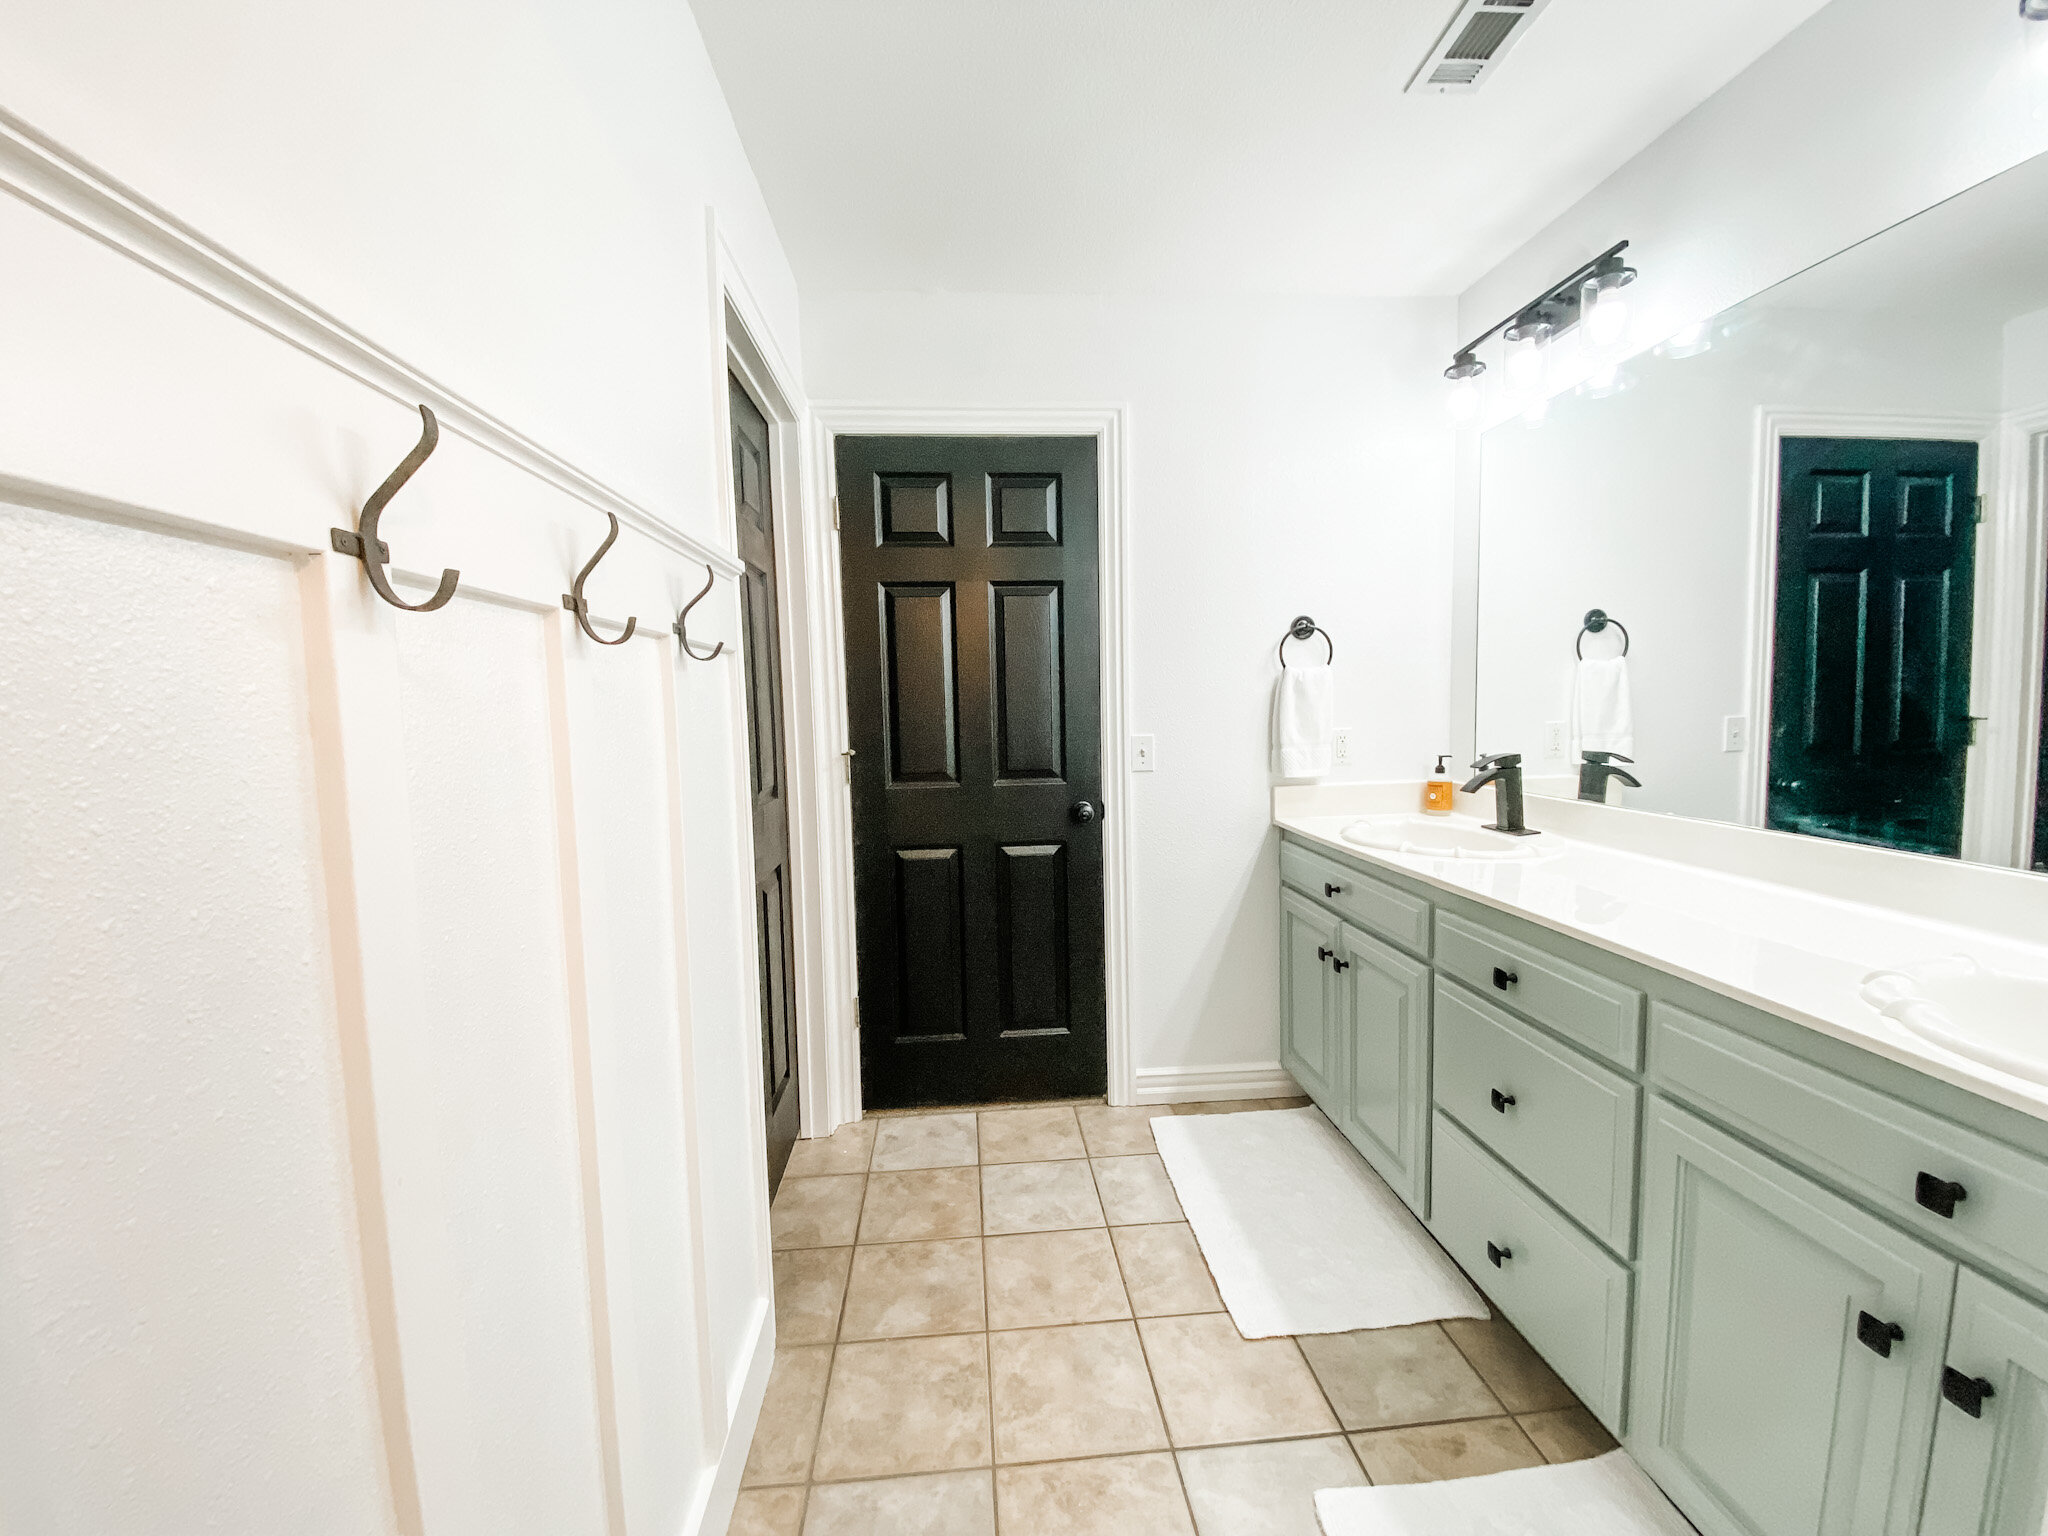
I removed the towel bar and added a little bit of board and batten with hooks for towels. Similar to my entry….super simple…again look for a tutorial that makes sense to you! Less than $50.

IMG_1886.JPG

I used some leftover trim paint to paint the board and batten and all the trim. Cost…zero.

I painted all the doors in the main part of the house before we moved in…but again, this space got completely ignored! I even ordered black door knobs but never put them on these doors. I used the left over black paint and the knobs I bought over a year ago. Cost today…zero.

The cabinets….I used the leftover paint from my master bath cabinets. Cost…zero.

I did buy new inexpensive hardware. About $4 each so less than $40. (But I could have painted the existing hardware with black paint I had on hand.)

IMG_1880.JPG

The ceiling needed to be painted. Big water spot around the HVAC vent. I sprayed the spot with some Kilz I had on hand and dug out the leftover ceiling paint! Cost….zero.

IMG_1839.jpg
IMG_1869.jpg

The beige walls needed to be “deblahed.” I painted them white…plain ole’ pure white. I only needed about a gallon and my son had some leftover from their house. Cost…zero.

IMG_1881.JPG

I would have loved to change out the 23 year old tops…maybe add a pretty tile backsplash…but the tops aren’t terribly offensive (just a bit dated) so for now they stay. Just added the new faucets.

Three new light fixtures…two vanity lights and a pendant light…again, Amazon. All three for less than $250.

IMG_1884.JPG

I could have repurposed the lights that where there with a little paint but the new were worth the investment.

Again, this space only gets used 2-3 times a years so it’s not like I need something expensive.

The flooring could stand to be changed…but again, this is a room that is rarely used….soooooo…..

The only other thing I would love to do in this room is change out the mirror…or at least frame it. I found THIS tutorial for a wall treatment I absolutely LOVE….

KM_DIYMirrorUpdate_0015.jpg

Not necessarily the gold mirrors…I think I would go with round wood framed. But I love the wood slate treatment and I may eventually tackle that project…someday…maybe when we have another national crisis and I need to focus on something constructive.

Sadly at the rate our country is going, that may be next week.

With all the negative looming over our heads…fires, hurricanes, Afghanistan, Covid, inflation….I can not stress enough how important it is to stay focused on the positives in your life. Believe me when I say I GET IT. It is hard to stay positive when people we love are sick and dying, our retirements are swirling the drain, you can’t meet you monthly financial obligations, the very fabric of our great country is being shredded.

Turn off the tv…shut down your computer….turn your radio dial. I’m not advocating bathing yourself in complete ignorance….just turn off and tune out the onslaught of negativity and focus on something that makes you happy.

The laughter of your children as they play.

The sound of the the crickets and birds on your morning walk around the neighborhood. (Get out and breath fresh air…EVERY DAY)

The babble of a brook in a nature park.

Coffee on the porch early in the morning before the heat and humidity sets in.

A tiny bit of “quiet time.” (Whether you do yoga, meditate, read your bible, just sit and stare…ALWAYS carve out a little bit of quiet, alone time EVERY DAY.)

A stroll down the aisles of Hobby Lobby…fall and Christmas are just around the corner!!!

I’ll admit it…my life isn’t all roses and peach fuzz. Somedays I really struggle to find something positive to focus on. But as I said HERE, you choose your “hard.”

Choose wisely.

Adding glass to an interior door...

IMG_1434.JPG

As I mentioned before there are certain things that made this house instantly feel like home.

Like my master bath….

IMG_0439.jpg

Almost identical to the master bath in my last house.

IMG_4031.jpg

Same backsplash, floor tile, vessel sink, shower tile…right down to the same ole’ shower curtain and rugs. And I am waiting on windows that are pretty much identical to the window I had in my old bathroom. Still not sure what I want to do with the cabinets but I have always liked the stained and open shelving look of the last house…

….who knows. I may do a little cabinet makeover at some point.

My black doors….

after.png

Loved them in the old house, love them here…it was one of the first things I did to make this house feel more like my home.

IMG_0716.jpg

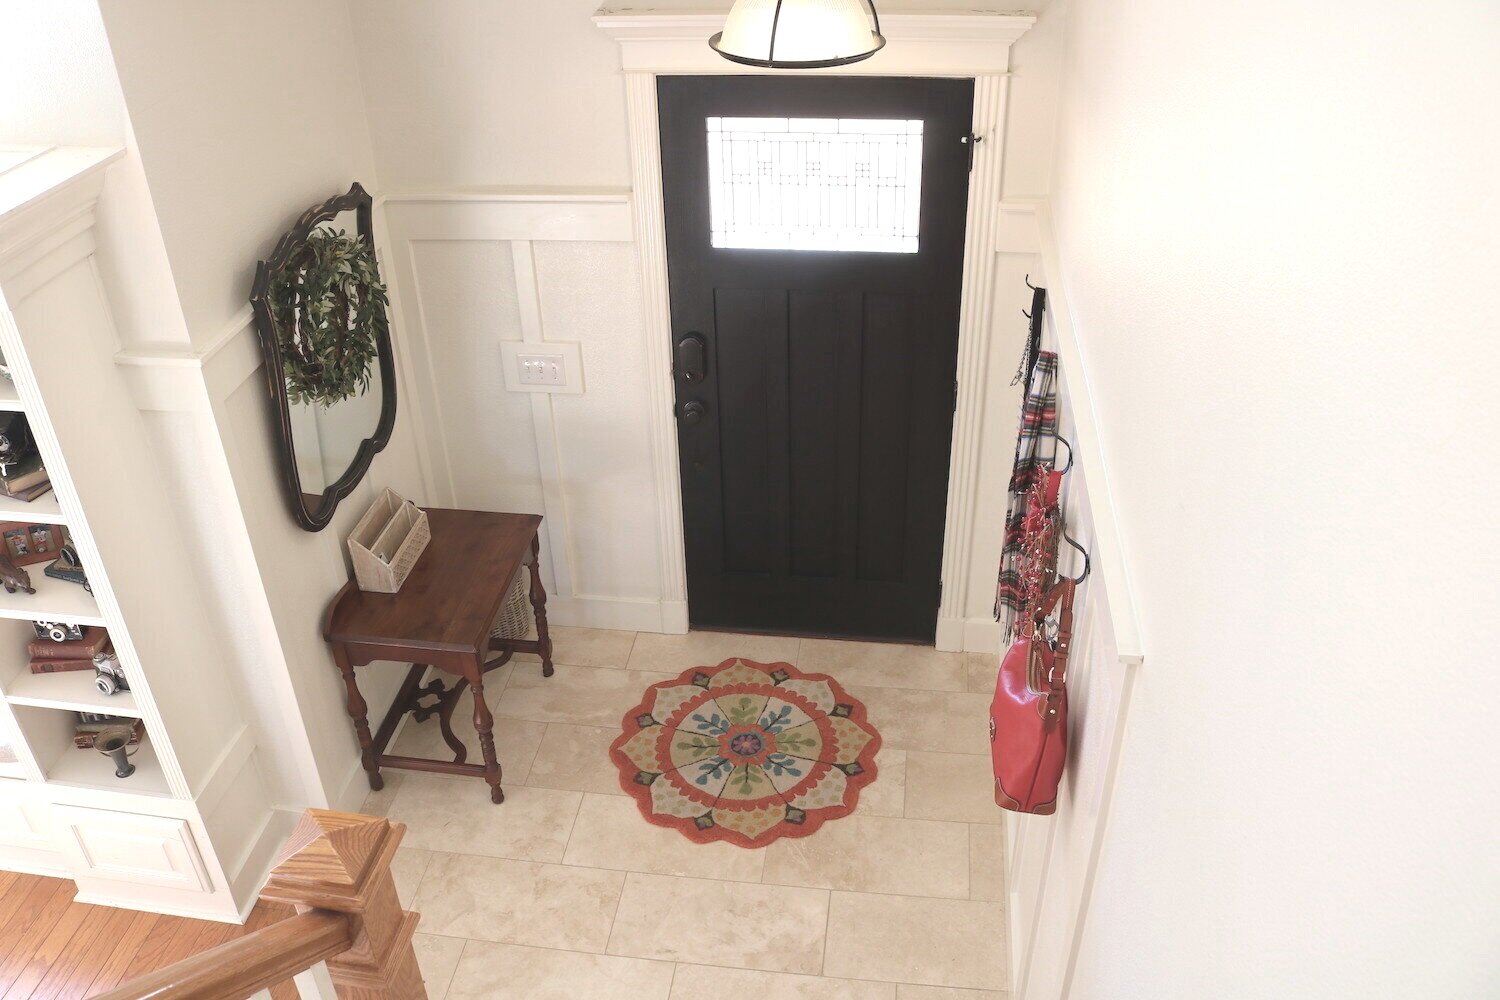
The entry…

IMG_1171.jpg

Same board and batten, same mirror and wreath, same rug…black door…

IMG_5981.jpg

I like what I like…and these are just a few of the design elements I really loved in my old house.

Then there are the paint colors, plants, shelving….sooooo much more!

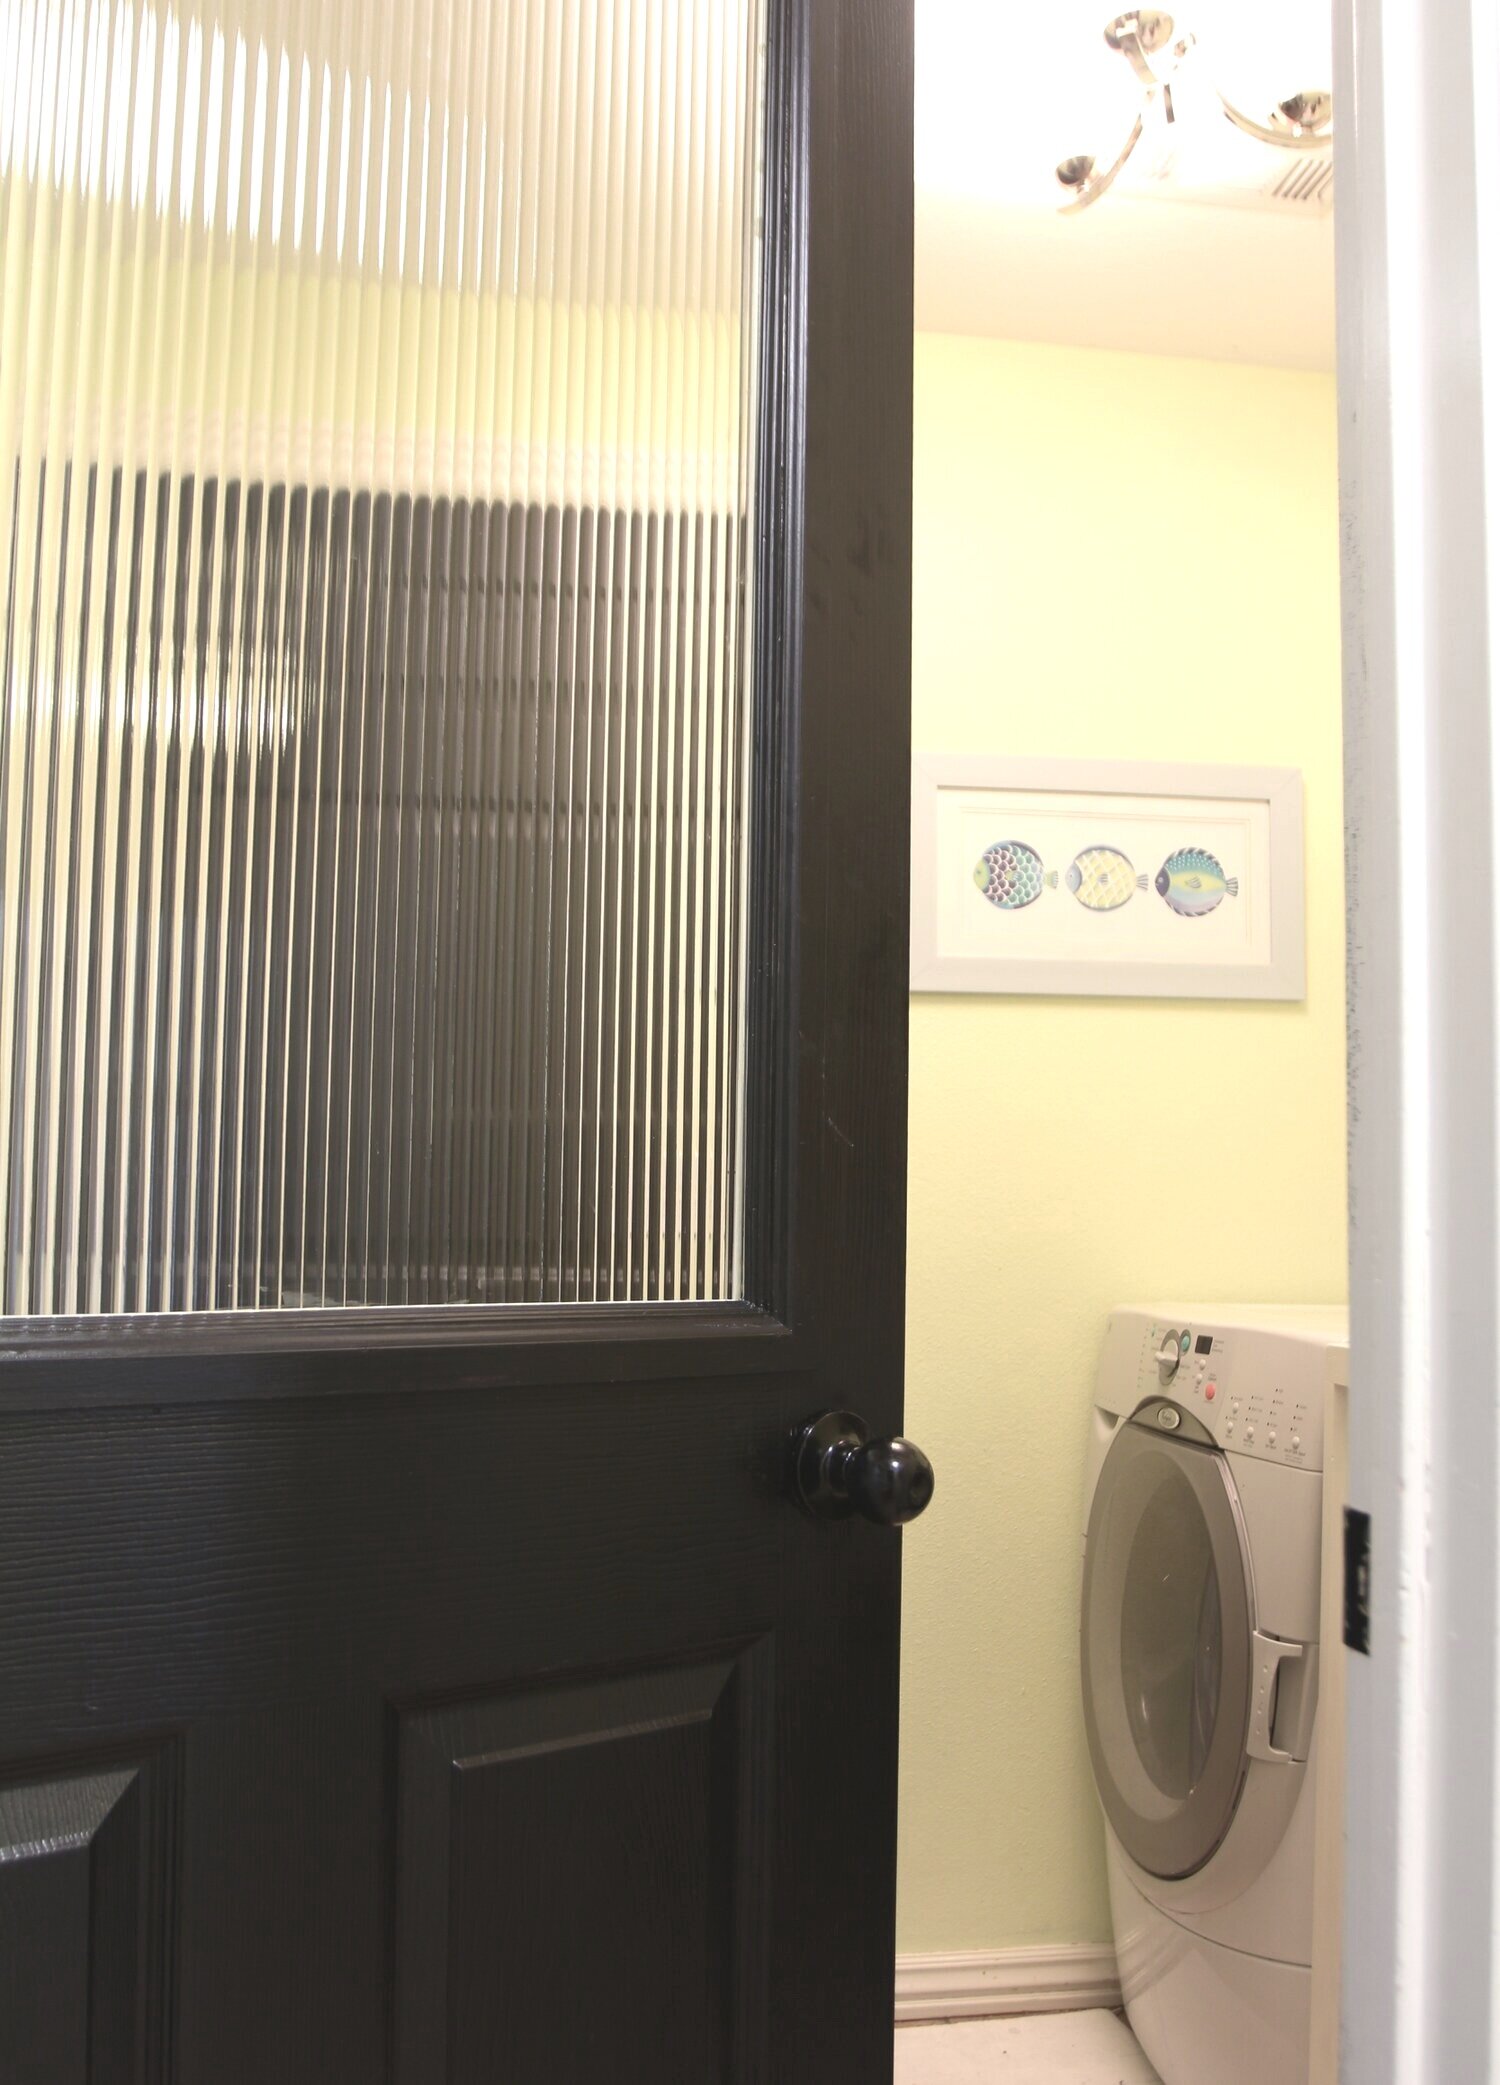
One project I did at the old house that I always loved was the reeded glass door in my laundry room…

IMG_5030-1.jpg

I absolutely loved this project and it was one time I actually posted a pretty good tutorial. Mainly because when I went looking for a tutorial, I couldn’t find one!

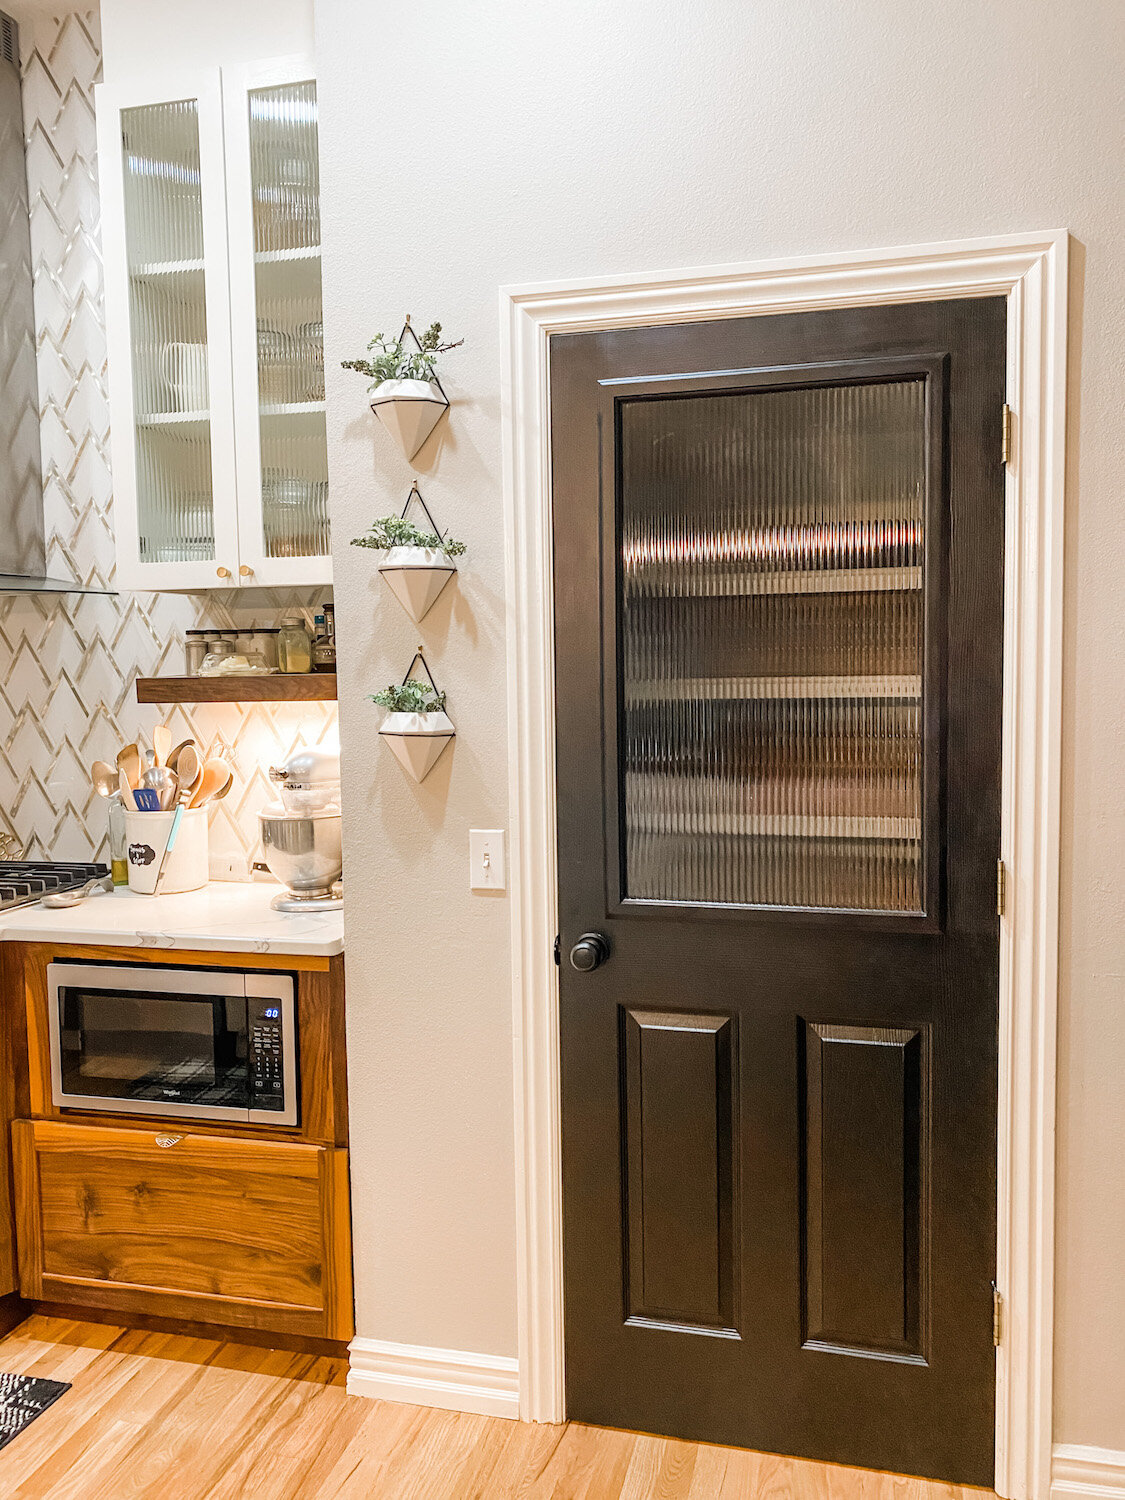
I have known from day one I wanted another door like this in my new house. I debated whether to do it with the pantry door or laundry room door.

I finally decided to start with the pantry door….

IMG_1005.jpg

Primary because I used the reeded glass in the upper cabinets and I thought it would look good to have matching glass in the pantry door.

IMG_1434.JPG
IMG_1435.JPG
IMG_1432.JPG

I LOVE it! I love this pantry and the door is just the cherry on top! Eventually I may do the laundry room door as well because then the light from the window in the laundry room can filter into the breakfast room. For now I am perfectly content with the one door.

This is a MUCH less expensive option than purchasing a new glass door…and you get the option to choose the type of glass you want vs. having to get whatever “frosted” glass is in the door you purchase. And it is seriously NOT a difficult project to complete.

YOU CAN DO IT!!!!

How to paint your front door properly...

I have been super busy with things other than DIY projects. But one project I did manage to do this past week was repaint my front door…just a quick little one coat “refresher.”

My tutorial for painting an exterior door gets a lot of traffic so I though I would link back to that post just in case you need a little help.

image-asset.jpg

I also painted house numbers on the door and I shared that tutorial HERE.

Remember, not everyone will see you newly remodeled bathroom or organized linen closet…but almost every guest will see your front door…keep it nice!!!

This is just one of the little projects I managed to get worked in this past week in the midst of some “big stuff” that I will share when I can.

In the meantime, I may be linking back to some little projects ANYONE can do! So if you are new around here you might want to stay tuned for some basic tutorials!


Super simple DIY wall decor....

As I look around at my wall decor, I realize that MOST of it is thrift store, garage sale, vintage market pieces that I have collected and "upscaled" at some point in time.

Here I shared a quick update to my little gallery wall of favorite family photos....

Simple, inexpensive frames spray painted and new matting. I didn't even have expensive "custom" mats made...I cut bulk matting to fit the frame and then mounted the pictures on top of it!

I spent a fortune on these dining pictures 17 years ago and in my quest to transition from "dark and dank" to "light and bright" I gave them a little make-over....

I did spend a little more on custom matting, but I chalk painted the frames and deconstructed and changed it all out myself. A tad more expensive but faaaaar less expensive then going out and buying new matted pictures! You can pick up frames like these for pennies at thrift stores! Maybe the picture is ugly and the frame is "dated" but it really is a simple little DIY project that can make a huge impact! 

This super cool mid century dresser mirror was another DIY project I shared here

I love the fact that I can change out the wreath for the holiday seasons...I have one for fall (pictured) and Christmas, a Valentine's wreath and a cool little metal thing for the 4th of July! For "off-season" I have a simple boxwood wreath!

Now this is where I admit that I am a bad blogger....because AGAIN I failed to take any "before" pictures. So close your eyes and imagine...inexpensive little brown frames with pictures of a goose...or something stupid like that.

Again, a little KTSP treatment, a tiny bit of spray paint, a little inspirational quote printed on stock paper and PRESTO....

When I was at an auction last week I picked up two unfinished oak cabinet doors. Here I shared how easy it is to turn them into cute little chalkboards...perfect for a kitchen, mud room or the kid's room! 

Chalkpaint, chalkboard paint, a little cup pull to hold the chalk and again, PRESTO! 

(I even painted the cabinet doors in my garage with chalkboard paint so I have a place to write down supplies I need to pick up or projects I need to work on!)

My point? If you don't like your wall decor,  change it! Paint it, change out the mats, change out the picture. 

Make it pretty! Cuz life is too short to live with ugly wall decor! 

Thanksgiving bench....

Last year I shared a couple of little benches I whipped up out of necessity! 

My dining table spends 364 days a year against the wall with nothing more than a couple of chairs.

Since I host Thanksgiving dinner, the table is extended and pulled into the middle of the dining room so I need the additional seating!

It is no secret that I tend to stick with what I know so when it was time to pull out the table and get ready for Thanksgiving dinner last week, it was back to the garage to build another bench for the holiday!

Since I had already designed and built a few last year, I really didn't need to draw up new plans...I just needed to dig around in my scrap wood and find a few pieces I could use to construct a new bench.

That was pretty easy considering I had some oak left over from my stairway demo earlier in the year!  I found an old pine dresser at the apartments that was missing the drawers, but the sides and top were perfect slabs of solid wood for the top of the bench. I also had some trim from who knows what project. I always have paint and stain on hand! I had to pull a few nails and sand off some old mastic, but other than that I had everything I needed! In the end, the bench cost me nothing more than a little bit of time!

It's no secret that oak is not my favorite wood but since I just need this little bench for the day, no biggy! The benches I constructed last year served their purpose and then where promptly sold in my booth, which explains why I had to build a new one!

I hope everyone had a great Thanksgiving! After a day of stuffing our faces with turkey and EIGHT pies, I spent the weekend decorating for Christmas! Some people start off the holiday season fighting the crowds at the mall on Black Friday, I start mine wrestling with strings of lights and yards of garland...fun time! 

Little changes from year to year...rarely do I tackle holiday projects. Here I shared a cute little project made out of a butter dish ...

...and here you can see how I made this versatile primitive box display...

....but all in all things pretty much stay the same. 

Well, except the constant changes I keep making....

A simple TV cabinet makeover...

This is the second year in a row I have been sick around Christmas. Fortunately, last year it was AFTER Christmas. This year it was BEFORE Christmas. Not good when I have so much to do the week before Christmas! I knew I felt bad Tuesday when I was out building fence (the wind did a number on my privacy fence at the apartments) but I didn't realize how bad I felt until I came home and sat down.

Now I have a list of things to do...presents to buy, a few things to return, wrapping boxes to hunt down, presents to ship, grocery shopping....and I feel to cruddy to even drag myself into the shower! Fortunately I THINK the worst is over so hopefully I'll feel like getting around later today!

In the meantime, I thought I would share another simple little makeover.

Remember all that dated, uninteresting furniture I keep harping on you to paint or do SOMETHING with! Well, this is just another example of a piece of furniture that no longer has a place or a purpose in our homes...unless you roll up your sleeves and give it a little makeover.

The dreaded old "tv cabinet" ...or "hutch"....or whatever you want to call it!

Here I shared how I acquired this less-than-interesting piece and how I used beaded craft board to start this simple transformation!

I gave the inside a KSTP treatment with my "go to" off-white and gave the outside a little plaster paint/dristress treatment. But it still lacked "character" so I wiped down the entire cabinet with walnut stain. That changed the color from a soft "teal" to almost a "greenish" color but it also added depth to the finish! Kind of a "patina"....

I sealed it all with poly and changed out the hardware. Actually I painted the original round knobs black and added black cup pulls to the bottom drawer! Remember, if you are changing out hardware, you may have to patch some holes BEFORE you paint. In this case I had to do just that since the holes on the bottom drawer were 3" apart and the holes for the cup pulls are 2 1/2"...no biggy! Just patch them with wood filler, sand and then paint....then just drill new holes for the new hardware!

It would be simple to reinstall the doors...but in this case I decided to go with an "open shelf" look! 

Simple little update! Now this little cabinet is ready for another season of life! 


Decorating with the traditional colors of fall!

The week before Brian and I left for our annual vacation to Colorado, I spent several days cruising the blogosphere and enjoying all the beautifully decorated homes on the "Fall Tour." I noticed many are now decorating with more "whites and blues" and neutrals for the season....blue and white pumpkins, vintage containers, natural elements, muted greenery.

I think it is all beautiful but as I decorated my home for the season I realized that all my fall decor are the bright and bold colors of traditional fall foliage....reds, oranges, yellows, browns and deep greens.

And as I have mentioned before, when I am done, it looks like fall has puked in my house. I LOVE this time of the year and every time I stroll through the isles of department stores, craft stores or a flea market I find more fall "stuff" I just can't resist.

I had pretty much convinced myself that I needed to transition to the more "neutral" pallet of the "farmhouse fall" next year. Until....

I neglected to take pictures of the southern view at Mesa Verde so I stole this picture from Thomas Mangan...he has some breath-taking photos....the colors are AMAZING and a pretty representation of the southern slope of Mesa Verde! 

....Colorado...the vivid yellows and orange of the Aspens, the deep reds of the mountain sides and red oak foliage, the vibrant greens of the pines.

Yes, there are whites and blues and neutrals...the stark white of the Aspen bark, the muted "pinks" of Mesa Verde (a MUST see!)....

...the neutral pallet of a canyon wall along the river...

...snow capped mountains reflecting in the crystal blue waters of a mountain top lake!

...white snow filled clouds creeping over a mountain pass.

All beautiful...all colors found in nature!

For me, I am still in love with the vibrant colors of fall that are so prevalent here in the Ozarks...the yellows, orange, reds and deep greens. I have shared my "fall home" before, but I thought I would share again this year...nothing much changes from year to year and that is just fine with me!

Notice the "Colorado red" flagstone...yes, that is native Colorado stone and yes, there are rivers and mountains that color!

These little lanterns are "multi-seasonal." I can easily change them up for fall, Christmas and even spring/summer!

Every holiday I hang a "seasonal" wreath on the big mirror in the living room! I now have one for fall, Christmas, Valentine's and the 4th!

Still love my black doors! In the fall I hang simple "candle wreaths" with ribbon to decorate every door and window. I simply change them out for Christmas wreaths after Thanksgiving!

Several years ago I hit the 90% clearance at Hobby Lobby and snatched up all the high dollar fall garland...I wrap it in the dining light fixture, lay it on top of the display hutch and in the transoms, and lay it across the fireplace mental!

Say hello to Litty...she loves the camera! 

Years ago I made two "table top" fall wreaths...I use to put hurricane candles in both but I found this awesome little grapevine pumpkin last year. What do you know...I actually do change things up a bit every now and again!

For vases and urns, I just bundled a bunch of fall stuff I like together and stick them in the container...simple! This one is a glass vase filled with fall glass beads I picked up for Pier One years ago! 

Mr. Owl was actually one of those ugly plastic "decoy" owls I picked up at an auction. I painted him off white...again, super simple!

Here I shared how easy it is to make a little seasonal vintage box that can be easily changed up throughout the year...

THIS is what I love to decorate with...the traditional colors of fall. I love the blues and whites and neutrals but every year I take a 14 hour trip west to see the vibrant colors of the Colorado Aspens. 

For some, it is the beach....white sands and blue waters and sky. For me, when I see a grove of shimmering fall Aspens, it fills my heart with pure joy! When I stand on a mountain top at Mesa Verde and look down at the red, orange and yellow foliage on a mountain side, I feel at peace.

So for now, I will continue to decorate with the colors I love. Maybe some day I will transition to the "in" colors, but this year, I am at peace in my home surrounded with the vivid colors of a traditional fall! 

And that, my friends, is what decorating a home is all about!

The kitchen makeover reveal!

It is time for the big KITCHEN REVEAL!!!

First, I had to wait on the maple trim...then I decided to wait on the new doors and glass!

I had not intended to start decorating for fall before "the big reveal." My plan for this week was to do the glass doors Tuesday, take pictures of the kitchen and get ready for Matt's birthday celebration Wednesday (he turns 26 Saturday!), post the reveal Thursday morning and then get most of the fall decor up and get my hair and nails done ...AND LEAVE FOR COLORADO FRIDAY!!! Yippeee!

One hitch...I got a call Tuesday morning that the glass wasn't on the delivery truck so it wasn't going to be in until Thursday...well that just threw a wrench in my whole week. So Tuesday I started working on my fall decor. Tuesday afternoon, the glass place called and said they "found" my glass and it was ready. Sooooo....short story long, the "reveal" pictures are going to have smatterings of fall! 

I think I have mentioned before that I have a bad case of "Pinterest envy" when it comes to kitchens. 

Tipsaholic recently featured some beautiful kitchen pantry/storage ideas. I love the painted kitchens and all the open shelving but the one thing I noticed about EVERY picture, whether featuring beautiful glass containers or pull out drawers, was the ORGANIZATION of every item and space.

For me, the key to a great kitchen (or any space for that matter) is making sure everything is organized and functional for MY needs! And of course aesthetically appealing, but unless it is organized and functional, I am wasting my time making it pretty!

While I love all the neat pull-outs and storage inspiration, I think the first thing you need to do BEFORE you start any kitchen remodel is get every drawer and cabinet purged and organized and see what you have, what you need and what space you can rework, organize or add to make your kitchen function for YOU! Plan, plan, plan!

Here is a post on purging and organizing your kitchen drawers! A super simple little project but it has made a big difference in my ability to find stuff I need!

My goal in "resetting" my kitchen was to make it more functional for my purposes.....and of course, change things up a bit aesthetically so I am not tempted to take a paint brush to these beautiful cabinets 

I basically had a "standard" (and small) kitchen layout.

I do love stained wood and as drawn as I am to painted cabinets, I knew the day would come in the future when I would regret painting mine. My stain color (Paprika Cherry on Maple) isn't totally offensive and fairly "timeless" if that is possible, unlike my daughter's kitchen which had "pickled oak," a stain my dad and I were putting in houses in the 1990s!! I did not discourage her in the least when they decided to paint their cabinets. 

For those who believe "white is classic and will never go out of style" obviously don't remember the "honey oak" trend of the 90s..."oak is classic and will never go out of style!" EVERYTHING goes out of style...eventually! Which is why we are all painting honey oak cabinets!

Earlier this year I made an offer on a smaller house with a smaller yard in a subdivision I would love to live in. The house was basically a "gut job" and the new kitchen I designed had NO upper cabinets...none! I wanted lots of windows, maybe a few open shelves, tons of base cabinets with drawers and a big island.

But that deal didn't work out and I don't have the "footprint" to build a kitchen even remotely close to what I would have put in that house. Right now I don't have the funds (or energy) to make major changes and I can't bring myself to change out appliances that aren't totally offensive and work perfectly fine! 

What to do, what to do!? I wanted some changes, but I didn't want to do something I might regret down the road.

This is one of those times when I had to "work with whatcha got" and make changes that would give me a few elements I crave, without spending a ton of money or eating out for 2 months while the kitchen is in complete disarray. In the end I probably spend under $800 (doing the work myself!) and I think we ate out two nights! Keep in mind that the three doors cost around $200 and special order maple trim can be costly. The changes I made would be A LOT cheaper if you use stock trim and don't add new doors!

If you aren't in a position to spend a lot of money on major changes and upgrades but you love the concept of open shelving and more storage, these few changes might just be the answer!

I did not paint my cabinets but I was making changes that required a few pieces of new maple trim the color of the existing. THAT is a Herculian task and one I would advise you do BEFORE you start moving things around...unless you have stock wood like oak or poplar, or intend to paint the cabinets! My kitchen cabinets are 16 years old and honestly even if I knew who, what, and where the odds that they would have trim pieces to match after all these years are pretty slim. I tried finding stock trim that came close, but none was close enough. There are cabinet manufacturers that will do "color matches" but unfortunately they won't do it for a few pieces of trim.

As I have mentioned before, most manufactured cabinets and furniture have a stain and finish that is sprayed on...so matching an existing finish can be pretty difficult! Thank you David, at Sherwin Williams in Springdale...most amazing color match EVER! I honestly can not tell the difference between the original and the new! I took a door and a few samples of the new trim and he matched it right up...amazing!

There were a few things I wanted to accomplish in this little "makeover." First, I knew I wanted open shelving. That is one element I am always drawn to in my quest for "inspiration." (Here I talk about finding your inspiration for ANY project!)

I wanted to "pop up" a few of my cabinets and open a few up for display. In the post featuring my laundry room, I tell you exactly how to "pop up" existing cabinets.

Moving the dish cabinet, spice cabinet and the two cabinets on either side of the refrigerator allowed me to add the open shelving beneath them. 

Here you can see a step by step tutorial for constructing three different types of floating shelves!

The frame to the left is just foam board with scanned copied of my grandmother's old recipe cards tacked to it! The boys always gripe about my "shallow" bowls so I pulled a couple Philbe Fire King bowls I had in my booth and then ordered small matching custard cups I found on Ebay for dips and such! 

My spices, along with my cooking and serving spoons, are now at my finger tips!

I love all the different glass jars! I painted my old knife block a pretty teal just to freshen it up a bit! I love refinishing and repurposing old cutting boards...this one is perfect for holding recipe cards!

This is now my "baking corner." I added the antique fan for comfort...you can see how easy it was to rewire this 80 year old fan here and bring it back to life! 

I choose not to pop the cabinets all the way to the ceiling. I know some would, but I have 9' ceilings and to do so would have looked funny and made the cabinets completely unusable. 

One thing I really love are the stainless and glass vent hoods. I really dislike the big hulking, over the range microwaves. The truth is, I don't have the real estate for a counter model, so for now I will stick with the big hulking over the range microwave!  Poo. 

I removed the doors on two of the cabinets and painted the interiors. After looking at them for a few weeks, I decided I did not like that open look even with all the "pretties," so I ordered new maple doors, stained them and added reeded glass inserts...like my laundry room door! (LOVE!)

I get the "openness"  without the cabinets looking "unfinished." There is a chance I may eventually do this with the doors on both sides of the refrigerator!

I did add some under counter lighting above the pasta shelf and the "baking" shelf. 

I wired into the existing under counter lighting and ran the wires between the cabinets and across the top of the cabinet above the refrigerator that was covered by a shelf. Now all the under counter lighting can be turned on with a flip of the switch that was added when we did the original lighting! 

I added glass jars here and there to hold tea, baking stuff, beans, and pasta. I love the Anchor Hocking Heritage jars for flour and white sugar but they don't have sealed lids which is necessary for brown sugar. (That was one great thing about reworking and organizing my pantry...I was able to designate one cabinet and shelf area specifically for baking stuff.) 

I found sealed jars similar to the Anchor Hocking Heritage jars, as well as jars tall enough for spaghetti and linguini at TJ Maxx! I ended up with a variety of jar styles I picked up at TJ Maxx, flea markets and Oneida online.... and I like the different looks! 

While I think the matchy-matchy boxes and storage bins are super cute in pantries, I prefer to actually SEE what I have...so I organized my pantry and cabinets so that like items are together and I am able to see what I have and what I need at a glance!

The upper shelves were a great addition...mostly so I can now openly display my cookbooks and a tiny bit of my china (I have 6 sets!) and also a few little decorative do-dads. 

The old coffee grinder is one I have had in my booth for MONTHS...probably because it is missing a piece of the top...but it looks pretty neat on the shelf with the big gold B I picked up at the flea market, a fall berry wreath (I also have a boxwood, but the berry wreath is a new fall find this year) and an old chopping board I turned into a little "chalkboard." 

This shelf had to be removable for one special reason! "Lord ?" He is stored away in the attic for the time being, but he has to have a special place when I decorate for Christmas and he would be too large for the space if the shelf could not be removed. So I painted the shelf bracing the same color as the wall and the shelf can easily be removed when it is time to display him!


As you can see, my kitchen is pretty "traditional." With furniture, I tend to lean more towards the clean lines of "modern/mid century" now but as with everything in my house, my kitchen is more of a mix of traditional, modern, and "farm house." Eclectic, to say the least. That seems to be the "style" I am most comfortable with...not too much of any one style, but a broad mix of everything!

A toss of this, a pinch of that, a smidge of whatever strikes my fancy!

One of the great things about being "eclectic" in your decorating style is you can pick up anything without worrying about whether it fits in with the "style" of the room. Whether it is modern, traditional, transitional or farm house...if I like it, I can usually make it work!

The biggest improvement for me is the addition of the open shelves and my ability to reorganize a few spaces to make the over-all kitchen a tad more functional and organized. 

And that my friends should be the PRIMARY goal for any "makeover." Because let's be honest...if the piece or space isn't functional and organized, all the pretty it the world isn't going to cut it!

First and foremost, make your space or piece functional and organized. THEN make it pretty!

BTW, as much as I debated painting the fireplace wall when I remodeled my den I am SO glad I didn't...it is perfect for the holiday seasons...fall AND Christmas.... and I can't imagine it any other color!

Friday we head out for our annual train/zipline/fishing/Aspens adventure! I am soooo ready. Matt will be here holding down the fort and when I get home, fall will be in full swing...regardless of the temperatures! 

How to install a window in an interior door!

I told you...when I am trying to avoid ripping into a MAJOR project, I start little ones.

I haven't had a lot of time to "project" around the house. Between the apartments and the furniture makeovers for the flea market, I've been a bit swamped. But I keep walking into my kitchen with a tape measure and graph paper and that is dangerous!!! 

So I decided to tackle a small project I have been mulling over for some time. I checked Pinterest and there weren't any tutorials for this project so I had to make it up as I went!

I wanted to add a window to my laundry door. It is a small room and while I am RARELY in there with the door shut, I thought it might open up this hallway a bit. And honestly, if I really like it, I may do all the doors. (I painted my interior doors black and shared that project here. It has been over two years and I STILL love them!)

As with many projects, I mull and plan and think and draw. I finally just took the door into the garage and cut a big ole' hole in it with my skill saw and jig saw. Solved the big problem...procrastination. Now I kinda had to do something with it...lol! 

I did make one critical error on this project. I neglected to get an estimate for the reeded glass I had fallen in love with. When I did call (AFTER I cut the hole!) I found out the glass was going to cost me THREE TIMES more than I "guestimated." To the tune of $160. Lesson learned...before you fall in love with an "idea," FIRST make a plan and get estimates! I could have gone with a cheaper decorative glass, but I wanted THIS glass.

Reeded glass!

My interior doors are typical "builder grade" six-panel, hollow core doors. When you cut into them you will find they are exactly what they say they are...hollow. Truth is, the only real wood bracing is around the edges and where the hardware attaches. 

So after cutting a big ole' hole in the door, I had to install wood bracing for my window frame. 

The bracing needed to be 1 1/8" thick to fit between the "skins." If you are familiar with wood cuts, you know that is not a standard cut. I could have stopped in the local door shop and asked for some wood strips to use for bracing around the cutout but I decided to use some wood I had on hand and rip it down to the width I needed.

Therein lies one of the problems I have when DIYing. I don't own a table saw...and never will. My father (who grew up in construction!) had 3 brothers and a brother-in-law...and he was the only one of the 5 who managed to get through his life with all his fingers intact. And someone once told me that if the wood got bound up in the saw, it would kick back and hit you in the face. Now I have never been on the cover of People Magazine's "most beautiful woman" issue, but I kind of like my face. One time I stupidly tried to use a utility knife to cut through vinyl siding...the knife slipped and the blade whacked me square in the nose. At the time my daughter was in diapers so I drove to the ER with a diaper on my face and demanded to see a plastic surgeon. After inspection in the bathroom mirror, I determined that it was a fairly superficial cut (dang, noses can bleed a lot!) and quietly left the ER without ever seeing a doctor (I do still have a scar!)

So I won't use a table saw. When I build cabinets or shelving, I have the awesome guys at Lowe's cut my plywood. But I have found a way to cut fairly straight lines for most projects.

I drilled little holes in a large metal yard stick. I measure for my cut and mark the line on the board, then I secure the yard stick with screws 1 1/2" from the cut line...this basically creates a "guide" to run my skill saw along and allows me to cut a straight line. 

Problem solved! Now if I could just figure out a way to get a flat tire changed since my father is no longer around and my favorite tire shop closed. Thank God I haven't had a flat in 20 years! Cuz I don't do that either!

Anywho, after cutting 1 1/8" bracing strips, I cut four pieces the length I needed for the four sides of the opening. I applied wood glue and slipped the strips between the door "skins." A little trick...set a screw on each end of the board before putting it in the door...that way if it slips to far into the door, you can use the screws to make adjustments. Then just back the screw out when you have finished clamping.

I measured from the inside edge of my strips to the outside edge of the door...all the way around....and adjusted the bracing strip so that I had the same distance from edge to edge.  My cutout was NOT the exact distance from the edges, but the strips need to be since I would be attaching my "frame" to it. I also measured the opening to make sure it was the same width and height all the way around.

After making adjustments to each strip and making sure each was in the proper position, I clamped them and let the glue dry.  

No need for nails...wood glue will do the trick if you let it dry well!

After the glue dried, it was time to add the "inside" framing. Fortunately the width of the strip and the skins combined was 1 1/2". That worked out perfectly for  1/4" x 2 (really 1 1/2") craft board (available at Lowe's) as my frame! 

I measured and cut them with my chop saw. I pre-primed my trim pieces with Kilz and sanded and then I installed them with glue and trim nails. 

Yes, I noticed the bottom frame piece was a tad off...my bad. I ended up "lifting" it, removing the nails and repositioning it so it was flush with the side piece!!! One of the many stupid frustrations of DIYing...the dreaded "oops."

I wanted a very simple and small trim since the real focal point of the entire project is the window! I thought I could use the 1/4" x 2 craft boards but they only came in 3' lengths and the height of the window was over 36". I ended up buying what is called "door stop" material....the piece of trim on the inside jamb of a door that actually stops the door. It is 1 1/2" wide and 1/4" thick and it comes with or without a decorative profile on one edge. I ended buying the one with a little decorative edge, just for a tiny bit of detailing! I trimmed both sides of the opening. (Forgot to take a picture after the trim was placed, but you can see it in the next picture! I secured it with glue and trim nails). 

I found a teeny tiny little decorative trim to use as a "frame" for the window. It's really tiny...1/4 wide. Since my frame is 1 1/2 wide, I marked the center (3/4") and then 1/8" on each side since glass inserts are usually 3/8 to 1/4" thick.

I cut and CAREFULLY glued and tacked the tiny trim on one line. 

I went ahead and caulked everything, puttied the holes, gave it a light sanding and painted it all. I did this so I would only have to tape off and paint one side of the window trim after I got the window set in place! (Mistake alert! I didn't prepaint the backside of the tiny trim I put on last...so you can see the white primer through the window now that it is installed! Paint the backside of your trim before you put it on!)

(Then I had to wait a week because I didn't think about the fact that they might just have to order the glass...which took "3-5 business days." Then I had to wait ANOTHER "3-5 business days" because they ordered the glass wrong...delays are inevitable!)

After the paint dried (and the glass FINALLY came in!) I applied a SMALL bead of silicone caulk all the way around the inside of the tiny trim and set the window in place. The silicone is important because it holds the glass in place and creates a "soft bed" for the glass so it won't rattle around in the frame.  Then I glued and tacked the tiny trim on the other side of the window. (Do this VERY carefully...if you hit the glass with a nail it WILL shatter!)

TA DA!!!! I absolutely LOVE it. The glass (reeded glass...google it!) is absolutely perfect. But it was NOT cheap. 

This is "rain" glass and it is about 1/3 the cost....

...a very pretty glass and a much cheaper option. But it wasn't the look I fell in love with so I paid the price for the glass I wanted. However, the odds of me doing the other doors is slim!

If you are installing glass in a door, I would strongly recommend getting a piece that is "tempered." It is about 4x stronger than "plain" glass and if shattered, it breaks into a bunch of tiny, relatively harmless pieces vs. the super sharp shards of regular glass!

Tempered glass really isn't that much more expensive...especially when you consider the safety factor! 

Also, the glass will be much heavier than the "hollow" door...so this is the time to replace the short hinge screws with longer screws that actually go into the framing of the door. You can buy longer hinge screws, but I just used black sheetrock screws. I will probably change them out next time I make a run to Lowe's. This is important because the weight can cause the door to "drag" or stick on the knob side. For that matter, if you have a door that drags or sticks, try replacing a few of the short hinge screws with longer ones! This door was sticking even before the new glass and using the longer screws worked like a charm! (In the picture above you can actually see where the black paint rubbed off on the door jamb!)

There you have it. A tutorial for dressing up an otherwise boring interior door! There are so many other things you could do with this same process...maybe a chalkboard insert or fabric or even a MUCH less expensive glass! 

You are only limited by your imagination!


Christmas home tour....

I noticed many bloggers featured their Holiday Home Tours earlier this month. I've been a bit slow getting around to it for a number of reasons.

First, the dog ate my card reader. Seriously. She ate it. And I read somewhere that you should never hook your digital camera directly to your computer because it could get "infected" with any bugs or viruses that might be lurking in your computer. So I always use a card reader to get my pictures. 

Second, I have been "playing" with the camera. I am notorious for taking "not so hot" photographs. Primarily because I was afraid to use anything but the "auto" setting which makes it difficult to get decent interior photos. Last week I decided to step outside my comfort zone (reasons explained here) and start playing with the camera settings in the manual mode. SHOCK! I was able to take some half way decent interior shots without blowing out the room and subjects with a flash! In the past I had to wait until the light was "just right" in a room or move pieces around or live with cruddy "flash" photos. 

I still honestly have no idea what I am doing "setting wise." But I feel better about turning dials and experimenting. At some point I will take a photography class and actually learn how to use a DSLR camera! Funny thing...I am not a newbie. I have had a digital camera for ten years...I just never used the manual settings and I was terribly limited in the quality of photos I could take.

So today I am going to share a few holiday shots of my house. I still have to be careful about when I take the pictures because I have a lot of windows and the sun can cast some pretty harsh shadows during the day! And they still aren't the best photos...but they are a tad better....

Welcome....

I always try to do a little something during the season around the front. I stick a little lighted Christmas tree in one of the flower pots and then a few wreaths and garland here and there. It is tough to see my Santa and pine forest in the arch window but he is well lit at night!

The living room...

...the BIG feature of course is always the tree! 

I made several Christmas pillows this year...you can see the post here!

Decorating can be as simple as sticking a few sprigs of berries or floral in vases or urns!

I absolutely LOVE the look of garland and ribbon down a bannister, but several years ago I decided I had to make holiday decorating a little easier on myself so I made 6 identical wreaths and tie them to the bannister! Simple but pretty!

For both Thanksgiving and Christmas I buy the little "candle wreaths" and tie festive ribbon on them and hang them on the doors throughout the downstairs. It is an inexpensive way to dress up the doors and I don't feel guilty about buying "fad" colors or styles because they are pretty cheap.

I have a thing for skinny Santas...I don't think it is intentional, but it just seems that all my Santas are a bit on the thin side...

This year I took the gold shades off the dining room chandelier...I like the "brightness" of the lights.The fixture really is simple to decorate. I just wrap a little plain garland around the fixture then stick a few sprigs of red and white berries here and there...a few crystal doo-dads from last years clearance...pretty! 

When my oldest daughter was a baby, my grandmother made her this Raggedy Andy and Ann. With my girls "grown" I really had no way to display them so a few years ago I made little pilgrim outfits for Thanksgiving and Santa outfits for Christmas. Now they get to hang out during the entire Holiday season!

The den during the day...

...and at night! Very cozy especially when it is cold enough for a fire!

Several years ago I decided to dress up the windows in the den...again, wreaths and festive ribbon! Simple.

Another skinny Santa by the fireplace...

I keep the holiday decorating in the kitchen to a minimum. Mainly because I have limited counter space and I don't want to clutter up what space I have. In the last few years I started adding little simple elements to the top of the cabinets...like Lord/Sir ? (Still no name!) 

Just a few little touches here and there can make a difference. I found a Christmasy apron at Hancock's Fabric this year. Holiday salt and pepper shakers, a penguin soap dispenser (you can't see it!), leftover ornaments in glass bowls and serving pieces, wreaths, my Southern Living cookbooks, and again, a few sprigs of holiday floral stuck here and there! Just a few things I think are pretty and festive.

Not much changes from year to year. As I have said before, I stick with the traditional and add just a few little elements here and there every year. But honestly, little changes. My basic rule is if I haven't displayed it or used it in the last two years, it gets donated...and I try not to spend too much time and money on the "fads." One thing about holiday decorating...if you stick with traditional, you probably won't go wrong. "Fads" are good in moderation as long as you don't bust your decorating budget. 

I don't mind hanging a few inexpensive peacock blue and neon green wreaths, but let's be honest...when it comes to Christmas, Santas and snowmen, green garland and pine trees and red, gold or silver colors, will probably never go out of "style!"

Have a VERY merry Christmas!