A simple side table...

When we added the new bedroom chairs....

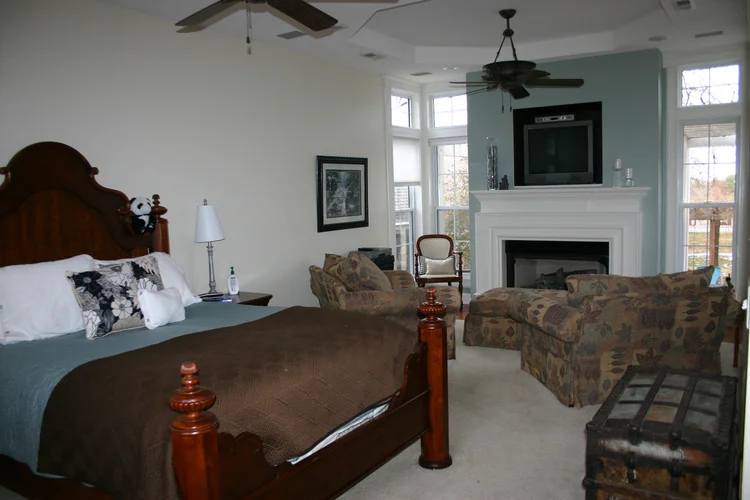
...we decided to take out the "surround sound system." When I built this room 16 years ago, I installed surround sound and we had a whole sound system set up and wired through the walls. 

Truth be told, we haven't used the surround sound system in YEARS...so there was no need to have the hulking components taking up real estate. It was just something to dust.

As pretty as the little MCM table was that held the sound system components, it really didn't work in the space.

But that left one small problem. Brian didn't have anything to set his computer or drinks on. Every guy should have a place to put his "stuff" next to his recliner...right?

Most of the side tables in my house are square or rectangular. And that just wasn't going to work in the space next to his chair.

Fortunately, my neighbor Carolyn has a "flea booth" and has a garage full of odds and ends. So I dug around in her garage and found this little round table....

She bought the little pedestal at a garage sale and attached a round craft board for the top. She hadn't gotten around to painting it and that was just fine with me! Again, "not my style" but it was the perfect size for the space.

So I brought it home, stained and sealed the top and painted the base the same color as the accent wall.

I painted it with chalk paint and considered "distressing" it a bit...and I may do that at some point. 

Right now it serves it's intended purpose.

So now this room is done...right?

Nope.

Last weekend we went shopping for a king size bed. I have NEVER had a king size bed...but sleeping with a huge dog and two cold kitties was beginning to take a toll on my back and sanity. 

So we bought a king size mattress and box springs. 

That set off a frantic search for all new sheets and blankets and a bed frame that will support and conceal the box springs...it all had to keep my bedding simple and easy to make and fit into vision I have for this room.

OH MY GOSH!!!! 

First, I hate shopping. It is just not my thing. Second, I'm "old school"...mattresses go on box springs, not platforms, which seems to be the "in" thing right now. That and REALLY tall head boards, which I don't like, or fabric covered headboards that will NOT work in a house full of critters. Third, box springs aren't suppose to show. And lastly, I'm lazy...the only way you can make a "platform" bed look decent is if you tuck all the blankets in on all sides. That breaks my "make the bed in 30 seconds" rule and we all know what would happen if I didn't make the bed every morning!

I did it. I bought new sheets and a mattress pad. I ordered a new down comforter and quilt online. I ordered a bed frame I THINK I will like...when it arrives in 1-4 weeks. 

So when it all arrives and is put together, I will do ANOTHER reveal on the master bedroom. And that should be the FINAL reveal.... until I change out the paddle fans or buy the new lamps I've been eyeing, or finally find the perfect piece of art for the big blank walls.

It's only taken me 16 years to get this far...no hurry!

Master bedroom paint color...

The "creme" walls just didn't jive with the new grey tone chairs.

It is a real struggle. It is a head banging, nail biting struggle that often leaves me feeling helpless and hopeless.

Just kidding...it's really not THAT big of a ordeal. But it is a struggle for me to change wall paint colors. Truth is, if you hate the paint color of anything, it is a relatively easy and inexpensive fix. Just repaint. Isn't that what I post time and again.

I think for me one of my biggest fears is that it will be too dark. When I was building homes I always told my clients, if you think you like the paint color on the chip, go one shade lighter. If they insisted on sticking with the color they liked, I would buy a sample, paint a huge swatch on the wall and EVERY time they would go lighter....every time. 

That is one reason I advocate painting large samples on the wall and living with it for a few days. Also, every paint has an "under tone" and it is impossible to see until the light in the room or natural light from windows hits it just right That awesome grey you thought you loved suddenly appears green or purple...the "off-white" that looks perfect on the tiny chip suddenly looks very pink...the blue-grey that matches your bedding looks purple when the sun hits it mid day.

I think that is why the process of picking a wall paint color sends me into a dark hole. 

The upside is, I KNOW THIS....and if I will just take my own advice, I will be fine.

So I pick colors I THINK I will like, paint large swatches on different walls in the room and look at them at different times of the day. 

Last week I shared the colors I first picked...and the reasons why I thought they would NOT work!

I did go back and pick up a sample of SW Nuance...it is one shade lighter than Useful Grey. I liked the Useful Grey but I was picking up a hint of green.

So Nuance it was...and I like it...but it is VERY light and truthfully, it is tough to see a real change.

Side by side, you can see that it is an exceptionally subtle change....but a change none the less. 

I probably could have gone with a darker color...this room gets tons of natural light but for now I am happy the "creme" is gone and the subtle gray blends a bit better with the elements in the room! 

Sherwin Williams "Nuance" is pretty close to the color in my "inspiration" color chart....

I originally discovered this little color chart at designseeds.com. It is a great site where you can find color combinations that work together...colors you would never imagine could exist side by side. This color sample has been my inspiration since I first started working on this room 3 years ago...one element at a time! 

This site is a source of endless inspiration and in my opinion it is one of the first sites you should visit when designing a room. If you have an element you HAVE to decorate around it will help you find colors that will enhance, and even mask it....that ugly brown couch or the wing back chair your mom gave you. 

I was able to pull every color off this chart and incorporate it into my master bedroom. The "white" in the trim, the "grienge" on the walls, the "bluish" on the fireplace wall, the "frosted berry" in the rugs, accent pillows and throw, the "grey" in the chairs.

Start your inspiration journey with colors in hand! And remember, if the paint is too light (or too dark) JUST PAINT IT AGAIN!

Master bedroom makeover Part ?

The chairs have arrived. One element of the master bedroom plan I started several years ago!

The original "plan" for this room was to eventually recover the existing club chairs.

But I decided they were just too big and I'm over the whole "matchy-matchy" thing. I wanted smaller and different...and that is exactly what I got!

So the master bedroom "remodel" that started three years ago when I painted the furniture and continued when we installed the laminate flooring, is still on going. 

I still love the original inspiration colors I chose....

The soothing soft blue, the pop of frosted berry...the two new chairs bring in the soft grey element. Unfortunately that makes the soft off white of the walls appear very yellow.

So NOW I need to paint the walls. I noticed too that I have never painted the fireplace surround with the new whiter trim paint I am now using throughout the house. And the 2001 grossly expensive paddle fans? Not feeling it, so those may get changed out....something not in the original plan.

The two empty frames on the wall? Originally they were dark wood and were hanging vertically in my living room with pictures of my kids in them.

They have been sitting in my garage since I added the new mirror over three years ago.

A little KSTP treatment and they are ready for a new life...as a frame for...? Honestly, I haven't decided...maybe pretty landscape water colors or mirrors. I can't decide. That is one thing I have never been able to do in this room...wall decor! I still have massive empty wall space!

As I mentioned here three years ago, I knew I would need to add length to the curtains...or ignore it. 


I share this only so you will understand that a "room transformation" doesn't always happen over night. Sometimes it can take YEARS and in that time frame, your wants and tastes and desires may change. 

One or two elements at a time...slow and steady...you don't have to do it all at once!

Making the holidays a tad easier...

"Its the most wonderful time of the year!!!" It is, but man, can it put a strain on our bodies, time and finances! 

Over the years I have found a few ways to make my holiday season just a tad easier and economical.

Today I want to share a few of those things....

LIGHT REMOTE

I bought mine at Lowe's....

This nifty little gadget allows you to turn on your indoor Christmas decor with the touch of a button. I have one on my big tree, one on my small tree in the den and one on the big wreath and trees in the den. Just plug anything into this outlet, plug it into the wall and punch a button...on or off...simple as it sounds!

TIMERS

Definite must-have for outdoor lighting! No more going out into the cold and unplugging the lights before you go to bed...or worse, FORGETTING to unplug the lights! I set my timers to 5 p.m. and 11 p.m. and know that my lights will automatically turn on and off! (Most home improvement stores carry them!)

STAR SHOWERS

These were pretty much out of necessity. Brian has been the official "outdoor light" guy for 16 years...but a few years ago he fell off the ladder and last year he had a hernia. So I had to find a way to light up the outdoors without killing him. Hence the Star Showers! One...mehhhh. Two...so-so....but two on the house and four pointed at the tall pine trees....WOW!!!! Beautiful. I almost don't miss all the colored and icicle lights...almost!

I bought mine at Bed, Bath and Beyond and I have seen them advertised online and on TV.

WRAPPING TABLE

Again, out of necessity. I'm too OCD to leave wrapping stuff strung out on my dining table for the entire season...and sitting on the floor wrapping presents for hours on end was more than my knees and back could handle. So now I set up this little table in my room and load up my wire baskets with paper, bows and boxes. Not only do I have a perfect spot for wrapping, I have the perfect place to stack gifts that need wrapping. Pens, scissors, labels and the tape dispenser are always at my finger tips!

WIRED RIBBON

I love this stuff...it makes beautiful simple bows for packages but the great thing is you can reuse it year after year. Just roll them up after all the gifts are open, thrown them in a box and you will have beautiful ribbon next year! Pretty and economical! 

STORAGE UNIT

This one is new for us this year. I have always stored my holiday decor in the attic. But as you get older, climbing up and down the rickety attic stairs with bulky boxes gets a little dicey. When Brian moved this year, we decided to get a storage unit big enough to hold some of his stuff and ALL our seasonal decor...both fall and Christmas. And there is A LOT! Yes, it is kind of a pain to have to go get the boxes and then take the empty boxes back, then go get the empty boxes, and then take them back. But honestly, it is easier than hauling it all in and out of the attic...and far safer! 

HEIRLOOM ORNAMENTS

I've shared this before...and it bares repeating...it is never too late to start a "tradition." When my oldest daughter was a baby my mother started giving her several special ornaments every year. She continued this "tradition" for all my children, who are now 35, 28, 27 and 19...2-3 ornaments times all those years! You can imagine how many I now have. My oldest daughter now has all her and her children's ornaments and they fill her tree. I still have the boys' and my youngest daughter's and will keep them until they have their own Christmas tree. Each ornament has some meaning...the year they went skiing, their first deer, high school and college graduations, glass ornaments created from the ash of Mr. St. Helen's...so many ornaments... enough to completely cover a 9' tree. I don't need ribbon or balls or "fillers"...I have a tree full of memories, each ornament marking a milestone or special time in our lives! Priceless...and beautiful! 


These are just a few little things that have made our holiday season a tad easier...and economical...and safer! 

Enjoy the season!

It's the little things!

Cheap and/or free are always my favorite way to add a little seasonal warmth to my home!

I shop sales, clearances, auctions, yard sales...it is always fun to find inexpensive little "treasures" I can use to decorate a space or add a touch of warmth or whimsy. 

Last Friday I actually did something I really hate. I shopped "retail stores." I was specifically looking for cotton stems or cotton wreaths. Evidently decorating with cotton is all the rage this fall and I wanted some...but evidently that is another "fad" that hasn't hit our area because after hitting every home decor store in the area I came home empty handed.

My neighbor Tammy dropped by this week...she had visited her daughter in south Arkansas and brought home some REAL cotton stems from their farm.

Tammy to the rescue!!!! I couldn't believe she had a pile of cotton stems in her garage just sitting there for the "pickin!" 

LOVE! I literally just snipped off the root ends and stuck them in a little vase. I probably should find a bigger vase, but I love how these REAL cotton stems fill this space! 

Last year I feature some awesome little "coffins."  Sounds morbid I know, but as I explained, they are actually the lids to antique sewing machines...and I absolutely love them! I used a couple for storing photo albums but I had one that was just sitting in the den.

My other neighbors, Kenny and Maryann, have these really cool trees in their backyard...they kind of look like Aspens and the bark is "whiter" than normal tree bark. I have no idea what they are but I used the branches in my little seasonal box I shared here. I decided to cut a few more of their branches and use those in this little coffin in front of the fireplace.

So simple!

Outdoors...an old galvanized bucket dressed for the season! Just drop a potted mum in it (no need to get your hands dirty!)....or if you don't want to spend the money on a mum, fill it with berry stems, pine cones and pine branches! Again, super simple!


My point? Adding seasonal touches to our home decor doesn't have to cost much, if anything. Just look to nature (and your neighbors!) We do it in the spring and summer when we bring in cut flowers. Fall gives us just as many ways to bring nature into our homes!

Green "horse apples," red berry bush stems, pine tree branches, tree limbs with colorful fall leaves...all ways to bring nature into your space. You can stick them in wood bowls or galvanized buckets or cheap vases or old wooden boxes. 

Some of the prettiest seasonal decorations are free!

Decorating with the traditional colors of fall!

The week before Brian and I left for our annual vacation to Colorado, I spent several days cruising the blogosphere and enjoying all the beautifully decorated homes on the "Fall Tour." I noticed many are now decorating with more "whites and blues" and neutrals for the season....blue and white pumpkins, vintage containers, natural elements, muted greenery.

I think it is all beautiful but as I decorated my home for the season I realized that all my fall decor are the bright and bold colors of traditional fall foliage....reds, oranges, yellows, browns and deep greens.

And as I have mentioned before, when I am done, it looks like fall has puked in my house. I LOVE this time of the year and every time I stroll through the isles of department stores, craft stores or a flea market I find more fall "stuff" I just can't resist.

I had pretty much convinced myself that I needed to transition to the more "neutral" pallet of the "farmhouse fall" next year. Until....

I neglected to take pictures of the southern view at Mesa Verde so I stole this picture from Thomas Mangan...he has some breath-taking photos....the colors are AMAZING and a pretty representation of the southern slope of Mesa Verde! 

....Colorado...the vivid yellows and orange of the Aspens, the deep reds of the mountain sides and red oak foliage, the vibrant greens of the pines.

Yes, there are whites and blues and neutrals...the stark white of the Aspen bark, the muted "pinks" of Mesa Verde (a MUST see!)....

...the neutral pallet of a canyon wall along the river...

...snow capped mountains reflecting in the crystal blue waters of a mountain top lake!

...white snow filled clouds creeping over a mountain pass.

All beautiful...all colors found in nature!

For me, I am still in love with the vibrant colors of fall that are so prevalent here in the Ozarks...the yellows, orange, reds and deep greens. I have shared my "fall home" before, but I thought I would share again this year...nothing much changes from year to year and that is just fine with me!

Notice the "Colorado red" flagstone...yes, that is native Colorado stone and yes, there are rivers and mountains that color!

These little lanterns are "multi-seasonal." I can easily change them up for fall, Christmas and even spring/summer!

Every holiday I hang a "seasonal" wreath on the big mirror in the living room! I now have one for fall, Christmas, Valentine's and the 4th!

Still love my black doors! In the fall I hang simple "candle wreaths" with ribbon to decorate every door and window. I simply change them out for Christmas wreaths after Thanksgiving!

Several years ago I hit the 90% clearance at Hobby Lobby and snatched up all the high dollar fall garland...I wrap it in the dining light fixture, lay it on top of the display hutch and in the transoms, and lay it across the fireplace mental!

Say hello to Litty...she loves the camera! 

Years ago I made two "table top" fall wreaths...I use to put hurricane candles in both but I found this awesome little grapevine pumpkin last year. What do you know...I actually do change things up a bit every now and again!

For vases and urns, I just bundled a bunch of fall stuff I like together and stick them in the container...simple! This one is a glass vase filled with fall glass beads I picked up for Pier One years ago! 

Mr. Owl was actually one of those ugly plastic "decoy" owls I picked up at an auction. I painted him off white...again, super simple!

Here I shared how easy it is to make a little seasonal vintage box that can be easily changed up throughout the year...

THIS is what I love to decorate with...the traditional colors of fall. I love the blues and whites and neutrals but every year I take a 14 hour trip west to see the vibrant colors of the Colorado Aspens. 

For some, it is the beach....white sands and blue waters and sky. For me, when I see a grove of shimmering fall Aspens, it fills my heart with pure joy! When I stand on a mountain top at Mesa Verde and look down at the red, orange and yellow foliage on a mountain side, I feel at peace.

So for now, I will continue to decorate with the colors I love. Maybe some day I will transition to the "in" colors, but this year, I am at peace in my home surrounded with the vivid colors of a traditional fall! 

And that, my friends, is what decorating a home is all about!

The kitchen makeover reveal!

It is time for the big KITCHEN REVEAL!!!

First, I had to wait on the maple trim...then I decided to wait on the new doors and glass!

I had not intended to start decorating for fall before "the big reveal." My plan for this week was to do the glass doors Tuesday, take pictures of the kitchen and get ready for Matt's birthday celebration Wednesday (he turns 26 Saturday!), post the reveal Thursday morning and then get most of the fall decor up and get my hair and nails done ...AND LEAVE FOR COLORADO FRIDAY!!! Yippeee!

One hitch...I got a call Tuesday morning that the glass wasn't on the delivery truck so it wasn't going to be in until Thursday...well that just threw a wrench in my whole week. So Tuesday I started working on my fall decor. Tuesday afternoon, the glass place called and said they "found" my glass and it was ready. Sooooo....short story long, the "reveal" pictures are going to have smatterings of fall! 

I think I have mentioned before that I have a bad case of "Pinterest envy" when it comes to kitchens. 

Tipsaholic recently featured some beautiful kitchen pantry/storage ideas. I love the painted kitchens and all the open shelving but the one thing I noticed about EVERY picture, whether featuring beautiful glass containers or pull out drawers, was the ORGANIZATION of every item and space.

For me, the key to a great kitchen (or any space for that matter) is making sure everything is organized and functional for MY needs! And of course aesthetically appealing, but unless it is organized and functional, I am wasting my time making it pretty!

While I love all the neat pull-outs and storage inspiration, I think the first thing you need to do BEFORE you start any kitchen remodel is get every drawer and cabinet purged and organized and see what you have, what you need and what space you can rework, organize or add to make your kitchen function for YOU! Plan, plan, plan!

Here is a post on purging and organizing your kitchen drawers! A super simple little project but it has made a big difference in my ability to find stuff I need!

My goal in "resetting" my kitchen was to make it more functional for my purposes.....and of course, change things up a bit aesthetically so I am not tempted to take a paint brush to these beautiful cabinets 

I basically had a "standard" (and small) kitchen layout.

I do love stained wood and as drawn as I am to painted cabinets, I knew the day would come in the future when I would regret painting mine. My stain color (Paprika Cherry on Maple) isn't totally offensive and fairly "timeless" if that is possible, unlike my daughter's kitchen which had "pickled oak," a stain my dad and I were putting in houses in the 1990s!! I did not discourage her in the least when they decided to paint their cabinets. 

For those who believe "white is classic and will never go out of style" obviously don't remember the "honey oak" trend of the 90s..."oak is classic and will never go out of style!" EVERYTHING goes out of style...eventually! Which is why we are all painting honey oak cabinets!

Earlier this year I made an offer on a smaller house with a smaller yard in a subdivision I would love to live in. The house was basically a "gut job" and the new kitchen I designed had NO upper cabinets...none! I wanted lots of windows, maybe a few open shelves, tons of base cabinets with drawers and a big island.

But that deal didn't work out and I don't have the "footprint" to build a kitchen even remotely close to what I would have put in that house. Right now I don't have the funds (or energy) to make major changes and I can't bring myself to change out appliances that aren't totally offensive and work perfectly fine! 

What to do, what to do!? I wanted some changes, but I didn't want to do something I might regret down the road.

This is one of those times when I had to "work with whatcha got" and make changes that would give me a few elements I crave, without spending a ton of money or eating out for 2 months while the kitchen is in complete disarray. In the end I probably spend under $800 (doing the work myself!) and I think we ate out two nights! Keep in mind that the three doors cost around $200 and special order maple trim can be costly. The changes I made would be A LOT cheaper if you use stock trim and don't add new doors!

If you aren't in a position to spend a lot of money on major changes and upgrades but you love the concept of open shelving and more storage, these few changes might just be the answer!

I did not paint my cabinets but I was making changes that required a few pieces of new maple trim the color of the existing. THAT is a Herculian task and one I would advise you do BEFORE you start moving things around...unless you have stock wood like oak or poplar, or intend to paint the cabinets! My kitchen cabinets are 16 years old and honestly even if I knew who, what, and where the odds that they would have trim pieces to match after all these years are pretty slim. I tried finding stock trim that came close, but none was close enough. There are cabinet manufacturers that will do "color matches" but unfortunately they won't do it for a few pieces of trim.

As I have mentioned before, most manufactured cabinets and furniture have a stain and finish that is sprayed on...so matching an existing finish can be pretty difficult! Thank you David, at Sherwin Williams in Springdale...most amazing color match EVER! I honestly can not tell the difference between the original and the new! I took a door and a few samples of the new trim and he matched it right up...amazing!

There were a few things I wanted to accomplish in this little "makeover." First, I knew I wanted open shelving. That is one element I am always drawn to in my quest for "inspiration." (Here I talk about finding your inspiration for ANY project!)

I wanted to "pop up" a few of my cabinets and open a few up for display. In the post featuring my laundry room, I tell you exactly how to "pop up" existing cabinets.

Moving the dish cabinet, spice cabinet and the two cabinets on either side of the refrigerator allowed me to add the open shelving beneath them. 

Here you can see a step by step tutorial for constructing three different types of floating shelves!

The frame to the left is just foam board with scanned copied of my grandmother's old recipe cards tacked to it! The boys always gripe about my "shallow" bowls so I pulled a couple Philbe Fire King bowls I had in my booth and then ordered small matching custard cups I found on Ebay for dips and such! 

My spices, along with my cooking and serving spoons, are now at my finger tips!

I love all the different glass jars! I painted my old knife block a pretty teal just to freshen it up a bit! I love refinishing and repurposing old cutting boards...this one is perfect for holding recipe cards!

This is now my "baking corner." I added the antique fan for comfort...you can see how easy it was to rewire this 80 year old fan here and bring it back to life! 

I choose not to pop the cabinets all the way to the ceiling. I know some would, but I have 9' ceilings and to do so would have looked funny and made the cabinets completely unusable. 

One thing I really love are the stainless and glass vent hoods. I really dislike the big hulking, over the range microwaves. The truth is, I don't have the real estate for a counter model, so for now I will stick with the big hulking over the range microwave!  Poo. 

I removed the doors on two of the cabinets and painted the interiors. After looking at them for a few weeks, I decided I did not like that open look even with all the "pretties," so I ordered new maple doors, stained them and added reeded glass inserts...like my laundry room door! (LOVE!)

I get the "openness"  without the cabinets looking "unfinished." There is a chance I may eventually do this with the doors on both sides of the refrigerator!

I did add some under counter lighting above the pasta shelf and the "baking" shelf. 

I wired into the existing under counter lighting and ran the wires between the cabinets and across the top of the cabinet above the refrigerator that was covered by a shelf. Now all the under counter lighting can be turned on with a flip of the switch that was added when we did the original lighting! 

I added glass jars here and there to hold tea, baking stuff, beans, and pasta. I love the Anchor Hocking Heritage jars for flour and white sugar but they don't have sealed lids which is necessary for brown sugar. (That was one great thing about reworking and organizing my pantry...I was able to designate one cabinet and shelf area specifically for baking stuff.) 

I found sealed jars similar to the Anchor Hocking Heritage jars, as well as jars tall enough for spaghetti and linguini at TJ Maxx! I ended up with a variety of jar styles I picked up at TJ Maxx, flea markets and Oneida online.... and I like the different looks! 

While I think the matchy-matchy boxes and storage bins are super cute in pantries, I prefer to actually SEE what I have...so I organized my pantry and cabinets so that like items are together and I am able to see what I have and what I need at a glance!

The upper shelves were a great addition...mostly so I can now openly display my cookbooks and a tiny bit of my china (I have 6 sets!) and also a few little decorative do-dads. 

The old coffee grinder is one I have had in my booth for MONTHS...probably because it is missing a piece of the top...but it looks pretty neat on the shelf with the big gold B I picked up at the flea market, a fall berry wreath (I also have a boxwood, but the berry wreath is a new fall find this year) and an old chopping board I turned into a little "chalkboard." 

This shelf had to be removable for one special reason! "Lord ?" He is stored away in the attic for the time being, but he has to have a special place when I decorate for Christmas and he would be too large for the space if the shelf could not be removed. So I painted the shelf bracing the same color as the wall and the shelf can easily be removed when it is time to display him!


As you can see, my kitchen is pretty "traditional." With furniture, I tend to lean more towards the clean lines of "modern/mid century" now but as with everything in my house, my kitchen is more of a mix of traditional, modern, and "farm house." Eclectic, to say the least. That seems to be the "style" I am most comfortable with...not too much of any one style, but a broad mix of everything!

A toss of this, a pinch of that, a smidge of whatever strikes my fancy!

One of the great things about being "eclectic" in your decorating style is you can pick up anything without worrying about whether it fits in with the "style" of the room. Whether it is modern, traditional, transitional or farm house...if I like it, I can usually make it work!

The biggest improvement for me is the addition of the open shelves and my ability to reorganize a few spaces to make the over-all kitchen a tad more functional and organized. 

And that my friends should be the PRIMARY goal for any "makeover." Because let's be honest...if the piece or space isn't functional and organized, all the pretty it the world isn't going to cut it!

First and foremost, make your space or piece functional and organized. THEN make it pretty!

BTW, as much as I debated painting the fireplace wall when I remodeled my den I am SO glad I didn't...it is perfect for the holiday seasons...fall AND Christmas.... and I can't imagine it any other color!

Friday we head out for our annual train/zipline/fishing/Aspens adventure! I am soooo ready. Matt will be here holding down the fort and when I get home, fall will be in full swing...regardless of the temperatures! 

The den makeover reveal...

Honestly, on the surface it doesn't look like much of a reveal.

I had plans...BIG plans. New couch and rug, paint, new flooring, fireplace makeover...teal, greys, whites. 

I found my inspiration, made a plan and started the plan.

When it was all said and done, it really doesn't look like I have changed much. My back and checking account say otherwise!!!!

Two huge projects did get completed. I painted and refaced the fireplace with travertine tile...

....and installed new wood flooring!

A little TIP for wood or laminate flooring. This is an "engineered wood flooring" you glue down. The transition pieces for this flooring were about $50 for a 6' stick, and I need three pieces! I went to Lowes and found unfinished transition pieces for around $15 a stick and stained them to match the flooring. Much cheaper! When I did my master bedroom floors in laminate, I did the same with the existing transition pieces...just gel stained them to match the new flooring!

Those two projects alone made a world of difference!

I did what I always do when looking for the perfect paint color ...I painted two samples on the wall and looked at it...for weeks.

But when it came right down to it, even with the new flooring, I really love the original color. This is my "fall room." Fall is my favorite time of the year and I just love the colors associated with the season...burnt reds, oranges, yellows, etc! 

So off to Sherwin Williams I went to see if they could mix a 15 year old color. God bless 'em...they mixed it right up. I painted over the "test patches" and gave the entire wall a fresh coat of the same exact original color.

I did infuse a few splashes of "teal" here and there. It all started with these little birdies I picked up at Midtown several months ago...

I THOUGHT I would like this table in teal...

Boy was I wrong....I really disliked it so when I cleared out the furniture to install the flooring, it went straight to the garage for another makeover...

I originally painted these candle sticks teal...nope, not happening. So again, back to the garage for a second makeover. 

I did paint this lamp a soft "teal." 

It's not really "my style" but it is different and I like that. And the shade is actually brass with a black exterior. I got a great deal on it at a design studio auction. It had the original $450 price tag on it. A little pricey even for a heavy brass lamp...but for my $15 bid it was worth it! Believe it or not, you can paint brass!! A little metal primer and a little spray paint!

After dinner with my super awesome girlfriends, we made our usual TJMaxx run! I found these awesome pillows and decided they will look perfect on the grey couch I want to eventually get for this room...eventually...someday.

Not sure they are "all that" on the old yellow couch, but they will inspire me to eventually "transition" this room into the vision I had in the beginning...greys, teal, whites. For now, I will leave the original pillows...they have a little bit of teal in them...just for the sake of the ratty old couch!

Not all "makeovers" happen over night. Sometimes, you have to take your time and do what your back and budget allow. 

So yes, I still want to buy a new couch...and a new rug...a few new club chairs. 

In time. For now, I will just enjoy the new floors and the "new" fireplace!

I party with Remodelaholic

Christmas home tour....

I noticed many bloggers featured their Holiday Home Tours earlier this month. I've been a bit slow getting around to it for a number of reasons.

First, the dog ate my card reader. Seriously. She ate it. And I read somewhere that you should never hook your digital camera directly to your computer because it could get "infected" with any bugs or viruses that might be lurking in your computer. So I always use a card reader to get my pictures. 

Second, I have been "playing" with the camera. I am notorious for taking "not so hot" photographs. Primarily because I was afraid to use anything but the "auto" setting which makes it difficult to get decent interior photos. Last week I decided to step outside my comfort zone (reasons explained here) and start playing with the camera settings in the manual mode. SHOCK! I was able to take some half way decent interior shots without blowing out the room and subjects with a flash! In the past I had to wait until the light was "just right" in a room or move pieces around or live with cruddy "flash" photos. 

I still honestly have no idea what I am doing "setting wise." But I feel better about turning dials and experimenting. At some point I will take a photography class and actually learn how to use a DSLR camera! Funny thing...I am not a newbie. I have had a digital camera for ten years...I just never used the manual settings and I was terribly limited in the quality of photos I could take.

So today I am going to share a few holiday shots of my house. I still have to be careful about when I take the pictures because I have a lot of windows and the sun can cast some pretty harsh shadows during the day! And they still aren't the best photos...but they are a tad better....

Welcome....

I always try to do a little something during the season around the front. I stick a little lighted Christmas tree in one of the flower pots and then a few wreaths and garland here and there. It is tough to see my Santa and pine forest in the arch window but he is well lit at night!

The living room...

...the BIG feature of course is always the tree! 

I made several Christmas pillows this year...you can see the post here!

Decorating can be as simple as sticking a few sprigs of berries or floral in vases or urns!

I absolutely LOVE the look of garland and ribbon down a bannister, but several years ago I decided I had to make holiday decorating a little easier on myself so I made 6 identical wreaths and tie them to the bannister! Simple but pretty!

For both Thanksgiving and Christmas I buy the little "candle wreaths" and tie festive ribbon on them and hang them on the doors throughout the downstairs. It is an inexpensive way to dress up the doors and I don't feel guilty about buying "fad" colors or styles because they are pretty cheap.

I have a thing for skinny Santas...I don't think it is intentional, but it just seems that all my Santas are a bit on the thin side...

This year I took the gold shades off the dining room chandelier...I like the "brightness" of the lights.The fixture really is simple to decorate. I just wrap a little plain garland around the fixture then stick a few sprigs of red and white berries here and there...a few crystal doo-dads from last years clearance...pretty! 

When my oldest daughter was a baby, my grandmother made her this Raggedy Andy and Ann. With my girls "grown" I really had no way to display them so a few years ago I made little pilgrim outfits for Thanksgiving and Santa outfits for Christmas. Now they get to hang out during the entire Holiday season!

The den during the day...

...and at night! Very cozy especially when it is cold enough for a fire!

Several years ago I decided to dress up the windows in the den...again, wreaths and festive ribbon! Simple.

Another skinny Santa by the fireplace...

I keep the holiday decorating in the kitchen to a minimum. Mainly because I have limited counter space and I don't want to clutter up what space I have. In the last few years I started adding little simple elements to the top of the cabinets...like Lord/Sir ? (Still no name!) 

Just a few little touches here and there can make a difference. I found a Christmasy apron at Hancock's Fabric this year. Holiday salt and pepper shakers, a penguin soap dispenser (you can't see it!), leftover ornaments in glass bowls and serving pieces, wreaths, my Southern Living cookbooks, and again, a few sprigs of holiday floral stuck here and there! Just a few things I think are pretty and festive.

Not much changes from year to year. As I have said before, I stick with the traditional and add just a few little elements here and there every year. But honestly, little changes. My basic rule is if I haven't displayed it or used it in the last two years, it gets donated...and I try not to spend too much time and money on the "fads." One thing about holiday decorating...if you stick with traditional, you probably won't go wrong. "Fads" are good in moderation as long as you don't bust your decorating budget. 

I don't mind hanging a few inexpensive peacock blue and neon green wreaths, but let's be honest...when it comes to Christmas, Santas and snowmen, green garland and pine trees and red, gold or silver colors, will probably never go out of "style!"

Have a VERY merry Christmas!


Simple fall decor....

I am a "warm" person so I love the traditional colors of fall and it is my favorite time of the year!

I know a lot of people are decorating with blue and white pumpkins...tablescapes, vignettes (that's a fancy way of saying a "grouping" of decor), mantles, etc...but I like the orange, burnt reds and yellows of a traditional fall! Warm tones....and I have TONS of natural light in my house so it makes it a lot easier to decorate with "warm" holiday colors!

Several years ago I decided I wanted to remake my bannister Christmas wreaths in blue and silver....a touch of "cool." Katie quickly reminded me that "red and gold" were our TRADITIONAL colors and she didn't want that messed with. So I obliged and stuck with the "traditional" colors of the season. Occasionally I sneak in something a little "non-traditional," but very little.

So very little changes from year to year...except maybe a few little "additions." 

Traditional decorating is, in my opinion, the way to go. I said last year that I thought it unwise to spend a great deal on burlap and chevron Christmas decor only because I knew it was a "fad" and would eventually fall by the wayside. As I predicted, we are seeing less and less of that this year.

So find a style or decor elements that you truly LOVE and make that the bulk of your "traditional" seasonal decor. No harm in infusing a few "faddish" elements here and there, but if you try to go all out with the newest fad, you may find yourself with an attic full of outdated seasonal decorations. (A few of us are old enough to remember Santa ducks and "mauve" Christmas ribbon...ouch!)

The BEST time to buy seasonal decor is AFTER the season. I know it is tough to buy things you are going to immediately stick in storage, but it is soooo much fun to discover all your new goodies year after year...and it is a great way to build a stockpile without spending a lot of money. MOST of my seasonal decor was purchased on sale for 80-90% off after the season! 

Another tip...you are going to get older and there will come a time when a lot of fluffing and froofing and climbing up and down ladders is hazardous...to both your physical well-being and your pets (yes, I have stepped on a few coming off the ladder!) So years ago I started transitioning to things that were easy for me to "set out."  It is much simpler to tie wreaths to the bannister than it is to struggle with yards of garland and ribbon...and I am not consumed for days every year painting and sewing and making wreaths and garland with the newest fads. 

So this is my "traditional" fall decor....

The den is the perfect template for fall decor. The fireplace wall is "burnt red" and it makes a beautiful back-drop for both my fall and Christmas vignettes. Years ago I bought new fall garland for the front door...the old garland had gotten a little "aged" looking but I didn't want to toss it, so now I just lay it across the mantel....takes all of 10 seconds. The white owl is a new addition I shared here. I bought 4 identical wreaths and hang them in the windows from ribbon. Fall leaf floral in the urn, pumpkins and scarecrows and knick-knacks here and there...

I shared how I dress up these simple outdoor lanterns for Christmas here. For the fall, they get a "fall" ribbon and floral pick, pine cones or a seasonal candle. 

Outdoor lanterns are great for all seasons. After the holidays I just remove all the ribbon and seasonal stuff and place a candle in them! I love that they are simple to decorate and don't have to be stored from one season to the next! 

The den side table gets a little fall vignette as well....

I shared the branch box on the floor here. Years ago I made two "table wreaths" with a round floral form, a grapevine wreath and fall picks. I put a candle in one and I found a nifty little grapevine pumpkin at a garage sale for pennies for the dining table! Both are simple to set out and store!

A few little knick-knacks here and there. (I bought the silly turkey at an auction for a few dollars! Garage sales, thrift stores and auctions are great places to find holiday decor for next to nothing!)

I bought a bunch of candle holder "berry wreaths" several years ago. I hang them on all the downstairs doors and on a few frames and cabinets with seasonal ribbon...super simple and when I decorate for Christmas, I just replace them with holiday wreaths!

This wreath I hung on my new living room mirror is a little larger. I think I found it in a box of seasonal goodies I bought at an auction for next to nothing! For Christmas I have the perfect crystal wreath I shared here and I think I will pick up a boxwood wreath for after the holidays! Wreaths are super simple to decorate with and store after the holidays! I just drop mine in plastic bags for storage!

Inexpensive (especially on clearance) floral picks and sprays are ideal for vases and urns...it usually doesn't take a lot to dress them up and they make a huge impact. I just replace the fall floral for Christmas floral every year!

Seasonal garland is super simple to lay on top of hutches, wrap around light fixtures, hang around doors and lay on tables. I love fall garland...but if you have ever priced it, you know it can be super expensive!!! And that, my friends, is where "after holiday" sales are great. Every year, I hit Hobby Lobby the weekend after Thanksgiving and snag their 80% off decor!

I lay inexpensive garland in the dining and den transoms and then mix in a few real pumpkins and gourds....well, usually but this year I didn't quite get around to picking up pumpkins and gourds...but it is still pretty!

Last but not least, the "kiddo scarecrows." I hesitate to even share these because it is so hard to get a good picture because of the glare (as I have said MANY times, I am NOT one of those bloggers that has killer photog skills!) I originally put these up when my two boys and youngest daughter were little...now they and the pumpkins are a tad faded and tired looking. I intend to change this little vignette every year, but a busy life always seems to get in the way. So, someday! In the meantime, they take their place every year and are replaced the day after Thanksgiving with Santa and the pine forrest!

Building a cache of seasonal decor can take time. But if you keep your eyes open at thrift stores and garage sales, shop the after season sales and stick with "traditional" decorating, you don't have to break the bank. Save the "fad" vignettes for one or two special places in your home and avoid the frustration and stress of having to decorate your entire house every year in a "Pinterest theme." 

Enjoy the season!!!!