DIY and Cinderella...

At this moment I am sitting in my “all-season” room drinking my coffee and watching it rain.

IMG_0254.jpg

Heaven.

There is so much I love about this house and honestly, I can’t t think of a thing I don’t. We have spent a great deal of time the past few weeks working outdoors and many of our neighbors have stopped to tell us how wonderful it is looking. (Probably more a testament to how badly the place looked to begin with.)

Making a home beautiful after years of neglect, for me, is like the Cinderella story. Abused, neglected, mistreated…until someone who cares comes along and waves a magic wand and makes everything beautiful again.

Simple analogy…seriously, who waves a magic wand and makes a home beautiful. Truth is, it takes a lot of work to turn an abused and neglected home or piece of furniture into something beautiful and useful.

My blog friend Cristina shared a chair she recently transformed. Abused, neglected, dated and something no one really wants in their home anymore was completely transformed into a piece of furniture fit for a ball!

A super simple project for someone like her and me and not so difficult that someone with minimal DIY skills couldn’t tackle. The hardest part would be the sanding and staining, but just a simple KSTP treatment (Kilz, sand, tack, paint (search on this site for examples) would completely transform this simple chair. How cute would it be paint lavender for a little girl’s room. Or bright royal blue for a little boy’s room. (Yes I am a “gender snob”…raised 4 kids like that and they are killing it…so get over it)

After sitting and watching it rain for a few hours I finally decided to tackle the trim and cabinets in the laundry room. As I mention I am painting all the trim a whiter-white…BM Chantilly Lace. Not so “yellow”…just a pure white.

I have drug my feet on the laundry room because I really dreaded painting the cabinets. But I did and they are now done. All except the new hardware and that should be here next week. The only other thing I want to do in that room now is replace the dated ceramic tile. That chore is WAAAAY down the bottom of the list.

Still waiting on the master bath windows. Built a dining table and bench for Brandon and Taylor’s new house…just waiting on the legs we ordered. Waiting on a few final touches before I FINALLY share my shop transformation. The glass for the pantry door should be here today. In other words, lots going on to share…just nothing quite ready.

Cinderella may have transformed with the wave of a wand…unfortunately most DIY projects take a little more time and patience. But the result is often the same…magical!

static1.squarespace.png

Master bedroom reveal....

When we moved into this house in September we basically moved our old bedroom into this new house. Nice fit, but zero thought put into the “design” of the room…I basically just put furniture on the floor and a few pictures on the walls.

A few weeks ago my daughter sent me a picture of a well designed bedroom similar to ours.

IMG_0694.jpg

That’s when I realized our current master bedroom has ZERO “design character.” I hadn’t even taken the time to paint all the trim the “new” white.

IMG_1317.JPG

Twenty year old lamps, white and brass paddle fan, stacks of pillows in bleach spotted pillow cases, no curtains, scuffed and dinged furniture, clutter…

IMG_1318.JPG

The picture was perfect inspiration! The push I needed to work this space to it’s potential.

So last week my goal was to to tackle the room. Paint the trim and furniture, new curtains, throw pillows, a few little touches here and there, and declutter.

I painted my bedroom furniture (HERE) almost 7 years ago and while I still love the pieces, they have gotten quite dingy looking. Remember, whites yellow over time and of course there are chips and scratches from normal wear and tear. So it was time to give them a little paint refresher! And the side table tops…holy crud they have gotten nasty. So it was time to strip and restain the tops as well.

Of course the little “room refresh” became a three day chore!

In the end, worth every minute.

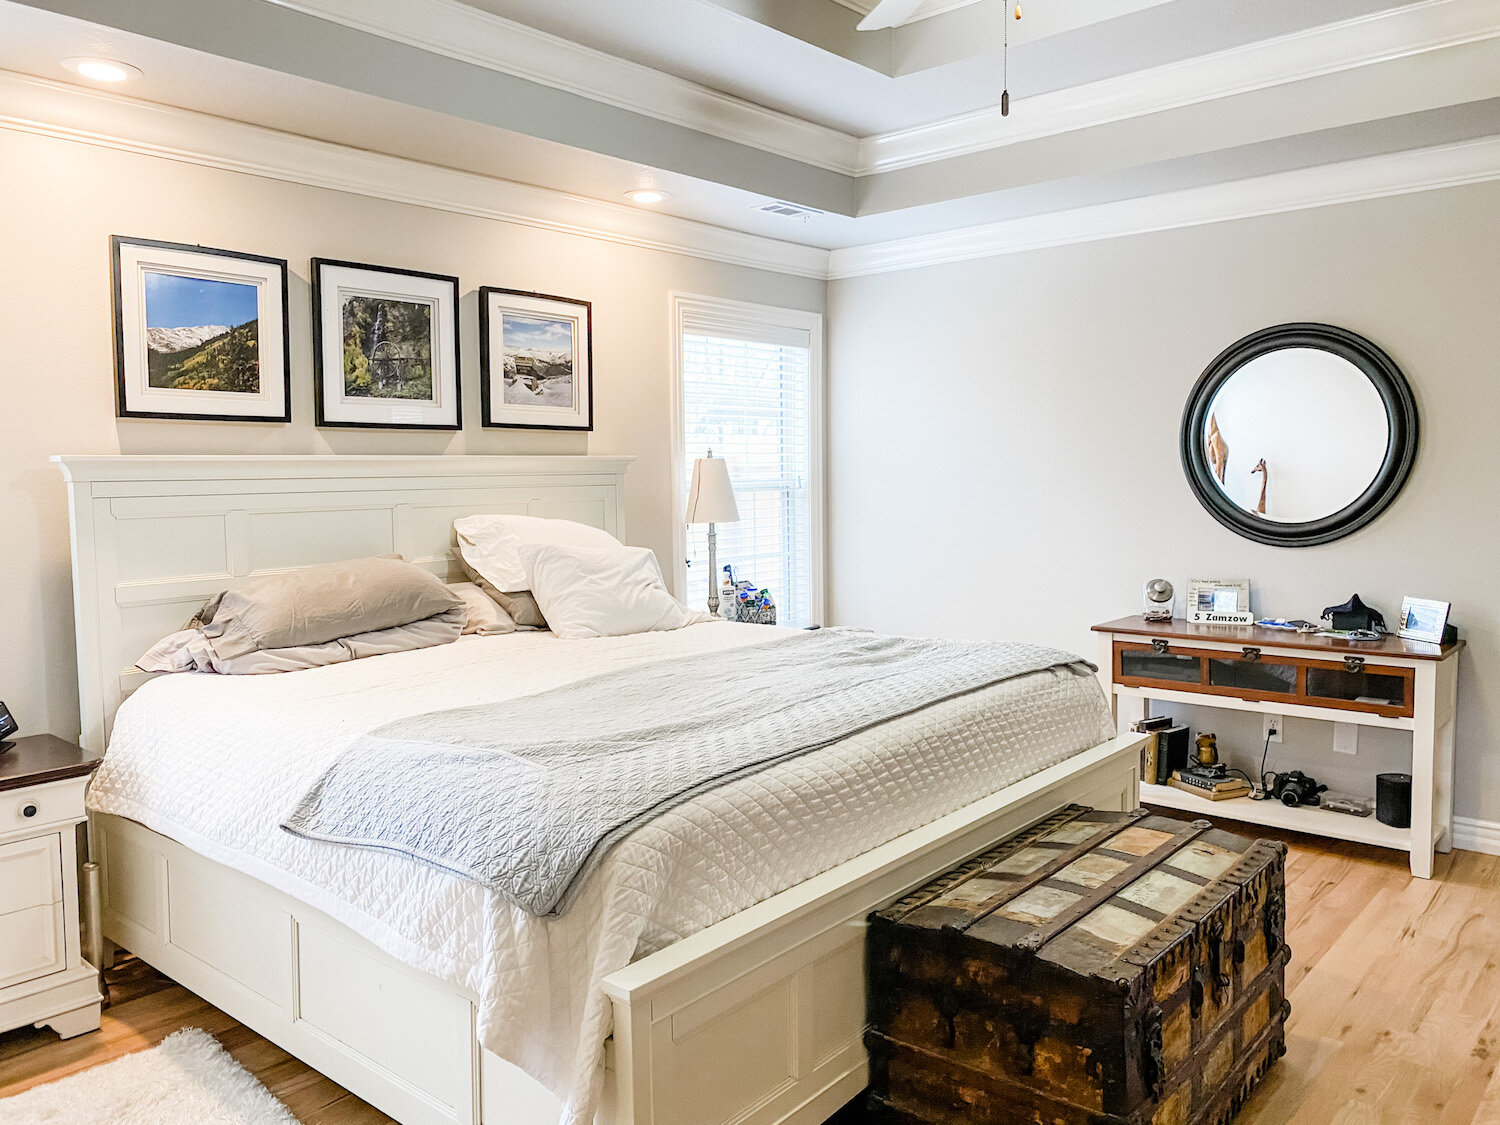
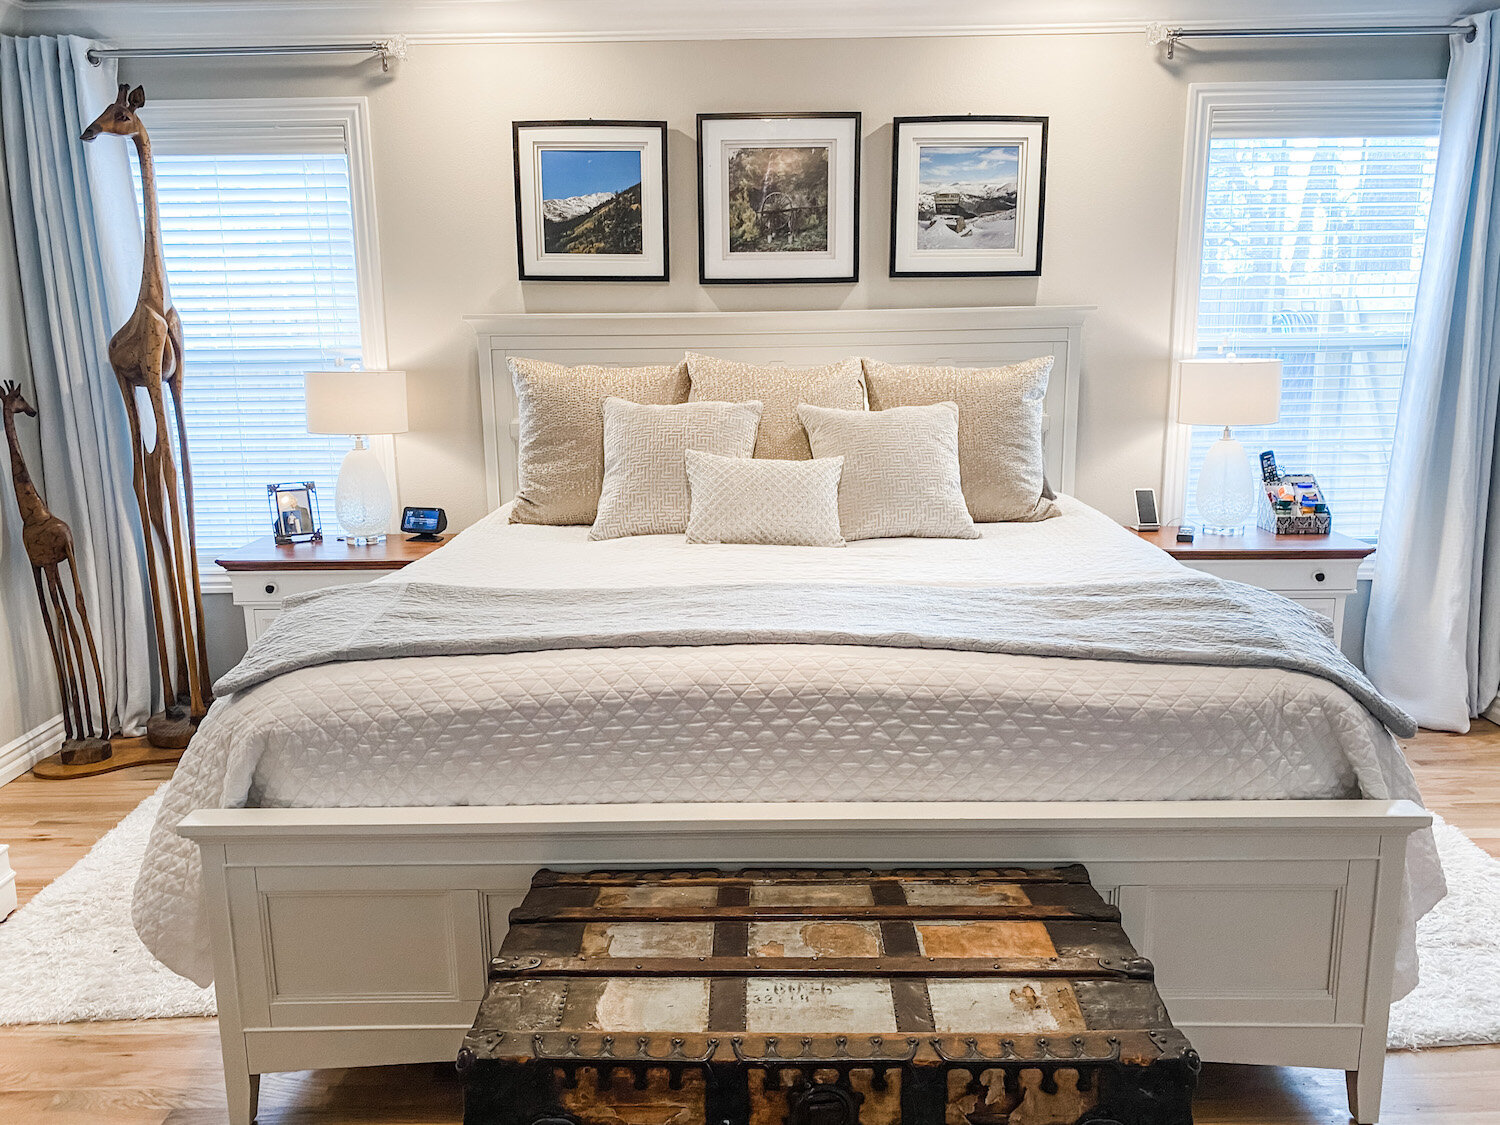
New curtains (I still need to hem them), a little wall art and a plant and new throw pillows.

IMG_1315.JPG

I stuck with my tried and true white bedspread…with a big dirty dog I need something I can bleach every week. It covers a down comforter in the cold months.

I have always loved the larger throw pillows in the guest room so I bought new for that room and put the guest pillows on our bed.

IMG_1308.JPG

(The giraffes? They were made in Africa from the root of a tree…they are Brian’s…they are different…what can I say!)

I painted the high boy and bedside tables and stripped and restained the tops of the bedside tables. ..the dark java stain has pretty much run its course. New lamps (finally!!!)

I love the look of chandeliers in bedrooms but as I have said before, I HAVE to have a paddle fan above the bed. Brandon gave us a paddle fan he took out of his house and it worked perfectly in our room.

Decluttering is always a must in any room makeover so a lot of stuff was put away.

One thing I loved in the inspiration room picture was the bed bench. My trunk belonged to my grandparents so it has to stay. You can still see my granddad’s name stenciled on the side.

I love the basket and pillows on their bench but our big dog uses this trunk as a spring board so that wouldn’t have worked out well. Sometimes you have to change up a plan to fit YOUR life-style (a.k.a. accommodate animals and kids!)

I still want to do more on the “tv side” of the room. I repainted and stripped and stained the top of THIS little side table…

Maybe add a plant…a little more wall art….a wall leaning mirror.

IMG_1306.jpg

It only took me a few decades to style the master bedroom in my last house so again, already working at warp speed here.

My next big project are the master bathroom (reveal HERE) windows…

Oh, it’s happening. I cut big holes in the wall to kind of “force the issue.” Windows are on order and the brick guy is on call.

This was the one thing I neglected to do, and my BIGGEST regret, when I remodeled this house…no operable windows in the master bath. I know from my last house that an operable window in the bathroom is a must. I have ordered two casement windows (the kind that crank out) and hope to have them by the end of the month. I have some plumbing to move (WHY IS NOTHING EASY!!!) and framing to do. These windows will look out at the large flower garden out back…I CAN’T WAIT!!!!

Wait I will though…it has been warm enough to plant a few larger perennials like azaleas and Kimberly ferns, but the threat of a freeze until mid-April prevents me from going all out with the annuals. So I sit…and wait…patiently. Okay, not so patient, but I learned the hard way not to rush the early spring planting! Pay attention to your “last freeze date”….then add a few weeks. Ours is the middle of April, but a few years ago it snowed the first week of May!

Until next week…

A few MCM makeovers and a life decision...

Again, I am a baaaad blogger. I jump head-long into a project and fail to take “before” pictures.

Prime example…

No “before” picture. It was in similar condition to THIS dresser…reeeeally bad. But of course I have no proof of that. Just take my word for it…again.

The entire piece was originally the old “natural” finish with a lot of “wear and tear.” I primed and painted the six side drawers and cabinet and stripped and oiled the top and middle drawers.

I absolutely love the wood handle “hardware” and the super nifty black concave and brass hardware. I sprayed the little concave pieces with metal primer and black paint.

The top had some chipped veneer. I originally planned to paint the top so I could repair these areas, but I just can’t resist beautiful walnut…even veneer. So I did what I often do…I just let it be what it is…an older piece with a few blemishes. You can buy replacement strips of veneer…but I would rather have flawed original…just a personal preference!

I did take a before picture of this piece….

I love the brass hardware on these pieces…again, the way to tell if it is solid brass is to use a magnet. A magnet will not stick to solid brass. Important because in order to clean these pieces I have to really scrub them with steel wool. No secret to cleaning brass hardware…lots of Brasso, steel wool and elbow grease!

Now…on to my “life decision.”

I have decided to stop doing the whole “auction/flea booth/resale” thing. I love doing what I do but doing it to “pay the rent” has become tiresome. I am just not enjoying it the way I use to.

So this past week I gave my notice at 410 Vintage and I went on a major “purgefest” in my garage (aka shop). I sold a lot of stuff on Facebook Marketplace, I donated a truck load to our local community thrift store and I took a truck load to the dumpster.

I have a friend who opened an awesome little consignment/flea market (Gathered Goods) so I took a few things to her to sell on consignment.

My garage has been a disaster for some time.

I painted the walls and cleaned all the shelving and cabinets!

I installed a Rubbermaid track system for large items….

…and we installed a nifty metal peg board system for all our tools. I knew where all my tools were but no one else could really figure out where anything was.

I even gave the door between the garage and laundry room a fresh coat of paint.

I am not “retiring” completely. I will still refinish and rehab pieces…I just won’t have to go looking for projects. If I find a project I want to work on, I can always take it to Darlene at Gathered Goods.

So fear not…I will always have a project to share here…and of course there are always my enlightened “muse” posts.

A simple "before" and "after"....

A simple and inexpensive makeover.

Before….

After….

A little homemade chalk paint….5 tablespoons of Plaster of Paris and 3 tablespoons of water, mixed well. Add 2 cups of latex paint. Two coats…a little distressing…sealed with polycrylic.

The hardware wasn’t anything special…I primed it with metal primer and hit it with some blue spray paint I had on hand…could have been black, teal, white…whatever…not sure I am loving the navy but it would be easy to change it!

Simple, inexpensive…but oh so much better!

Remember, LIFE IS TOO SHORT TO LIVE WITH UGLY FURNITURE!!! YOU CAN DO IT!

Just ANOTHER makeover!!!

A few weeks ago I promised to share some of these makeovers….

I shared the details of this one….

here….

It sold in a couple of days!

This chest was a mess…

It is solid wood and pretty sturdy. A few of the drawer tracks needed some minor repairs but all in all it was a decent piece…just super ick.

Again, I have to have my “wood fix.” Since the drawer fronts were solid wood, I decided to use gel stain on them.

First I removed all the old hardware and gave the entire piece a good cleaning with a mild detergent.

There is no need to remove the old finish when using gel stain…maybe a light sanding to remove any boogers and dull the shine on the existing finish.

I ONLY use General Finishes brand gel stain. I applied three LIGHT coats with an athletic sock over a rubber glove, allowing each coat to dry overnight. The first coat will look like crud, the second will look a tad better, the third coat looks awesome. I sprayed on polycrylic to seal them. General Finishes has a wipe-on poly and it is pretty awesome…but I had polycrylic on hand so that is what I used.

I sprayed the “cabinet” with Kilz, sand, tack and latex paint (KSTP). I ALWAYS use an additive with paints I am going to roll and brush…Flotroel for latex.

New hardware…and PRESTO….

Another piece saved from the clutches of ugly and dated!
I share these makeovers to remind you….IT’S NOT HARD to take dated, ugly furniture and turn it into something you will be proud to have in your home.

Life is too short to live with ugly furniture!

Another antique chest makeover...

I promised last week to share all the dresser and chest of drawer makeovers I have been working on. This time of the year it is tough to get a lot of work done over several days because of the temperatures…fortunately this dresser was one I could work on inside.

Takes a little “strategizing” to figure out what I need to do outside on warm days and what can be done inside on cold days.

I knew I was going to paint the cabinet so I managed to get it (and a few others) Kilzed on a warm day. I try to avoid using Kilz inside because it is SUPER stinky…and I like to use the spray kilz on smaller pieces and that can’t be done inside. Sanding and wiping with tack cloth can be done when it is a tad colder so no biggy. I had to strip the drawers and top outside, but that can be done in the cold as well. I was able to bring everything inside to oil the drawers and top and paint the cabinet!

Again, this one didn’t need any major repairs…the only real boo-boo was one missing handle. This hardware was one of the most unique I had ever seen….not only the style but the fact that it was installed “vertically” vs. “horizontally.” Different…I like…so I was determined to use as much of the original hardware as I could.

I removed all the hardware. First I primed them with “metal primer” then I sprayed them with black lacquer.

Since one of the handles was missing and I knew there was NO way I was going to find a replacement, I decided to remove the handles on the top two drawers and replace them with knobs.

That meant the holes in the top drawers had to be puttied…and there is no good way to “disguise” putty holes without painting…but the wood on these drawer fronts was so pretty I really didn’t want to paint them!

The drawer on the right has been stripped…the drawer on the left has not. I just love how “clear and clean” the wood looks after removing the old finish (I used THIS process! Super easy!)

I decided the best way to disguise the puttied holes was to paint a stripe down the drawer fronts. I did this BEFORE applying the tung oil finish.

The stripe needed to be pristine…absolutely NO bleed through…and we all know how tough that is! I read a few tutorials on preventing that…some suggested using modge-podge…one suggested using caulk. I went with the caulk suggestion and it worked like a charm.

I used blue painter’s tape to tape off my stripes, then I ran clear LATEX (NOT silicone) caulk along the edges of the tape….

Then I used my finger to “mash” the caulk along the edge of the tape and wipe off any excess. WORKED LIKE A CHARM! Zero bleed through! I used clear caulk so any caulk that bleed through didn’t show!

I painted the stripes and cabinet. I used a grey latex I had on hand. I added Floetrol…ALWAYS add a paint additive…Penetrol for oil based paints, Floetrol for latex. I use a 4”foam roller and a high quality brush to minimize brush strokes and roller marks. And again, always apply 2-3 LIGHT coats to avoid drips and runs. I oiled the drawer fronts and top with 3 coats of tung oil finish (sand and tack between coats), drilled new holes for the knobs and reattached all the hardware and PRESTO!

Cute as a bug’s ear and super simple!

I just love bringing these pieces back to life!!!!

Just another little makeover....

You are probably asking yourself “WHY?”

Why would she even mess with something so hideous?

Because I knew I could make them pretty…that’s why!!!

Truthfully these pieces didn’t have a lot going for them…but what drew me to them was the really cool hardware and they are pretty sturdy. Ugly, but sturdy!

The hardware is obviously “reproduction”…made to look like the hardware of years gone by.

They aren’t REAL flush mount ring pulls, but they are real brass so I knew with a little scrubbing, they would shine right up!

The top…fake leather…ewww!

But it was in good shape!

The front of the cabinet and drawers were solid wood but the sides were particle board…and it had some minor “water issues.” Some of the particle board had started chipping and “bubbling.”

Rather than use wood filler I decided to add a little trim piece to the bottom. Glue and trim nails…simple!

The trim covered the chipped areas and beefed up the base a tad. The minor “bubbling” on the particle board sanded smooth.

The bottom of the drawers had that “fake print” thing going on but they were in great condition. Ugly, but solid and sturdy.

I decided to disguise the “cheaponess” with paint.

First I removed all the hardware and spend a few hours scrubbing it. Again, I have no deep dark secrets for easily removing years of tarnish on brass. SOS pad and brass cleaner…and a lot of elbow grease!

I Kilzed the entire dresser…even inside the drawers.

Sanded everything smooth.

Tack cloth…always!!!!

I painted the inside and sides of the drawers with a sample pot of latex navy blue paint. (I recommend priming and painting the inside of drawers if they are “cheapos” or if you can’t remove offensive smells with a good cleaning and vinegar!)

Again, I am kind of obsessed with the white lacquer finishes especially with bright brass hardware.

The repaired sides painted beautifully!

Told you I could make them pretty!

Remember the MCM chest of drawers I featured here? I finally got the brass cone hardware from China…worth the wait!

A mid century chest of drawers makeover...the reveal!

When last we spoke, I shared a little “step by step” tutorial for repairing and prepping this “less-than-desirable” chest….

I can not stress enough the importance of “prep work” on any project. Again, if you don’t take the time to make repairs and properly prep (regardless of whether it is a dresser or a wall or a floor) all the “pretty” is going to be wasted.

(BTW, while cruising Pinterest I found this super awesome tutorial for repairing chipped corners with wood filler! Great suggestions!)

Make proper repairs, sand patches smooth, use the right tools and materials! Do the repairs and prep or you are wasting your time and resources making it pretty.

After all the patching and repairs, the next step is properly priming! (I had already stripped and oiled the drawers and set them aside!)

I primed the cabinet of the chest with Kilz. That is usually my go-to primer since it sands smooth and holds up well. Primer is a SUPER important step on most paint projects…unless you are chalk painting! Since this was a relatively small project I used the spray Kilz…one can.

TIP: I know a lot of paints SAY they are a “paint and primer” in one…I may eventually change my tune but I don’t believe them. I ALWAYS use a primer…always!

After the Kilz had dried well (usually overnight but several days is best), I sanded it smooth with 220 grit paper.

After sanding I checked all the areas I had repaired…there were a few little spots that needed additional putty and one I missed on the first go round…

…no biggy….I just filled them again, let it dry, sanded smooth, spritzed on a little more primer and then sanded it again after that had dried.

Tack cloth…it is an absolute necessity on any paint job. I see tutorials all the time that recommend wiping the piece with a damp cloth or even mineral spirits. Forget about it! USE TACK CLOTH! It will pick up the finest grains of whatever and will make a huge difference in the final look and feel of your paint job!

I’m kind of obsessed with white lacquer these days. i just love the high gloss finish. Spray paint is always a great option for smaller projects and you can find a multitude of colors and sheens! Just make sure you use a quality brand! You can also brush and/or roll alkyd (oil based) or latex (water based) paint. ALWAYS use an additive and use a high quality brush and 4” foam roller to apply the paint. Pay attention to the manufactures recommendation for temperature and application…it matters!

Regardless of whether you use a spray paint or lacquer, latex or oil, always apply 2-3 THIN coats, allowing dry time as recommended. Thinner is better. If you try to get a one coat finish, you will likely be disappointed and make a HUGE mess!

Spray, roll, and/or brush on the paint…a thin coat…let it properly dry, lightly sand the boogers AFTER it has properly dried with a fine grit paper (IF needed), tack and recoat. Regardless of whether you need to sand between coats, always use tack cloth before applying additional coats. I usually apply at least two coats and sometimes three.

Most paints do not need a top coat but if your piece will be getting a lot of use, I recommend a light coat of polycrylic. Polyurethane is some good stuff but it tends to “yellow” so polycrylic works great.

So…before….

…and the oh-so-better after….

You may have noticed one little missing element. The hardware! Why? Well because I didn’t pay attention when I ordered new brass cone knobs and they are coming from CHINA!!! So I should have them someday…maybe…who knows! The hard work is done…knobs are no biggy!

One of the patched areas after paint…

Dry time…IT MATTERS. I cringe when I watch DIY shows and they immediately stage all the pretty pieces they just painted. There is a huge difference between “dry to touch” and “dry to USE.” Truth is, paint and finishes need time to cure before you put all your pretties on it. You can move it in place, but give latex paint AT LEAST a week or two to cure and oil based paints a good 3-4 weeks. Otherwise you may find that your heavy lamp or knick-knacks will stick to the finish or leave a mark!

This is another dresser I finished up a few weeks ago. It didn’t have near the issues the first had, but the refinish process was the same…KSTP the cabinet and refinish the drawer fronts…presto-bingo…

Again, I know this sounds like a daunting and time consuming task…but if you take the time to do it right, you will have a piece that will last another lifetime and one you will be proud to use in your home!

Next week I hope to share my bathroom remodel. In the meantime, you can check out Cristina’s master bath…it will knock your socks off!

Until then….

A new bar top and Wayfair light fixture...

As I mentioned here, change is tough for me...which is why these things haven't changed much in 19 years.

I painted the dining room light years ago (antique bronze to black)...as much as I really didn't love the actual fixture, I loved what I could do with it during the holidays....

One year I removed the little shades and I liked that a bit better, but I still wasn't digging the light fixture itself.

Just too ornate and "heavy."

But I could never find one that would allow me to decorate it for the seasons...until I did!

(As you can see, I still have the Drexel buffet...love the piece...just not the color...waiting on "inspiration.")

The install was super simple...here I share how to install a new light fixture!

Not a huge fan of the Edison bulbs, but I think those can easily be changed out...eventually. For now I can live with them knowing that come fall (right around the corner...yea!) and Christmas, I can still decorate the fixture!

I think it is more of a "farmhouse" look but the nickel accents tie in with the more "modern style" brushed nickel bar lights. So it works for me....

Which brings me to the bar top....

...it wasn't totally offensive, but in my quest to go "light and bright" in my kitchen without painting all my kitchen cabinets, I impulsively ordered a white quartz top.

Truth is, I wasn't really loving it after it was installed. Just too "stark" and soooo white! 

I painted the little support corbels the same color as the trim...more "white." (They were originally black but since I didn't damage them when I removed the old top I just primed them and painted them with the trim paint...BM Swiss Coffee.)

This is what we refer to in the design world as "OMGosh what have I done" moments.

I decided what was really bugging me was the dingy old bar stool seats. They had certainly seen their better days. The bar stools are 18 years old and I still love the style dearly...heavy iron and super sturdy...but the "grey tweed" upholstery just didn't cut it any more!

Choosing fabrics is something I really struggle with...but I know I LOVE the fabric I used on this little chair makeover

Light and bright with just a touch of grey! So I ran out and bought enough fabric to recover the bar stool seats. About 1 1/2 yards for four seat cushions. If you don't know how to figure for fabric, take your measurements with you and they will help you figure it...just make sure you add 2" on each side! (Or better yet, just take a seat with you!)

Pay CLOSE attention to the direction of the fabric. This fabric doesn't APPEAR to have a "right or wrong" way, but it does. I put a pin in the top of each piece so I would know which way to lay the fabric on the seats!

Reupholstering chair seats is a super easy DIY project...probably one of the simplest DIY projects one can tackle! And this easy little project is an excellent way to make a pretty dramatic change in any room without breaking the bank or dragging out the sewing machine! There are thousands of great tutorials online...so again, do your research and find one that makes sense to you and use it!

In this case I had no desire to paint the stools...I like the black iron...but if you want to paint a dining chair or stool, do it after you have removed the seats but BEFORE reattach them. Again, super simple project! Use the KSTP method (kilz, sand, tack, paint...here is a pretty good paint tutorial.)

I removed the seat cushions! In this case, 4 little screws! I also scrubbed down the stools...pretty nasty after 18 years of use!

Then it was just a matter of wrapping the seats with the new fabric...I didn't even remove the old fabric or bother with applying a new underside....and reattaching them.

I guess that might be an issue if you are laying on the floor looking up at the underside.

Here I do share a few helpful tips on upholstering...pretty much applies to the simplest project!

While I had the camera out I played around with a few different "centerpieces" for the bar with knick-knacks I had on hand...

But honestly, with mischievous cats who insist on knocking everything off the bar, we are better off leaving it clutter free! Same with the dining table...too many broken vases and scattered flowers!

A few relatively minor decor changes that made a subtle but significant difference! 

Simple "before and afters"...

Some of the simplest "befores" turn out to be my favorite "afters."

Which explains why I often don't have decent "before" pictures...I think "oh, that's no biggy" and dive right in to giving them a simple little makeover. Then they turn out so stinking cute I wonder why I didn't take time to take "before" pictures.

They are a reminder of why do this blog...to show you how easy it is to take a simple, boring, out-dated, dark piece of furniture and turn it into something you will want in your home rather than in your yard at the next garage sale!

We DIYers live for those hidden treasures...pieces of furniture that people want to get rid of... they drop them at their local thrift store or sell them for pennies in garage sales or just set them out on the curb...we take them home, clean them up and work a little DIY magic. 

The worst...you live with the ugly, dark furniture because you can't afford to replace it!

I get it...you paid a small fortune for your "matchy-matchy" bedroom furniture so you can't bring yourself to get rid of it.

I've shared "makeovers" hundreds of time...too many times to link ALL the pieces I have "upcycled" over the years. But I would bet money you still have a few pieces lurking around your house that serve a purpose or are "family heirlooms" or you paid too much to get rid of it...so you just live with it.

Don't fret...take the plunge...buy some primer and some paint AND CHANGE IT!

LIFE IS TOO SHORT TO LIVE WITH UGLY FURNITURE!

This shelf was your typical Target cheapo...dark finish...no I did not take a picture of it "before." Honestly, I think it was a piece someone left at the apartments so I loaded it up and brought it home.

I removed the back panels...primed and painted the frame and shelves with one of my "sample" pots of white (KSTP). I painted the back panels with a sample pot of teal and then reattached them.

Super simple and too stinking cute!

This little bedside table came with a set I bought at an auction. Someone bought the dresser, chest and bed but didn't want this little table.

Meh....

Simple makeover! I removed the drawer and simply brightened it up with some Restorafinish. I primed the cabinet, sand, tack and white gloss paint. It was missing a knob so I ordered two new ones...

....again, SUPER SIMPLE and so stinking cute!

This old oak dresser...the finish and the little applique' really dated the piece.

I popped off the appliques using a chisel...lift carefully...chances are they are applied with a little bit of glue and a few tiny nails.

... sanded the old glue, stained the top with gel stain (no need to strip the old finish) and chalked painted the rest of it....distressed and sealed the whole thing with poly...

Too stinking cute!

Simple...simple...simple! 

Nothing earth shattering on any of the pieces...just super simple little makeovers that updated the pieces and gave them new life! 

Walk around your house...what simple little piece can you haul out to the garage and work a little "DIY magic." Trust me...if you don't like it when you are done, you won't get any less for it at a garage sale!