Another campaign dresser makeover!

If I find one, I'm gonna buy it! A campaign dresser!

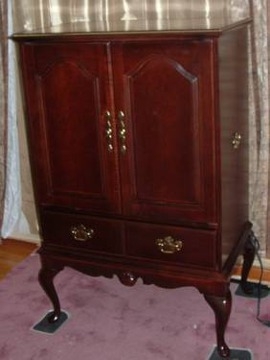
This one isn't a "vintage" campaign dresser...probably an imitation but sweet all the same! Well...it wasn't when I bought it....

Structurally it was in great shape but the finish was definitely lacking. A little KSTP (Kilz, sand, tack and paint...high gloss white lacquer), scrubbed up the brass hardware, and presto....

Again, this one wasn't a REAL vintage campaign dresser...but that didn't stop someone from buying it 1 hour after taking it to 410 Vintage.

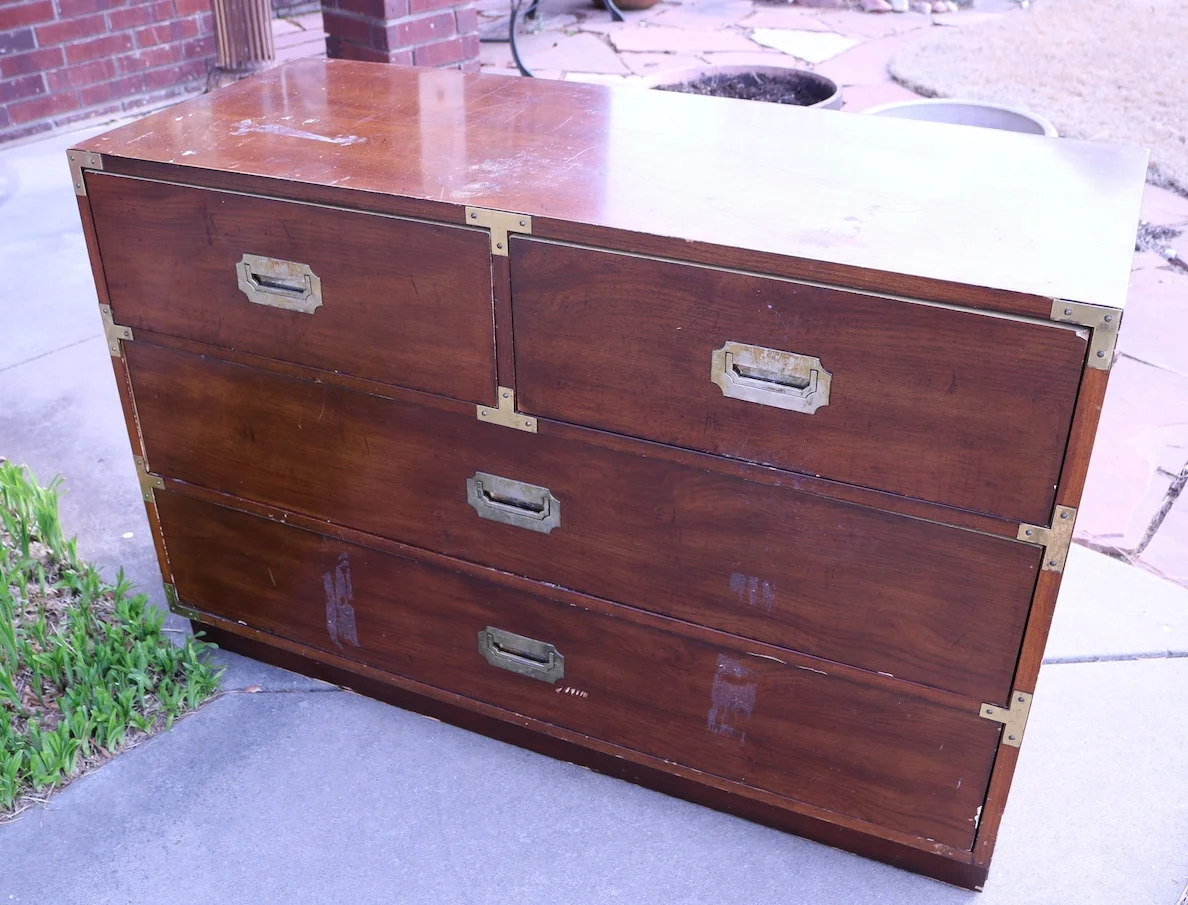
This, my friends, is a REAL campaign dresser!!

I have already scrubbed up the brass hardware (no tricks there...Brasso, Brillo and A LOT of elbow grease.) I had to order a few replacement hardware pieces...holy cow those little brass doo-dads are expensive (found them on Etsy.) I sprayed on Kilz and sanded it down. Now I just need to apply a few coats of white lacquer...I can't wait! I will make sure I share it when it is done because I know it will be beautiful!

PORCH MINI-MAKEOVER....

Now that Matt has settled into his new house, we have started on a few little projects that make his home a little bit more...well..."him." (If you search "Matt's house" on this site you can will see several of the projects we have worked on!)

The back yard was a total disaster...lots of trees and years of neglect. I wish we had been smart enough to take before and after pictures of the side yard we have been working on. We added a few flower beds, raked up a truck load of rocks and brought in four truck loads of dirt and mulch. We seeded with fescue. I know it will probably burn up this summer but he was so excited to see the little guys sprouting! We dug up some of my neighbor's lirope and transplanted it in his new flower bed....repurposed the stones that were originally used as a "pad" to make a stepping stone path....a new little Japanese maple. I think it will all be wonderful when he is finished. My yard is an oasis...I have remind him it took 19 years of hard work to get it that way!

The back patio was a tad on the blah side. I did remember to snap a few pictures with my Iphone before we added just a few little touches.

We changed out the flush mount "boob" light for a pendant light...seriously, who puts a dinky flush mount light on a vaulted ceiling?

Threw down a pretty striped rug and added a potted palm and hanging basket. Nothing earth shatter but just a few simple touches to dress the space a bit!

He still needs to change out the seat cushions and eventually I would like to add a baker's rack or build a potting bench...maybe add some kind of wall decor on the wall! We could paint the wood railing but he is determined to eventually add a large deck off the patio so no sense in putting out the effort for the time being!

A few little touches here and there can add personality and style to a space.

It takes time to make a house your home... 

Just ANOTHER mid century dresser!

I can't help myself...when I see one, I just gotta have it!!!

A mid century bedroom set...Fashion Trend by Johnson Carper. I couldn't find a maker's mark anywhere on the set so I googled "mid century dresser" and found a picture of one like it!

(Look at the curves on this lady!)

I ended up having to buy the entire set at an auction...dresser, chest of drawers and full size bed frame. I sold the chest to off set the cost of the dresser...which is the piece I really wanted! I have a full size bed in  Mitchell's room so I might use the bed frame in there.

I decided not to strip and oil the drawers...they really are in excellent condition....I wiped them down with Restor-a-finish just to clean and brighten a bit. I painted the "box" (KSTP...high gloss white) only because the top was laminate... I did that with Matt's dresser and I love how it turned out!

My original plan was to put the new dresser in the guest room until I get this one back from Katie in a year or so...

But then I got to thinking...why would I hide a beautiful piece like this in a guest room? 

So I took the dresser out of my room and put it in the guest room and put the new one in my room!

LOVE!!!

The only other thing I have added to my "proper" guest room is this little rattan table (bought two and sold one) and the magazine rack from the living room. 

Again, you will not find AFFORDABLE new furniture that is built as well and with woods like walnut, teak, rosewood and mahogany! There is a reason vintage and antique furniture have managed to survive decades of use!

When I walk around my house and look at some of the beautiful vintage pieces I have collected I am amazed at just how little I have paid for them. Keep in mind MOST were in much need of a little care and attention but if you are willing to roll up your sleeves and do the work, you can create a home filled with beautiful pieces too! 

That is why I have this blog...to show you just how easy it can be!!!

Stop drooling and start doing!!!

Cherry tv cabinet makeover....

I've said it before...I am a bad blogger and mediocre photographer at best.

Bad because I often get in such a hurry to start a project I completely forget to take a "before" picture. Mediocre photographer because...well, my photos speak for themselves.

As is the case of this Queen Anne Cherry tv cabinet. Hello 1998! 

No, I did not take a "before" picture. So I did a little google search and found a cabinet that was SIMILAR to the one I acquired from my neighbor. Color and style are the same, but mine does not have a drawer. 

We have all seen this furniture style...many of us still have it in our homes! I had similar bedroom furniture...not the Queen Anne style, but heavy and dark. I painted my bedroom furniture a few years ago and honestly I don't give it a second thought these days!! In other words, update the outdated and you may stop feeling the need to spend thousands on new!

There are several problems with this tv cabinet. First, who still uses these cabinets for housing tvs? Most of us have transitioned to flat screens...I finally pitched my last hold out a few years ago. 

Second...it is dark and "heavy" looking. Not really the in thing right now.

But they are still good solid pieces that have use and purpose. Maybe not for their original intent, but who couldn't use more storage! 

It is super simple to give these pieces a little update. I know most will not want this piece for a tv cabinet but everyone is looking for storage pieces for crafts, linens or even clothing. Honestly, it could be used in a kitchen for pantry space or a bathroom for towels and such!

Again, it just needs a little facelift.

I removed the back...super simple since they are usually just stapled on.

I added a new shelf then primed the inside of the cabinet with Kilz, sanded, tacked and spray painted it with white paint (KTSP!)

I used bead board to make a new back to add a little "interest." I used THIS process to "stain" it. Normally I would use an accent color but this time I used the same latex paint I mixed up as chalk paint for the exterior.

Making your own chalk paint is super simple...thoroughly mix 3 tablespoons of water and 5 tablespoons of Plaster of Paris and then add 2 cups of FLAT latex paint. You can use satin or eggshell paint but I have found that the flat tends to "chalk" better when you sand.

Sand and seal! Again I never use wax on chalk paint...usually polyurethane or polycrylic. If you want the added character that you get with dark wax, try applying a dark "glaze" before you seal. Personally, I think you get the same affect without having to use wax. I have even used stain as a "glaze"...this mirror being a good example.

Finally, I added simple knobs.

Sealing the piece with poly makes it super simple to repaint when the "distressed" craze ends...and trust me it will eventually! 

Some of us remember when this dark "cherry" look was all the rage...

Another mid century dresser...

I love vintage mid century furniture! Love it. The style is my absolute favorite to refinish and as I have said before, I try to infuse as many pieces as I can into each room. Beautiful wood...clean lines...sturdy as the day it was built!

These are just a few of the dressers and chests I have refinished over the years...

Here....

Here....

Thank goodness my kids have inherited my passion for this style of furniture...because when I found this awesome dresser and matching chest on Craigslist, Matt had no problem taking them off my hands (AFTER I had worked a little makeover magic on them!)

As you can see I couldn't wait to start stripping the old finish before I remembered to get the camera.  And the finish on this sucker...it was a booger! Usually my 1/2 and 1/2 mixture melts old finish right off! I dang near had to blast this stuff off...I finally had to break out the heavy duty stripper and break my cardinal rule against sanding veneer (DO NOT attempt to sand veneer unless you have some serious experience.)

The top is laminate so I decided to paint the cabinet and refinish the drawers and legs....

Stripped and oiled the drawer fronts and legs...KSTP the cabinet and tops...drum roll....

I usually add a piece of protective glass on painted dressers...just to be on the safe side!

I love these pieces...and they are perfect for Matt's new home. He is using the dresser in his master bedroom and the chest in his guest room! Because these pieces were so well built, they will last another life-time!

I have several projects in Matt's house to share! He has already started "projecting" and I try to sneak in and take pictures when I can! So stay tuned for a cute little breakfast table makeover and his updated brick fireplace.

A vintage chair makeover for the new house....

As I have mentioned before, it is important to do research on "vintage" or "antique" pieces before you take a can of spray paint to them...God forbid you find LATER that you have spray painted a potentially valuable piece.

Such was the case with this pathetic little chair....

Someone had painted a true "vintage" piece...a McGuire ratan chair. (At least I THINK someone painted it...I couldn't find any information indicating this chair would have originally been painted)

With a little bit of research I found a listing for this pair on 1stdibs selling for a small fortune!

The prices on 1stdibs and Chairish always seem a bit high for my tastes but I have found both sites to be excellent sources for researching vintage pieces. 

When I first researched this coffee table (Drexel Declaration) I found it on one of these sites for around $1600. And this little cabinet for thousands.

This little chair sat out front of 410 Vintage for several weeks before I decided to tackle it. I wasn't drawn to it because of "what it is" but rather Matt needs a few little accent chairs. Since they sold it to me for $10 I didn't feel too guilty about painting it...the "true value" was pretty much toast in its current condition! 

The strapping on the joints (strictly decorative) is actually leather, but it was all pretty dried out and one was broken...a little hot glue fixed it right up. 

I repaired the broken seat strapping, primed the frame with Kilz, sanded a bit, sprayed it with black satin paint and made new cushions and pillows. I had some foam cushions stored away in my attic from an old couch and a few small pillow forms lying around so the only thing I had to buy was the paint and fabric.

Since Matt is a pilot and we are leaning towards an "aviation" theme in his living room, I thought this fabric choice for the pillows was down right clever...lol! 

Not bad for a small investment.

So now Matt has a defaced "McGuire ratan" accent chair...of little value but perfect for his needs! 

And cute as a bugs ear!

Closing is next week and I can't wait to get started...not sure if I am more excited about Matt buying his first home or getting all this "stuff" I have accumulated out of my house! I have most of the pieces ready to load and go! I am ready to roll out the rugs, set the furniture and hang the pictures. 

In a few weeks I will post a few "project pieces" I have worked on for Matt's house. I can't wait to share what a few bucks and a little time and effort can do.

I blame it all on "Fixer Upper" ...

As I mentioned here, Matt is buying a house so I have been on the hunt for inexpensive pieces he will need. I often remind my children that it took decades for me to accumulate the pieces I have in my own home...so patience!

But I find myself being terribly impatient when it comes to someone else's house. I blame it on "Fixer Upper." A couple walks into their home after 1 hour and it is perfectly decorated and styled and staged...certainly I can do that in 2 months.

HA!!!! 

Maybe if he had an endless budget...but he doesn't so I have to focus on the essentials with a few "froo-froos" thrown in for good measure.

Saturday I scored a "free" sectional couch. It will be an awesome piece if an upholstery cleaner can get all the nastiness and dog hair off of it...for now it is in the storage shed along with patio furniture, garden tools, kitchen stuff I have picked up and of course his "college day" collection.

I do have a garage full of "projects" and a few of those pieces will work beautifully in his new house...IF it will ever stop raining and I can get them all repaired and painted!!! For now it is just a collection of "junk" that is stressing my OCD tendencies.

Actually I pulled a lot of it out into the driveway Monday, went for supplies, and got home just in time to drag it all back into the garage before it got soaked. Curses. 

I worked Monday and Tuesday building and repairing and cleaning...making wood tops, gluing busted drawers, puttying splintered veneer and misplaced hardware holes. All the stuff you can do when it is raining and you can't drag everything out and start assembly line painting.

One piece is a neat little three drawer chest I scored while emptying out one of my apartments....

It certainly had it's issues. Laminate top, busted drawers, splintered veneer, and an AWEFUL finish! 

Number one rule...if it is broke fix it PROPERLY! No sense in "making it pretty" if the veneer is going to continue to peel or the drawers don't function.

I removed all the "loose" veneer, puttied and sanded. I repaired all the drawers. And because I think this would make an awesome bedside table in Matt's new house, I replaced the top with a stained wood top....

I chalk painted and distressed the cabinet with one of the sample pots I bought when I was looking for a wall color for my bedroom. I kilzed and painted the drawer fronts with another sample! Nothing goes to waste!

And of course new hardware.

Again, I think it would make an awesome bedside table but I have a few other little projects up my sleeve Matt may like better. Nice thing about having a room in a vintage market...if he doesn't love it, someone else will! 

Master bedroom makeover Part ?

The chairs have arrived. One element of the master bedroom plan I started several years ago!

The original "plan" for this room was to eventually recover the existing club chairs.

But I decided they were just too big and I'm over the whole "matchy-matchy" thing. I wanted smaller and different...and that is exactly what I got!

So the master bedroom "remodel" that started three years ago when I painted the furniture and continued when we installed the laminate flooring, is still on going. 

I still love the original inspiration colors I chose....

The soothing soft blue, the pop of frosted berry...the two new chairs bring in the soft grey element. Unfortunately that makes the soft off white of the walls appear very yellow.

So NOW I need to paint the walls. I noticed too that I have never painted the fireplace surround with the new whiter trim paint I am now using throughout the house. And the 2001 grossly expensive paddle fans? Not feeling it, so those may get changed out....something not in the original plan.

The two empty frames on the wall? Originally they were dark wood and were hanging vertically in my living room with pictures of my kids in them.

They have been sitting in my garage since I added the new mirror over three years ago.

A little KSTP treatment and they are ready for a new life...as a frame for...? Honestly, I haven't decided...maybe pretty landscape water colors or mirrors. I can't decide. That is one thing I have never been able to do in this room...wall decor! I still have massive empty wall space!

As I mentioned here three years ago, I knew I would need to add length to the curtains...or ignore it. 


I share this only so you will understand that a "room transformation" doesn't always happen over night. Sometimes it can take YEARS and in that time frame, your wants and tastes and desires may change. 

One or two elements at a time...slow and steady...you don't have to do it all at once!

The hardware sets the tone...dresser makeovers!

We have been pretty busy this past month so I haven't been able to go to too many auctions. I was forced to scrounge around on Craigslist and online garage sale sites to find a few pieces to work on..

They did not disappoint!

As usual, I am drawn to the "nobody wants me because I am totally ugly" pieces of furniture.

I like different and unusual.

This chest and side table checked off all the boxes...kinda ugly and unusual.

The ugly part is pretty obvious but they do have nice "bones." Solid and sturdy!

The unusual part was the hardware. I love unusual hardware. Sometimes the hardware dictates what direction I go with a piece.

In this case the heavy black handles pushed me towards blue/gray. A friend asked me what paint color I used. Well, let's see...I had some blue, I threw in some black...too dark, so I added some white. 

So I have no idea what color it is....blue/gray!

They had some detailing so I decided to do a chalk paint and distress treatment. I usually save that for pieces that have good detailing that will "pop" when I distress it. 

Two coats of chalk paint, a little distressing and sealed with poly. The hardware just needed a little cleaning and it was good to go!!!

Hardware can be a booger when it is missing. I picked up a campaign dresser last week and the brass hardware was amazing. The only problem was it was missing one handle and they are next to impossible to replace.

I really wanted to stay "true" to the style of this dresser...a mid century campaign. But the old finish was pretty dark and dated. (did I take a before picture like a good blogger...um...no!) 

Very similar to this little side table I recently refinished. 

I decide to shine up the brass hardware and give the piece a sleek new look with gloss white paint.

The missing handle, however, posed a real challenge!

I knew I was going to have to scale back to one handle on each of the top drawers but I couldn't just patch little screw holes because the handles actually "inset" into the face of the drawer. 

The thickness of the hardware was 1/4"...so I bought 1/4" pieces of craft board....

....cut out a hole big enough for the hardware to sit in and then attached the boards to the face of the drawers with wood glue to cover the existing cut outs! 

KSTP (Kilz, sand, tack and paint!) treatment, reinstalled the spiffed up hardware and.....

Perfect! Obviously someone else thought it was perfect because it sold the day I took it in!

Until next week....

Oak dresser makeover....

I shared here how I scored a new bed frame for my master bedroom!

I bought the entire set which included a chest of drawers and two nightstands. Since I am not into "matchy-matchy" and didn't need the chest and nightstands, I decided to do something to mask the "timeless" honey oak of the remaining pieces....

Notice the use of "quotes" on "timeless." I have lived long enough to know that NOTHING is timeless. Nothing. Not subway tile, trestle tables or hardwood floors.

Why? Because while they date back decades, there was a time when those now-popular must haves in the decor world were seriously out of favor. Had you bought a house with subway tile and hardwood floors in the 70s, you would have immediately replaced them with wall-to-wall carpet and olive green 4x4 tile. 

Not saying you shouldn't decorate with the times, just don't expect it to be the "in thing" 15 years from now!

Anywho, back to the chest and side table make overs! 

As always I have to have my "stain" fix. Occasionally I will paint an entire piece, but if there is some redeeming wood on a dresser or table, I want that mix of stain and paint. These piece are oak, but the color of the oak was the dated "honey oak." So I used gel stain on the tops and drawer fronts and painted the "cabinet."

Gel stain is super easy to use and allows you to change the color without having to strip the old finish.

I always stain before I paint. Primarily because after the stain and finish cures, you can tape it off to paint!

Again, no stripping or sanding. I have tried every gel stain on the market....General Finishes brand is the ONLY gel stain and finish I would recommend for this process. It comes in a variety of colors and sheens.

First, knock the sheen of the old finish off by lightly sanding with 220 grit paper...you don't need to get it ALL off...just a light sanding (WITH THE GRAIN!), then wipe it all down with a tack cloth. Wipe on the first coat of stain with an old athletic sock (I put on a disposable glove first)...let it dry for 24 hours, then wipe on the second coat with a fresh old sock...dry 24 hours...then wipe on the 3rd coat (again, fresh sock).

The first two coats will leave you in a panic...don't. I promise you will have the look you want after three coats.

Keep in mind, it is stain...NOT paint. So don't be heavy handed with it or try to get perfect coverage with the 1st and 2nd coats. Keep it thin and translucent. And ALWAYS wipe with the grain of the wood! After 3 coats of stain, I seal it with the General Finishes wipe-on poly!

If you goof, the stain will easily wipe off with mineral spirits BEFORE you seal it with the poly.

Let the poly cure well, at least 4-5 days before taping it off for paint.

This is what my "assembly line" process looks like when I prime several pieces....

I had four dressers that needed priming. This is also what I call taking a piece to "base neutral." Sometimes I have no idea what color I want to paint a piece until I can get the old crudy finish covered. I prime and sand and then wait for inspiration.

When it was all said and done, the oak dresser and side tables got plain ole' "off white." Classic. 

And of course, new hardware.

Obviously I did something right...the chest of drawers sold immediately. 

If you have a piece that has a "dated" finish, try using gel stain to update the stain color. Every decor needs the warmth of a wood finish...so don't be so quick to slather paint on every piece! 

Until next week....

Drexel Accolade Nightstand makeover....

I cringe when I even think about painting any MCM piece but occasionally I bite the bullet and paint. Painted this MCM dresser and chest and have never regretted it...yet.

These little Drexel Accolade campaign "nightstands" are described as "MCM" but my research shows they are from the 1980s...so at best they are "vintage." (I cringe even more describing anything from the 80s as "vintage" since I graduated from college in the 80s!)

These little tables vary in "value." Originally my intent was to sell both as-is. But one had some serious "splash marks" all over it and as much as I tried I could not get it off. My only option was to completely strip and refinish the piece...or paint. 

Since I am AGAIN working on the final stages of my den makeover, I decided to paint the one with the serious flaws and use it as a side table. I started to strip and stain it, but I really need a painted piece rather than stained....just my preference. I believe it is important to have a balance of paint and natural wood in any decor and in this case the scales tipped toward paint.

(I will remind you to use extreme caution when painting "vintage" or "antique" pieces...do your research and know what you have FIRST! Make an informed decision before you refinish or paint...you don't want to find out later that you slathered paint on a 1796 colonial side table or spray painted a Hans Wegner chair...just watch "Antique Roadshow")

You can use ketchup or lemon based cleaners to clean brass. Just Google!

The brass hardware on these little tables needed some serious attention!

One interesting tidbit I ran across was how to determine if you have solid brass or brass plated...a magnet...magnets won't stick to solid brass...if it sticks, it is plated...interesting. Mine are solid so that determined how "aggressive" I could be cleaning them.

I'm not sure if a "clear coat" was sprayed on this hardware or age had taken a toll (maybe both), but even my 1/2 and 1/2 mixture didn't cut it. In the end I used a toothbrush, 0000 steal wool, a heavy duty brass cleaner and a ton of elbow grease.

Then I gave the entire piece a little KSTP treatment...Kilz, sand, tack cloth and then paint. 

I really like the look of "high gloss" so I went with a high gloss lacquer white...I think the brass really pops against the gloss white and hopefully it will look good with whatever couch I finally set my sights on!

One word of warning I hope all will take seriously...give paint time to "cure." Nothing is more frustrating than spending time and effort making a piece pretty with paint, only to mess it up by putting doo-dads on it too soon! Cure time IS important!!!! 

I cleaned up the other and it may be sold...I may hang onto it for the time being to see if I can use it in the den...but I am not really into "matchy-matchy" so I may not use it...who knows. And besides, that brass is a booger to shine up so I'm not really looking forward to doing that again any time soon!!!

You may notice I have a mix of MCM and "traditional" in my den...and that is honestly how I would describe "my style"....eclectic or maybe "transitional"...a little of this and a little of that. It allows me to add elements I love without having to worry too much about the actual "style" of each piece. 

Until next week....