The Pantry Makeover....

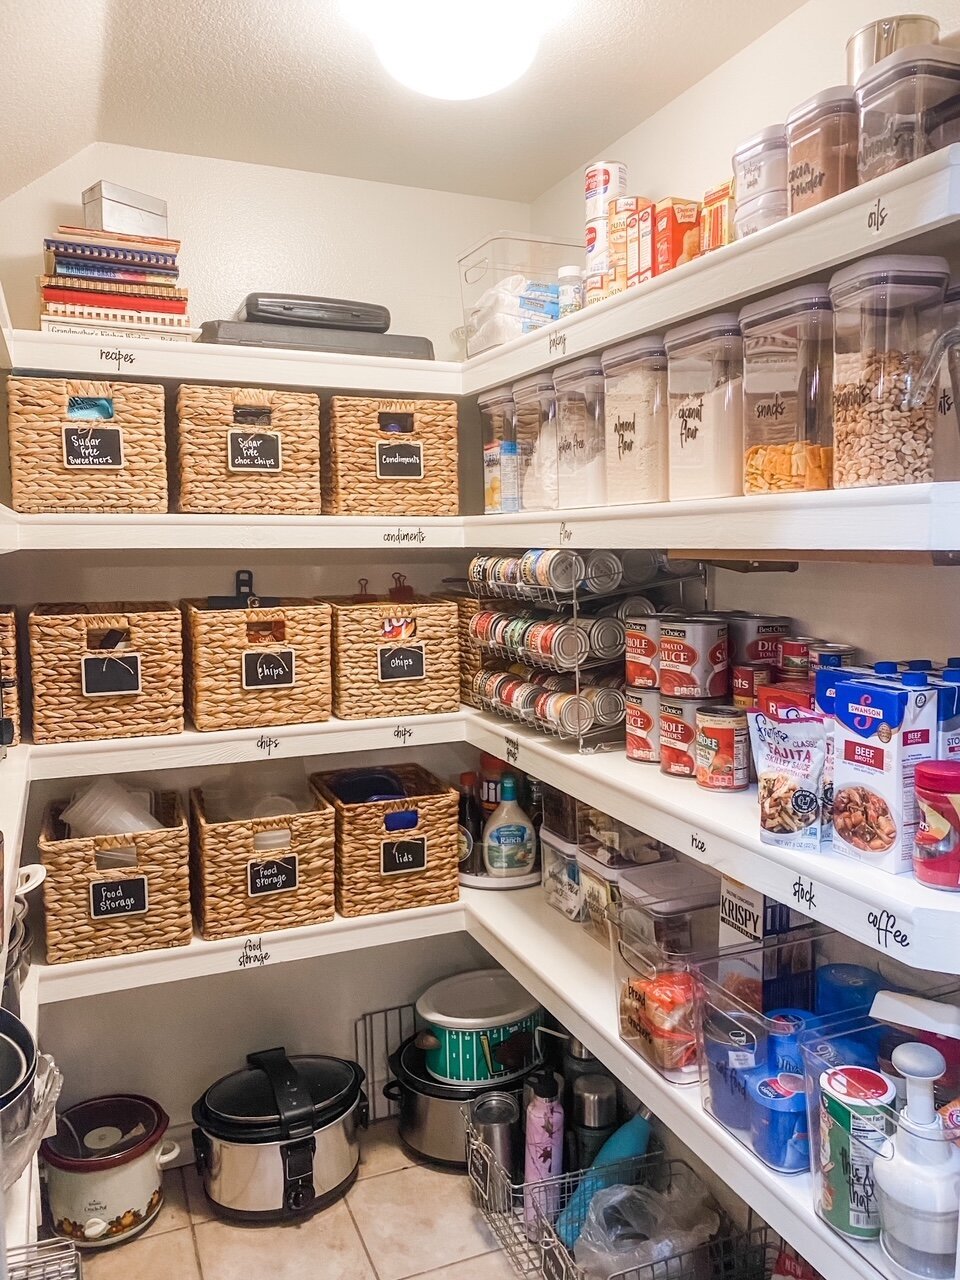
It has only been a little over a year since I “froo-frooed” my kitchen pantry. I love it and have found all the little storage elements I added to be very helpful. I have managed to keep it fairly organized.

After living with this space for a few years, it is time to reconfigure it and install new flooring.

First things first….find my inspiration. Same song, second verse…cruise the blogisphere and Pinterest and see what trips my trigger.

Once I had an idea of what I WANT, it was time to take some measurements and draw everything out on graph paper…inspiration + space = ”the plan.” Drawing the space to scale gives me the ability to play around with the elements I think I want on paper before I start sawing and nailing. It also gives me important measurements for cabinets, flooring and shelf material.

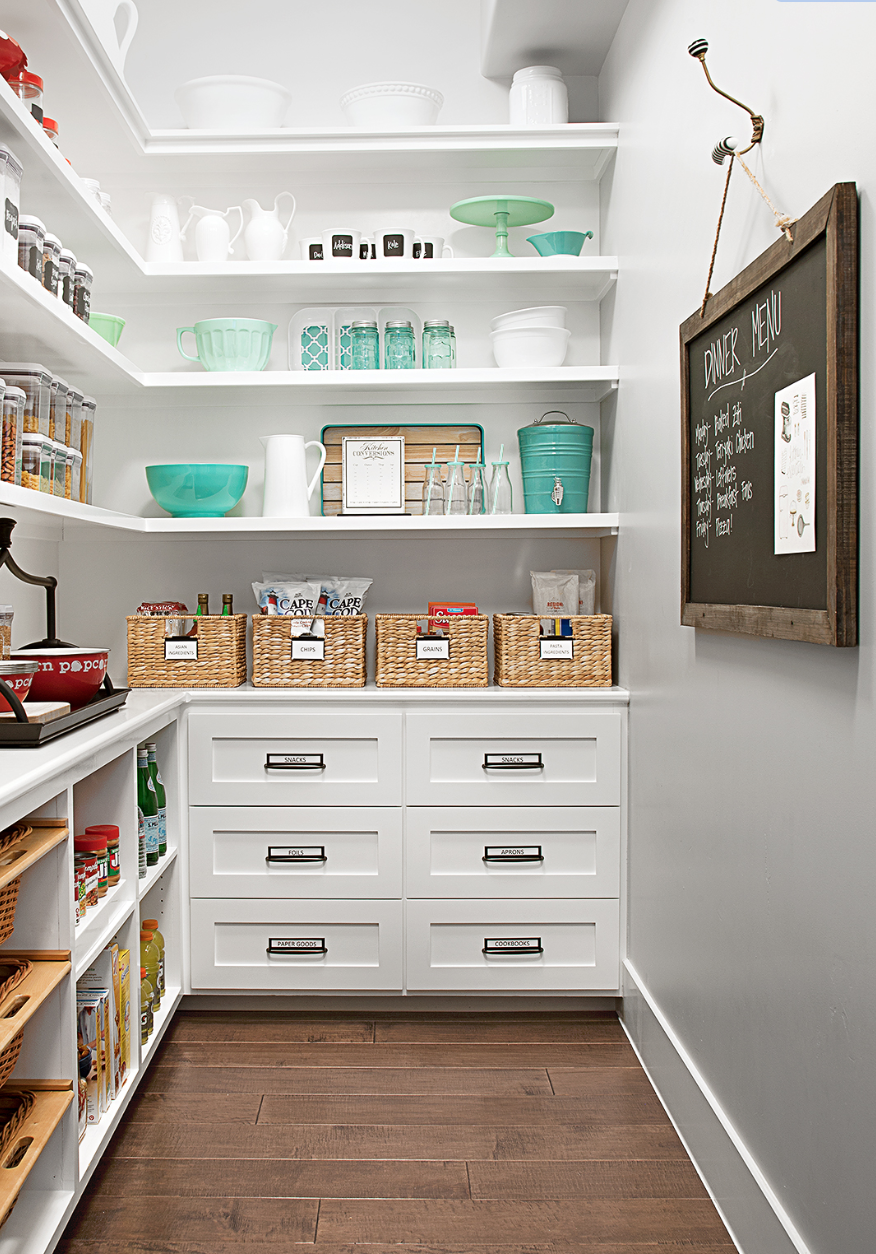
I wanted base cabinets to hide rarely used appliances (food processor, grinder, etc), dutch ovens, crock pots, etc.

I wanted a cute counter top for the flour/sugar jars, toaster and can opener.

Lauren’s pantry was most similar to my layout so I looked closely at what she did….

Like Lauren, I knew I wanted to use 12” wall cabinets as the bases. However, I decided to build my shelves a tad differently.

I liked the look of the shelving featured HERE….

Unfortunately I couldn’t find any wall cabinets to use as base cabinets…at least none that are affordable. It’s a pantry. With the cost of materials THROUGH THE ROOF I have to be conscience of the cost of this little project.

I wasn’t real keen on open base cabinets but Lindsey built some really awesome bases

She posted a great tutorial on building these base cabinets…pretty much exactly the way I built mine!

So all this got worked into “the plan.” Again, a fluid plan, but a plan none the less.

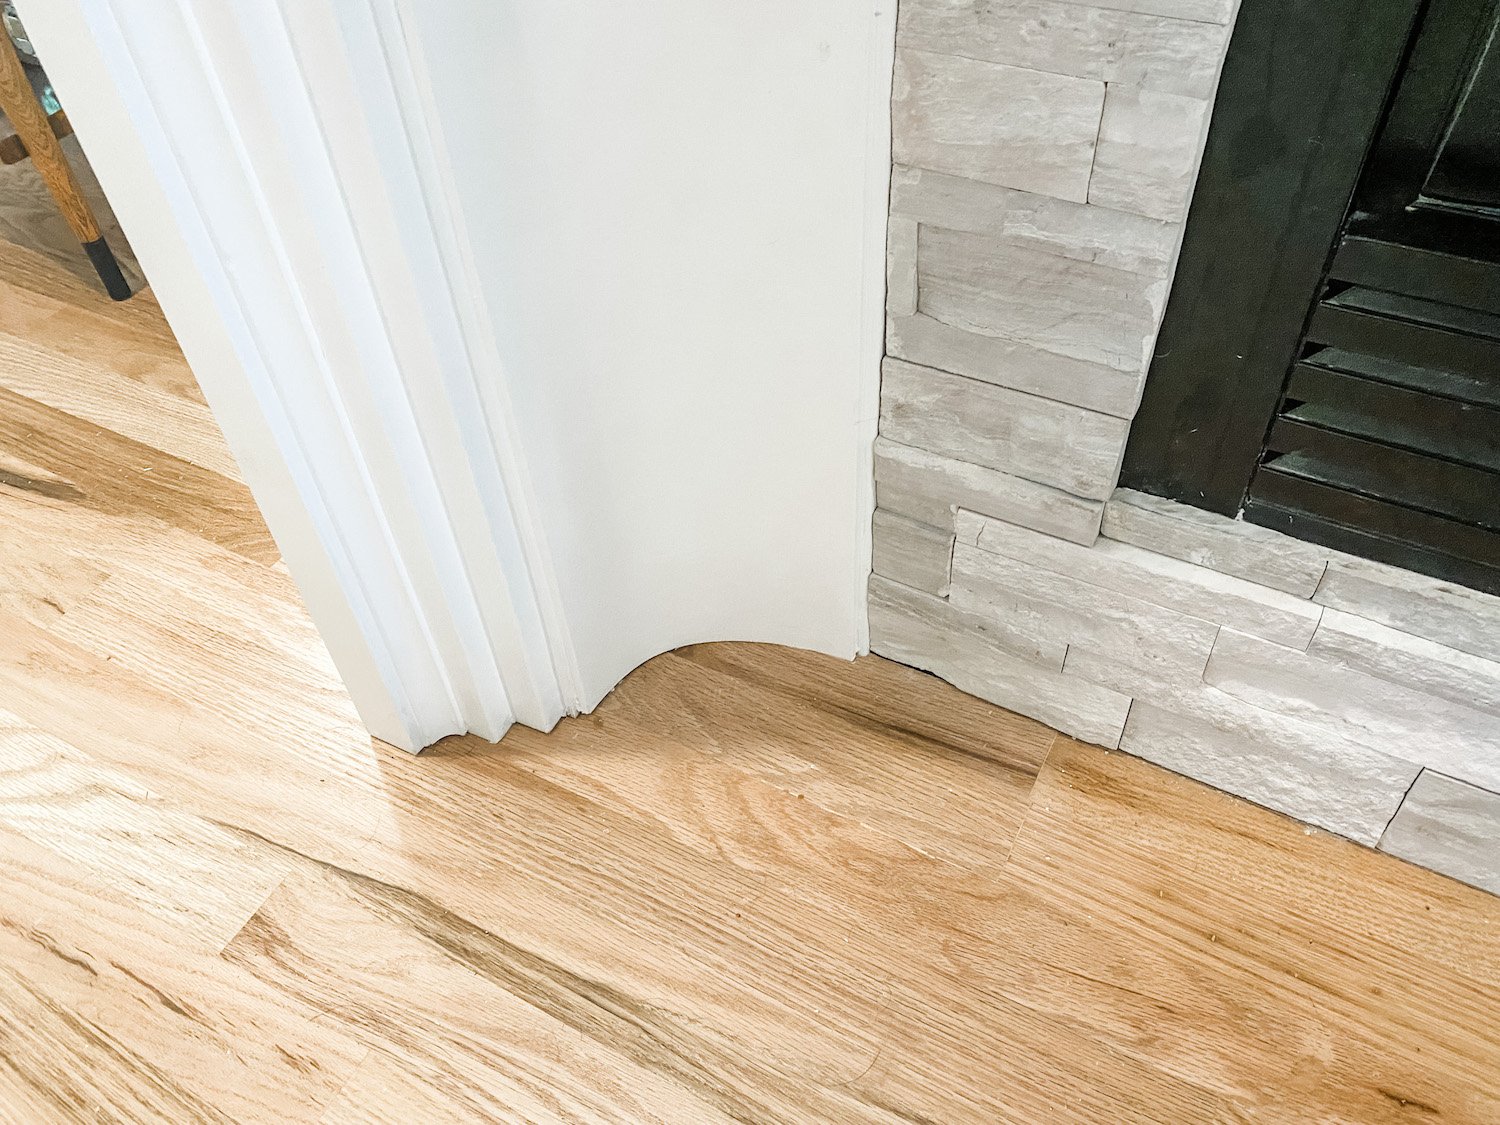
First up…the flooring. The flooring was the original tile and I decided to use the same tile I used in the laundry room. Tiling over the tile in the laundry room worked well so I decided to do that again.

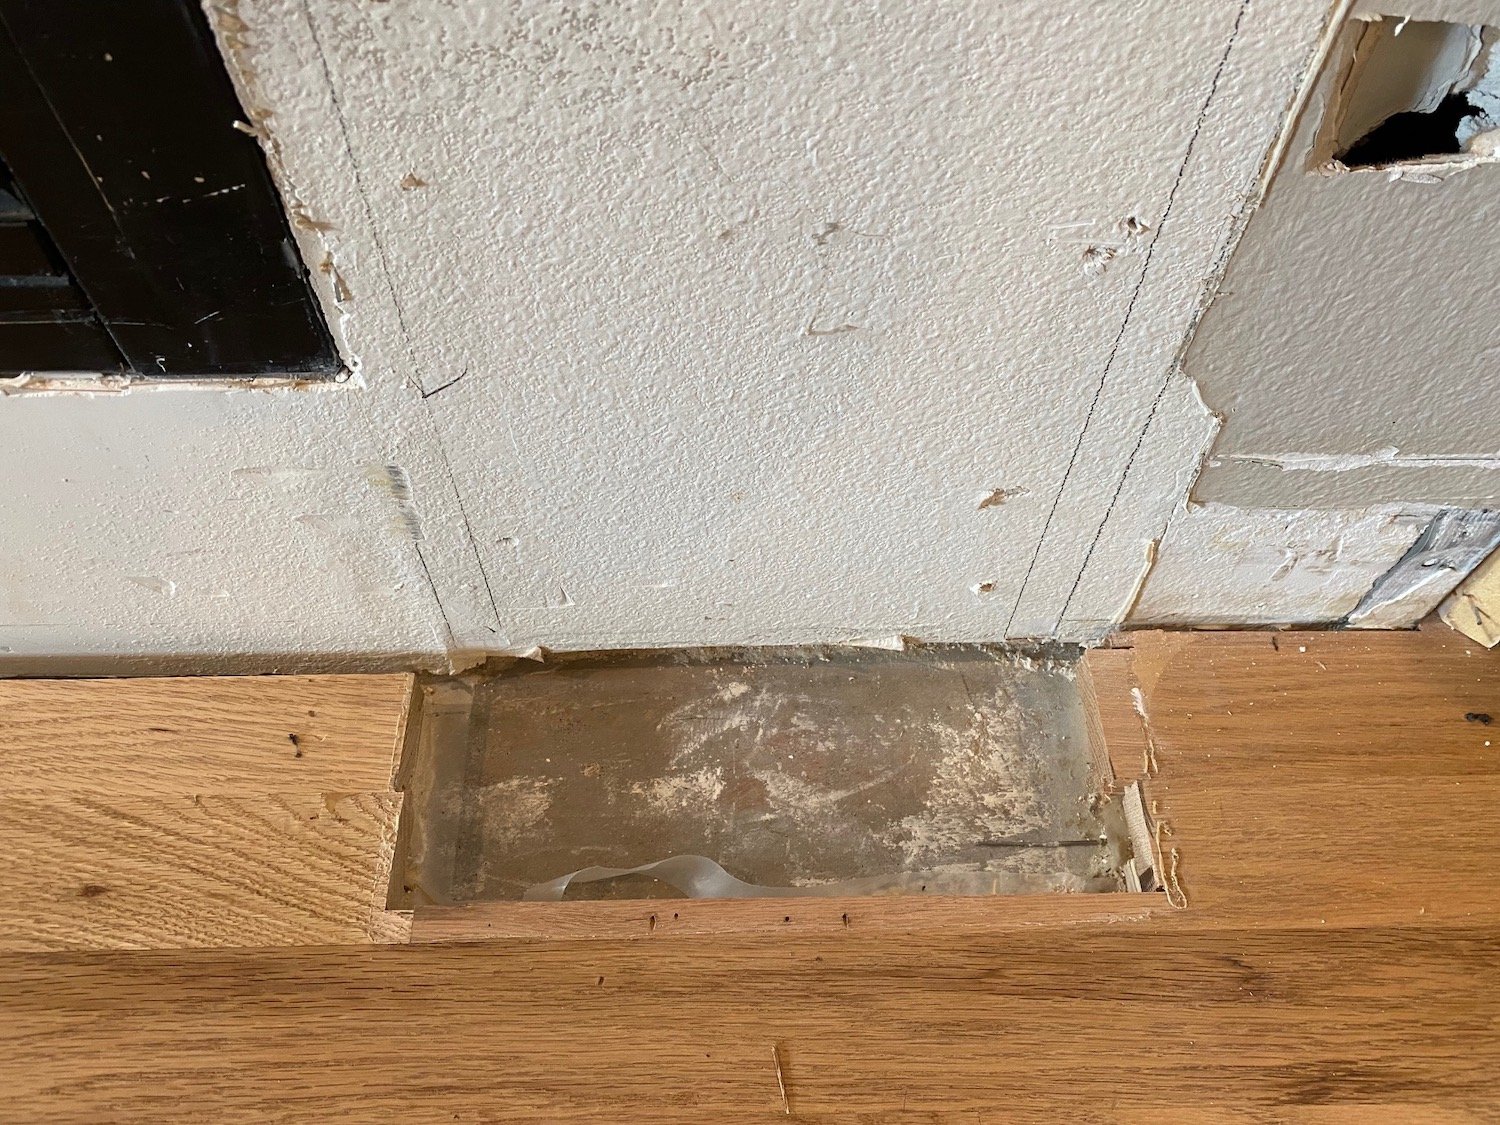
I wanted to reset the shelving and build some additional “shelf towers” so I removed all the existing shelving….

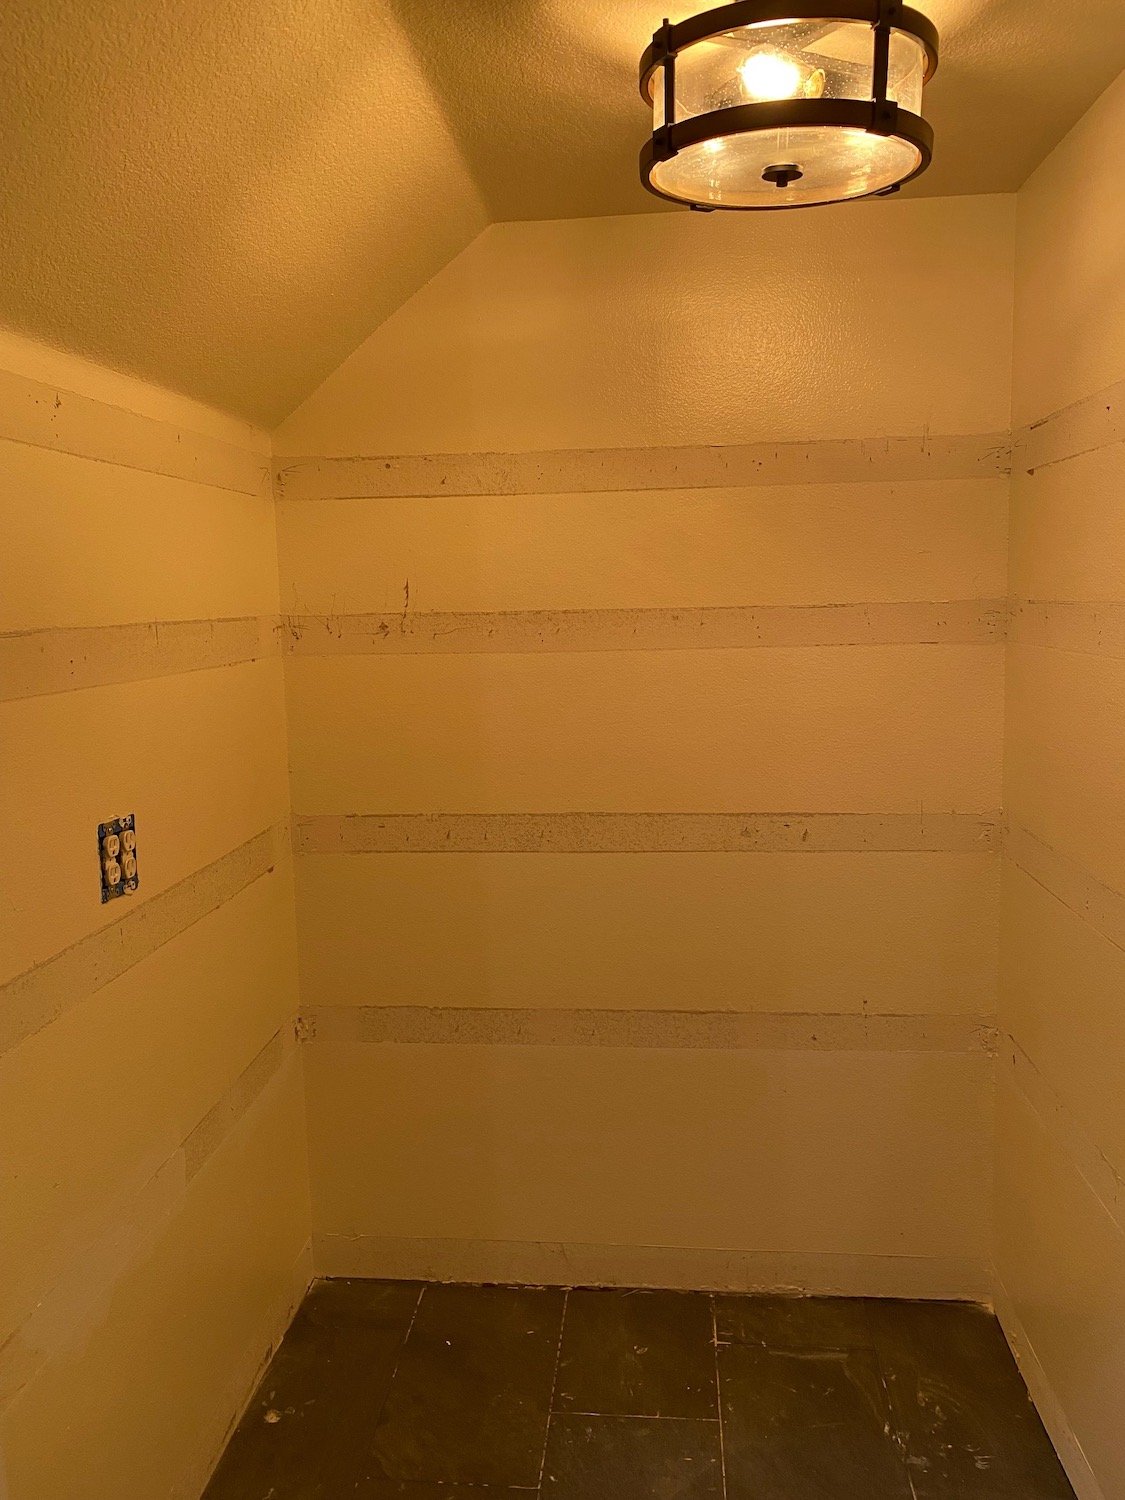
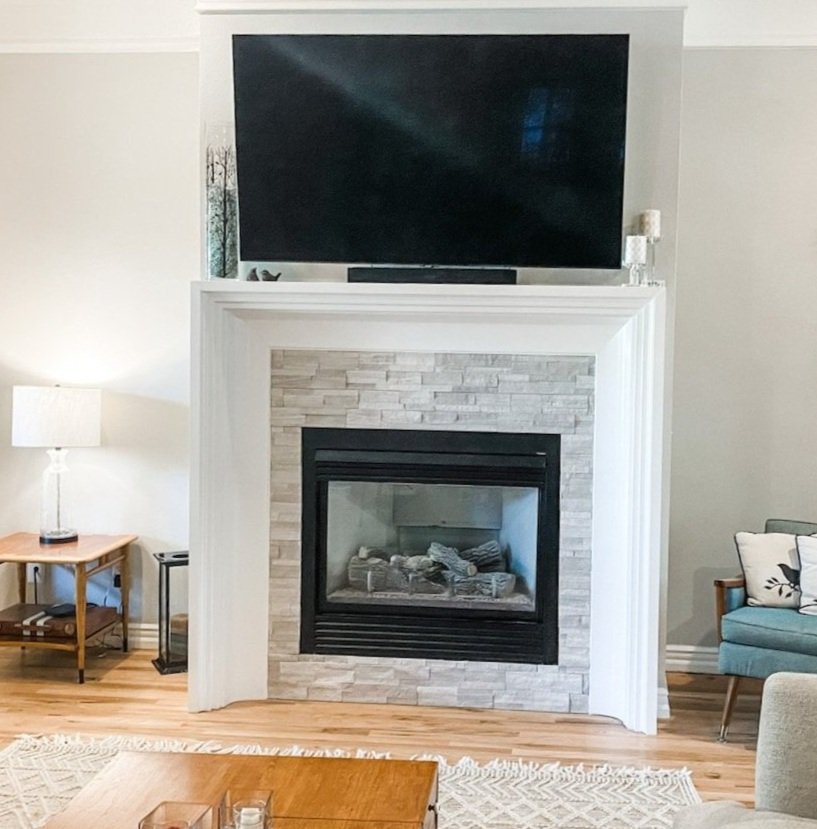
I wanted a new light fixture so I found one I kind of liked. HOWEVER, it came with Edison bulbs. Kind of important since you can see the bulbs through the glass but I just don’t like the light…just too “yellow.”

One morning I woke up thinking “I really don’t like that light.” So I got up, took down the new one and put the old one back up. Again, it’s a pantry…functional is more important that pretty sometimes. Maybe I’ll eventually find something that is both pretty and functional…way down the bottom of the list at this point.

BTW, in case you want to see what “projecting” looks like around here….

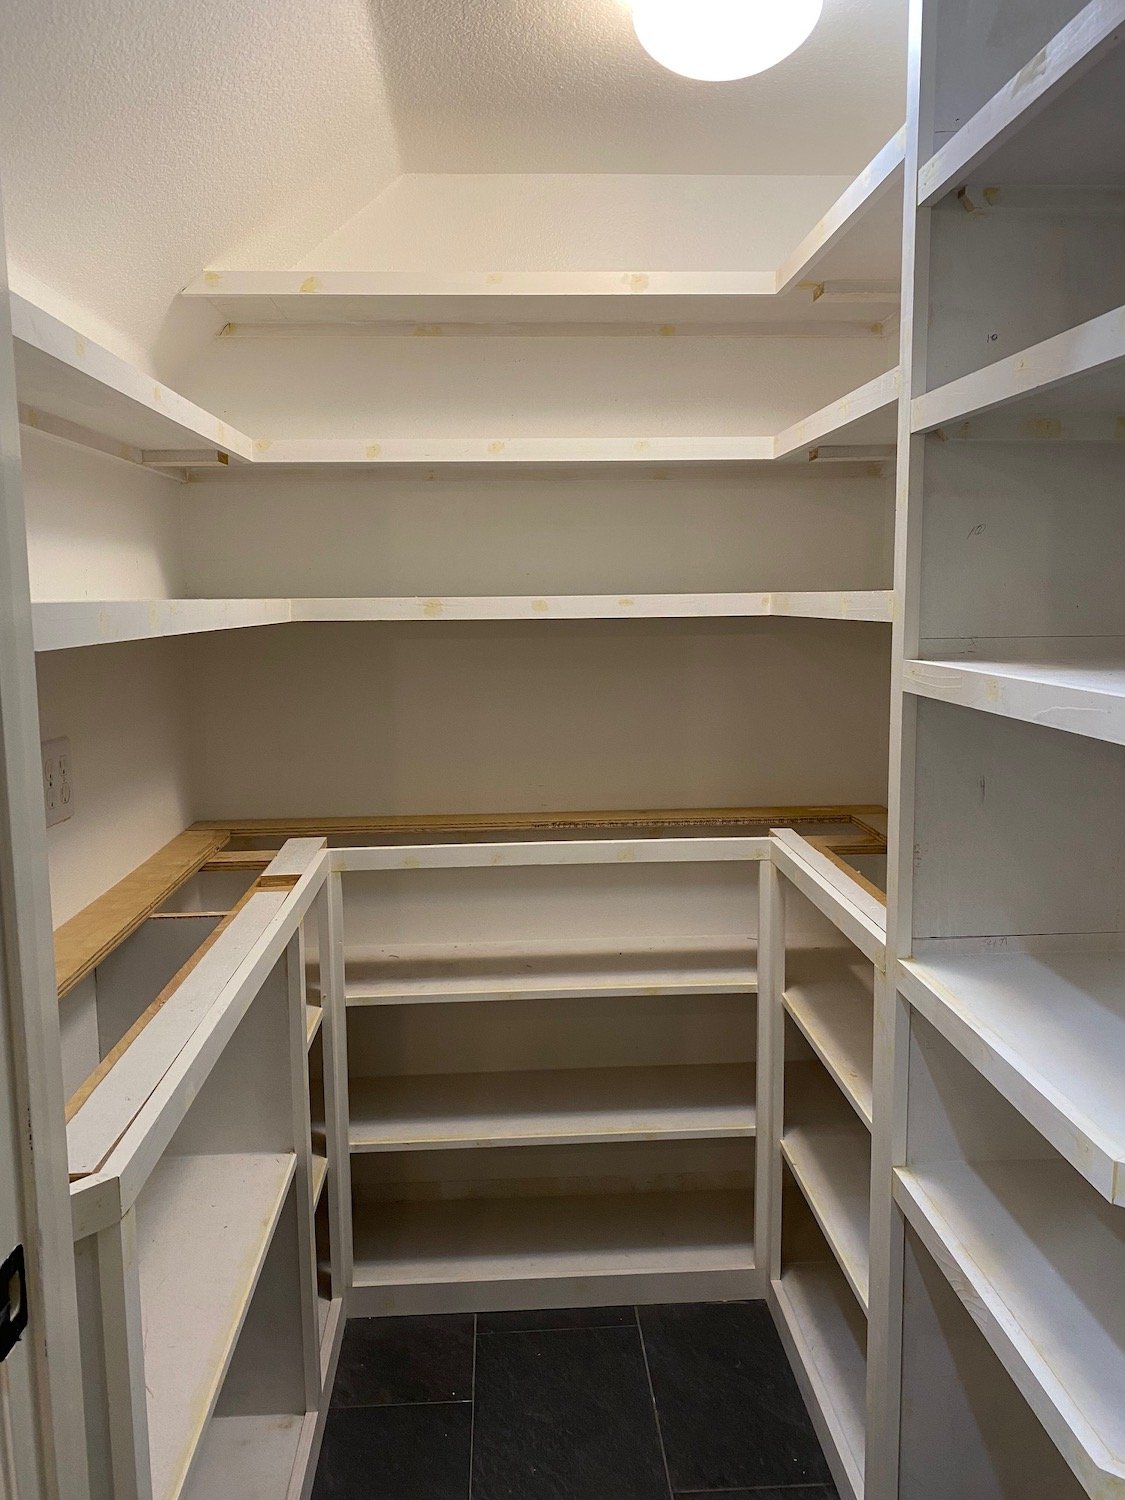
I patched and painted the walls white (my new fav, BM Chantilly Lace), grouted the floor tile, then started building the base cabinets and adding the new shelves. I preprimed and sanded all the material so all I had to do after it was assembled was caulk and putty holes. A light sanding, wipe with tack cloth and it was ready for paint. Prepriming and sanding BEFORE you cut and install will save you a MAJOR dust storm in the house.

AGAIN, I am not going to go into a long drawn out tutorial…just so many great tutorials out there.

Some people go to the lake during Memorial Day weekend. I build shelves.

The countertop. I like wood since it is not an actual food prep space.

If I wanted to splurge I would have built walnut counters or even a butcher block. But again…it’s a pantry!

The question then is if I go with a less expensive wood do I stain it with a dark stain or just leave it natural.

SOURCE

I love the dark stain but I worry it is running it’s course. But you know what, I don’t care. I love the darker stain and since the walls and cabinets are white, dark it is! I decided to use the pine “project board” from Lowes, stain with a “brown mahogany” and then apply a couple of coats of polycrylic. (Remember, polyurethane has a tendency to yellow over time)

Floors done, walls painted, cabinets and shelves built and painted, top on. Now the hard part…letting it all sit and cure before I load everything back in. IT IS IMPORTANT PEOPLE!!!! Let your paint and finishes cure before you go all decor-crazy on it…otherwise you will scar and scuff and will have wasted all your time and money!

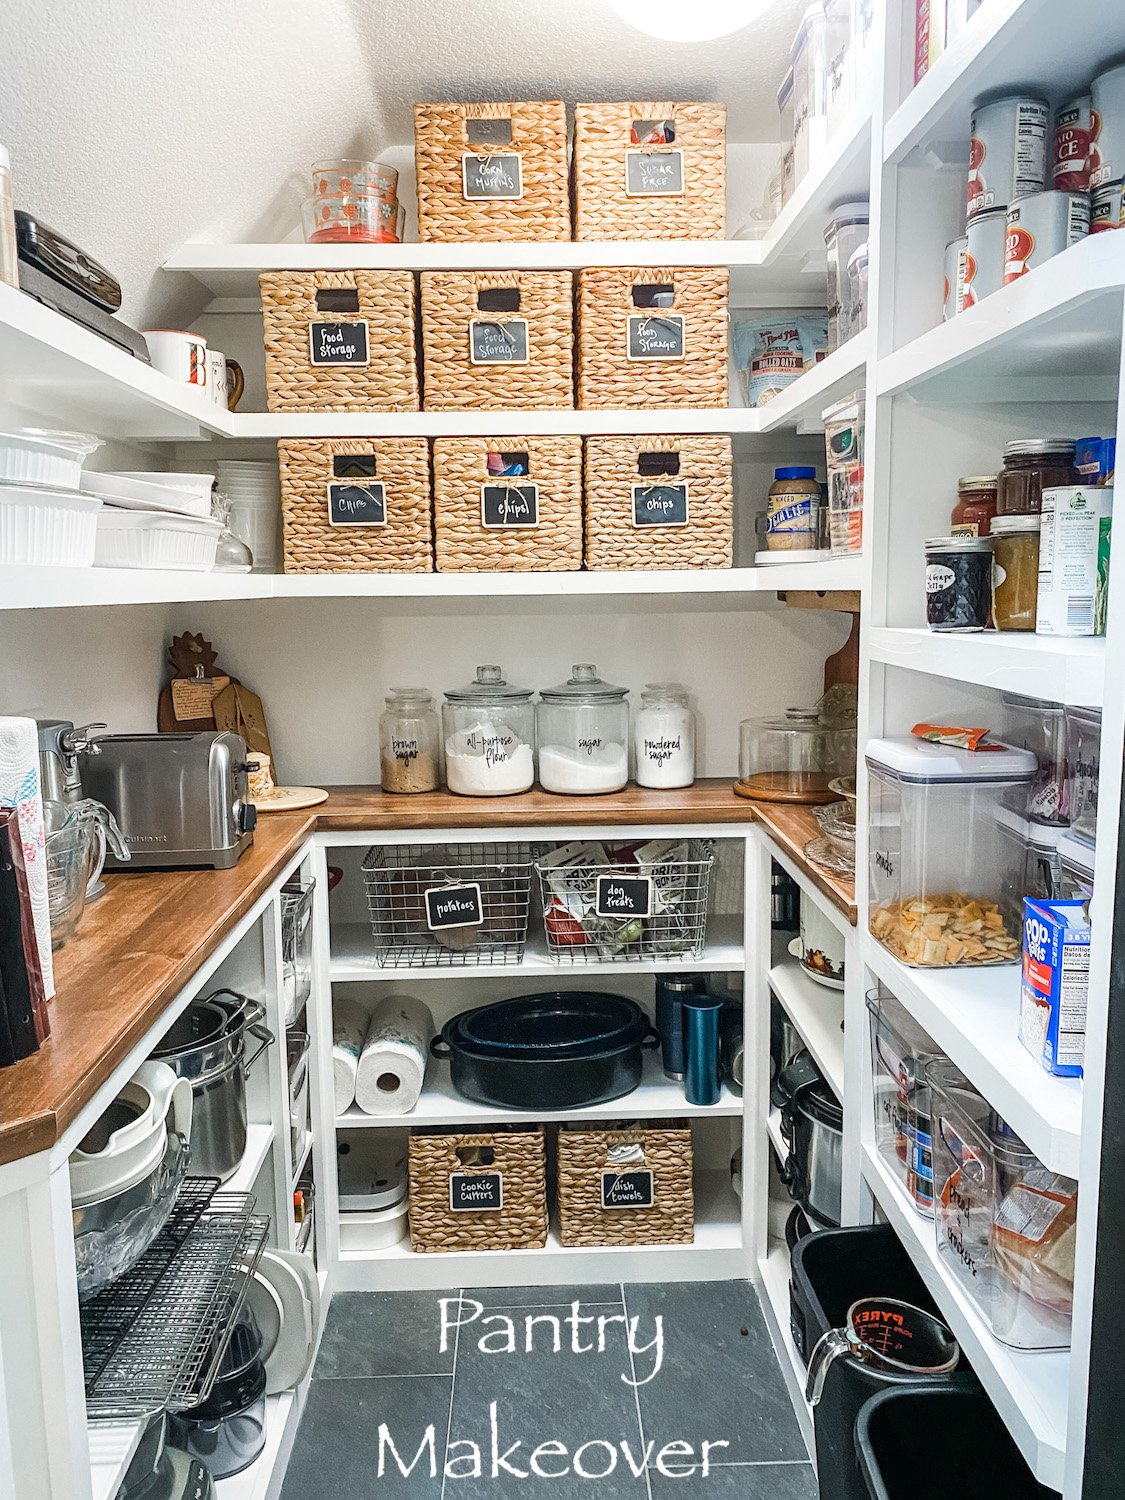
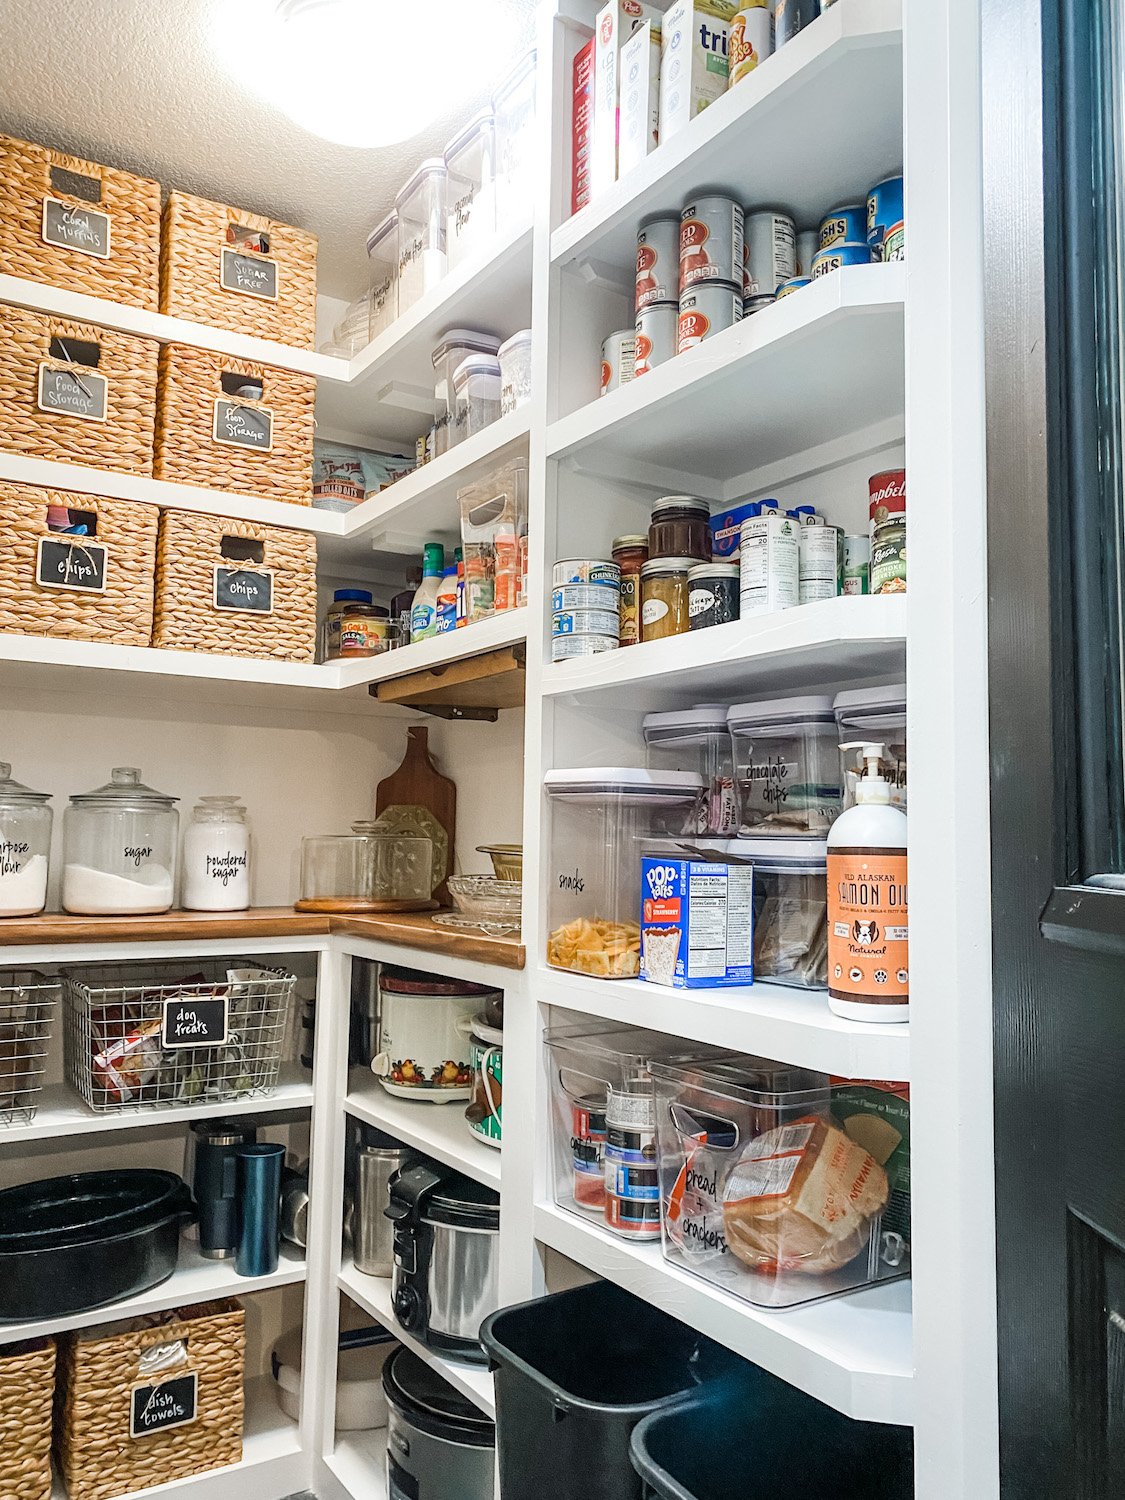
You may notice I actually gained a couple of shelves on the right and middle walls just by reconfiguring them. I also changed the upper shelves on the left to 10” and 8” deep shelves instead of the 12” that were there. I didn’t need the depth and it seemed to “open” up the space a tad.

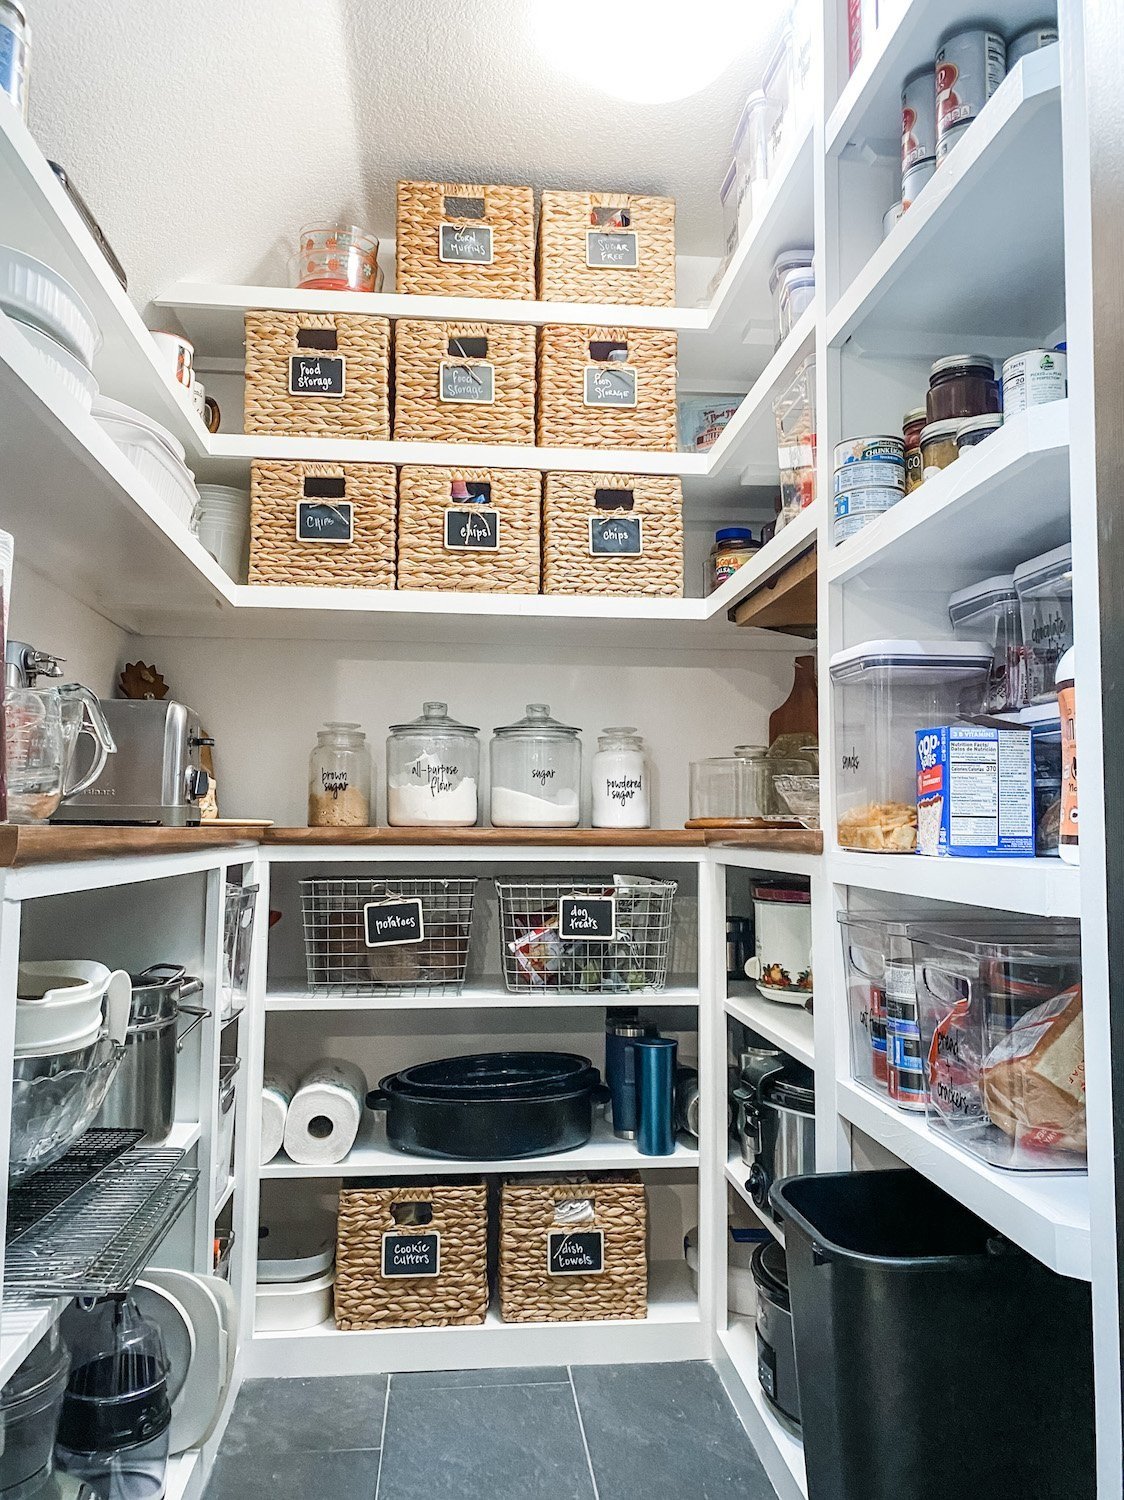
I could have carried the top all the way around on the right and still had dog and cat food storage under it…but I needed a few shelves 14” tall so I decided to do a separate “shelf tower.” Perfect for taller items like the stacked storage containers, cereal boxes and wine bottles. All the other shelves have a 10” clearance which is ample tall enough for most of my stuff.

Right side….

Left side…

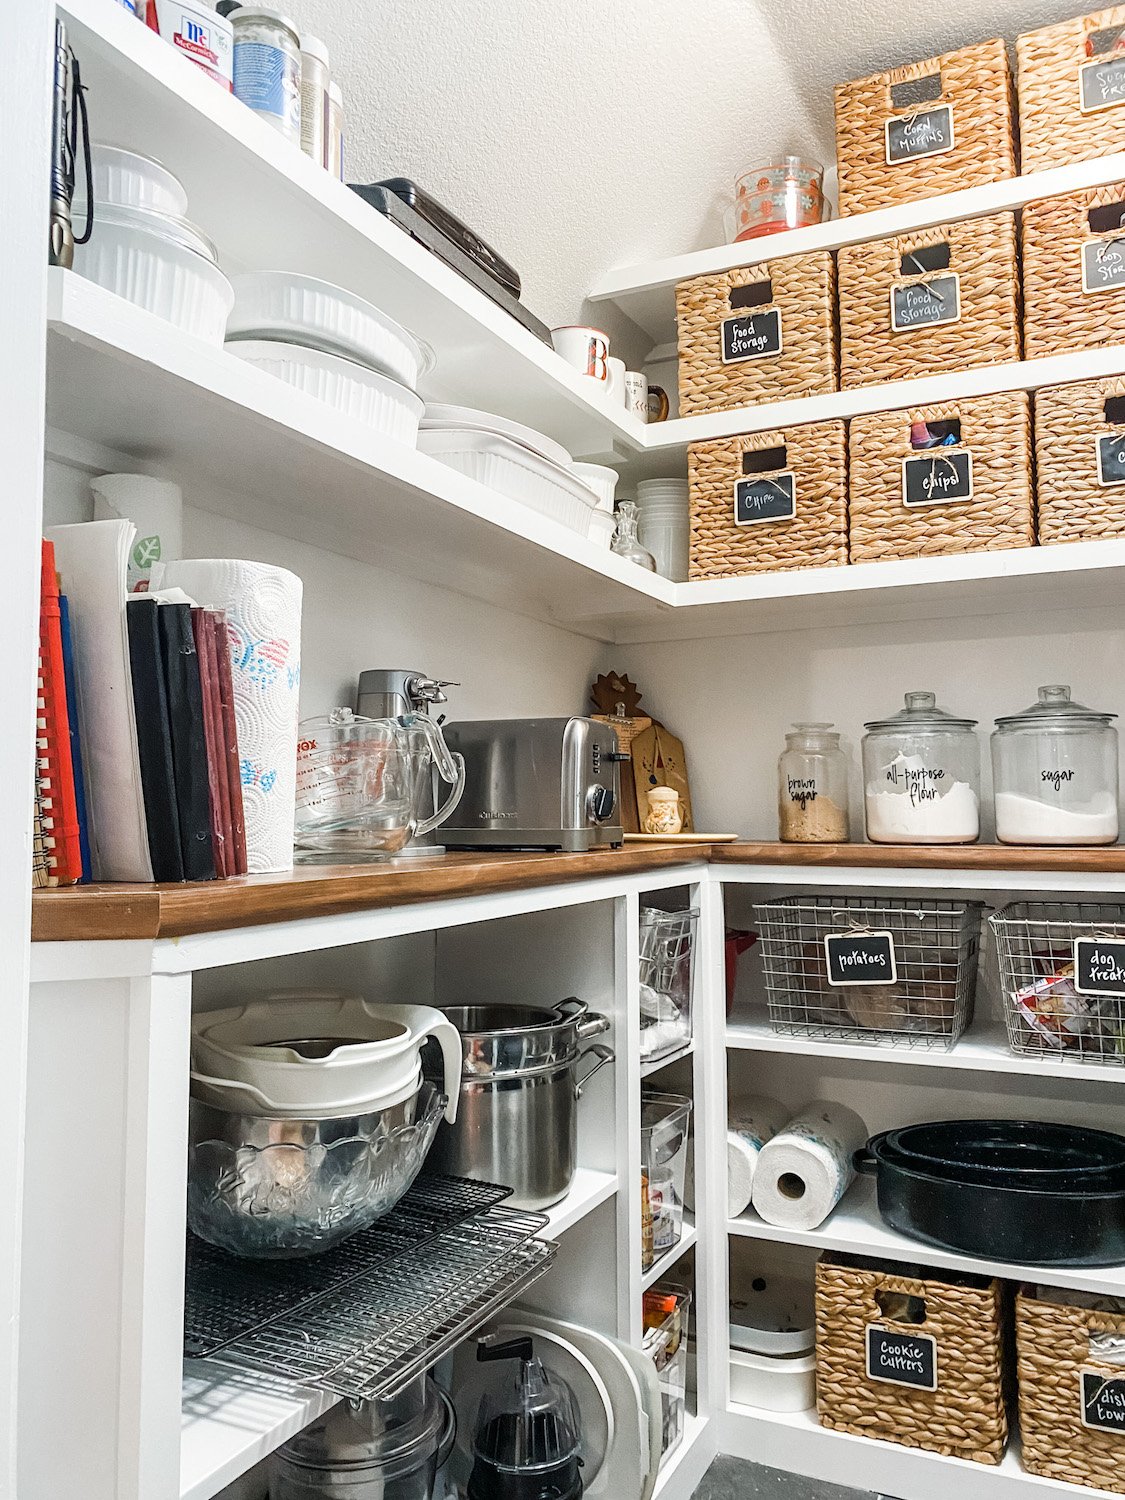
I love that we added an outlet in this pantry…perfect for the toaster and can opener so they don’t take up real estate in the kitchen.

I think my Kitchen Aide mixer would look cute in here but I like it on my kitchen counter. If it were in here I would have to haul it back and forth to the kitchen…it’s too heavy and I’m too old!

I was a bit bummed that I couldn’t originally find cabinets with doors but honestly I like this look better! While dutch ovens and crock pots aren’t really display worthy, the open shelves keep the room from feeling so small and claustrophobic. Believe it or not this space is only 5 x 5. Tiny but mighty!

I have no doubt that at some point I will add a backsplash…not sure whether it will be tile or wallpaper or something else…but something to give the space a little color and character. Right now I am worn out just getting to this point!

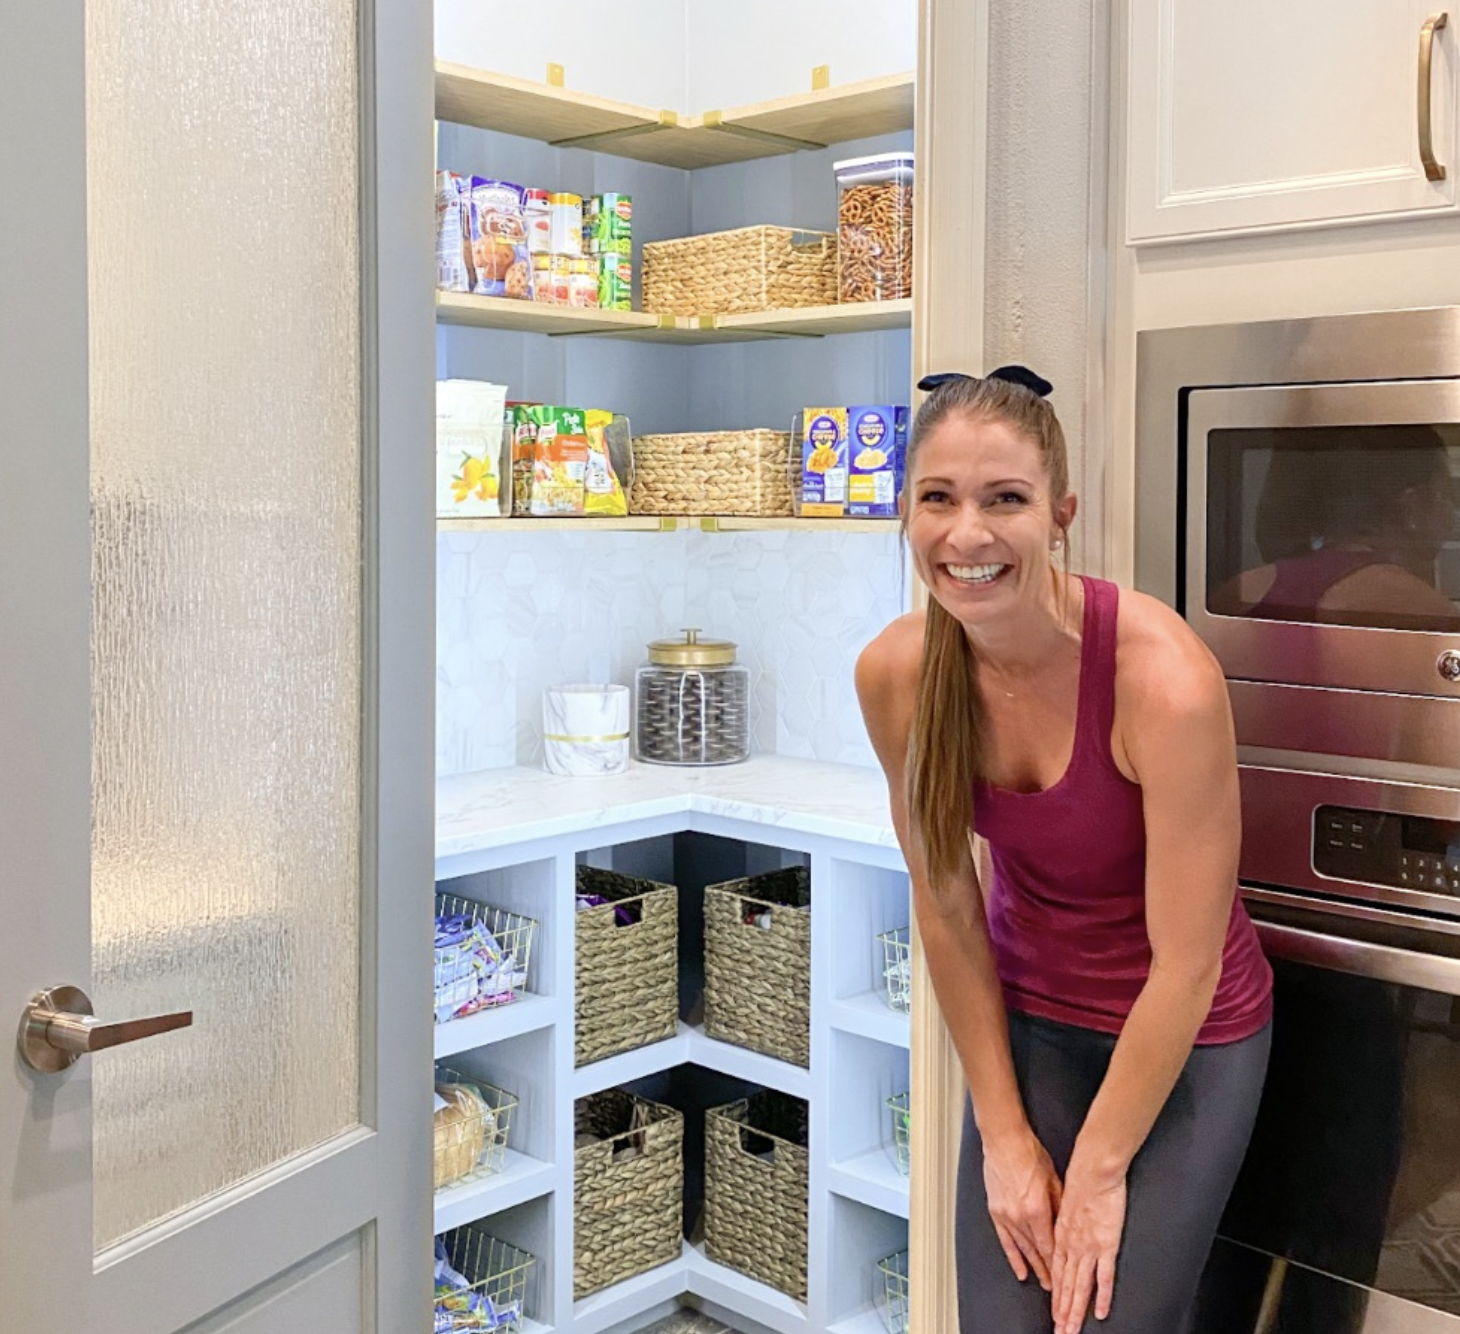
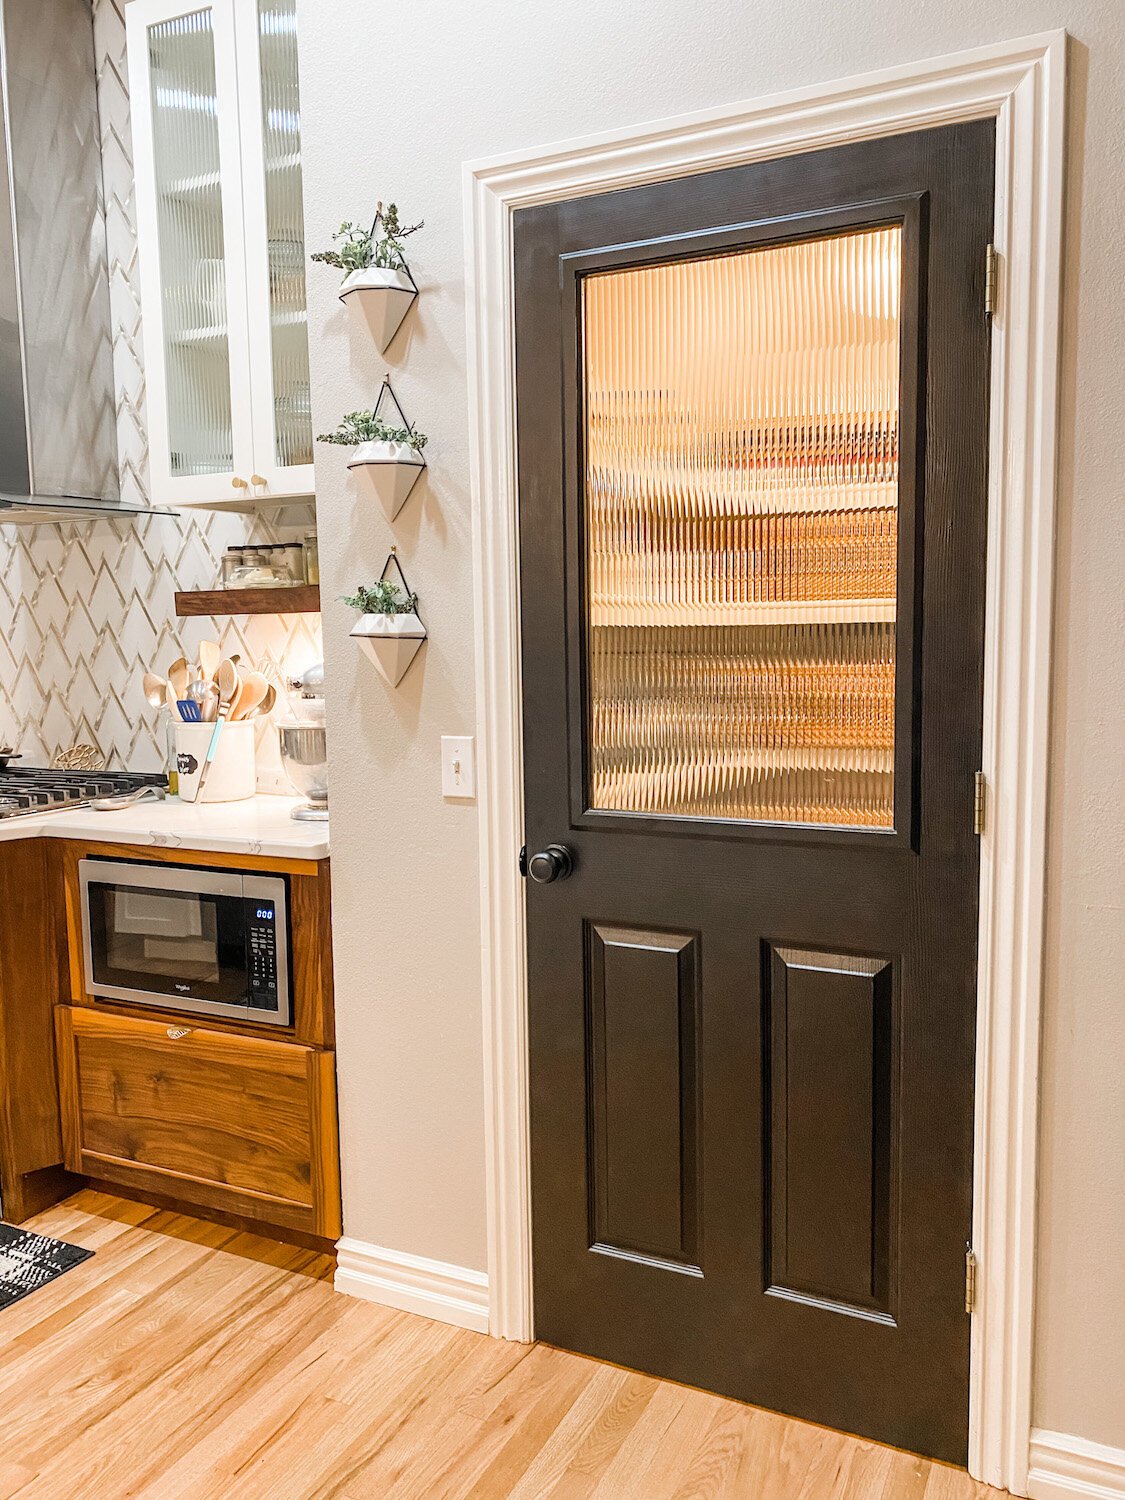
Last year I added glass to the pantry door. I LOVE it and I’m glad that is one chore I don’t have to do now!

The important thing I want to share is that reworking a space can make a huge difference. I now have a pretty pantry that works beautifully as an extension of my kitchen. Remember, I don’t have a lot of upper cabinet storage in my kitchen so this pantry is super important!

On a scale of 1-10? For me, not difficult because I have the tools and the know-how. For a novice DIYer, probably an 8. But there are a ton of tutorials out there for how to build simple shelving or how to use old cabinets to create a space like this. The first thing you have to do is find “inspiration” for the space you actually have and work from there. It is doable…YOU CAN DO IT!!!!!

On a blog board I am on someone said she was afraid to do something like this because she was afraid to mess up.

Don’t be afraid to “mess up.” That is how you learn…watch tutorials and read blogs. There are so many great resources at your fingertips these days.

Use them…and JUST DO IT!

The next project...

The pantry….

HERE I shared how I “organized” my pantry. I’ve even managed to keep it in order this past year.

I still love all the baskets and bins but now it is time to change things up a bit.

This will be a full fledged “gut job” so I need to crack some knuckles, stretch some muscles and dig out the crow bar!

So stay tuned…I’ll share my inspiration, my plan and the reveal!

Comment
Share

The living room fireplace reveal....

FIREPLACE MAKEOVER!

I have known from day one that I wanted to give each of the fireplaces a little makeover.

HERE I shared the den fireplace….

Now it was time for the living room fireplace.

The original fireplace wasn’t totally offensive. It just wasn’t “my thing.” Whatever that is! A little dated…just blah.

My original plan was something like this…

SOURCE

I really loved this “cove molding” look but this surround is stone…and SUPER expensive. I decided to try to recreate the look with wood.

First thing I had to find was the “cove crown.”

I found it HERE. The only issue I had with it was the fact that it is a “polyurethane” material…basically styrofoam with a plasticish shell…hum. I did some research and it is SUPPOSE to withstand heat up to 200 degrees. That should hold up to the heat put off by my fireplace….should. I guess I’ll find out next year!

So as I mention HERE, I found my inspiration, took measurements and made a tentative plan.

What is the old saying about “best laid plans?”

No matter how carefully we plan, not all will go right.

Case in point.

So I started by removing the old surround….

TIP! When you remove wood trim from a wall, first score the joint between the wood and the wall with a utility knife. It should have caulk between the wood and the wall and if you don’t score it, you may tear the paint finish. If there is still caulk on the wall, just take a chisel or putty knife and gently scrape it off. Also use a board behind the pry bar so you don’t bust through the sheetrock…I did it just for demonstration purposes…NOT!

When I removed the old surround, I discovered this….

I forgot this room originally had carpet. When they added the hardwood, they had to work around the existing fireplace surround which sat on the slab, so of course when I removed it there was a gaping hole in the hardwood flooring.

“Best laid plan” #1….

Not a big deal for me. First, I always keep “spare.” The problem was remembering where I put the spare pieces of hardwood. Once I dug it out from behind all the stored Christmas decorations I went to work patching these floors. Since much of it was going to be covered by the new surround, I didn’t worry about “lacing” it in like you would a prominent area. I glued and laid some 3/4” material as a subfloor, then cut a few pieces of the oak and glued them to the subfloor with construction adhesive, using wedges between the wood and the wall to fit them tight until the glue set up. I sanded and applied one coat of polycrylic before installing it. After installing it, I used wood filler to fill the gaps, gave it a light sanding, then applied another coat of polycrylic.

Hardly noticeable…or as my daddy use to say, “You’ll never notice it on a passing train!”

I decided to build the surround on the wall vs. building it as a unit and then attaching it to the wall. Just personal preference honestly.

I used a stud finder to find all the studs and marked them on the wall.

I put up 2 x 4 “bracing/supports” on the wall using THIS construction adhesive and deck screws. I was able to hit a few studs, but not as many as I would have liked…hence, the adhesive. I like this construction adhesive better than most because I have found it is tackier and less likely to “slide” before it dries.

Since these were the “supports” that all else would be attached to, I made sure they were perfectly straight and level.

I strongly suggest priming and sanding all your materials before installing it…this will save you from a serious dust storm IN the house! First course of business.

I began building the surround by attaching 1x material to the supports I had secured to the wall, using adhesive and nails. I used 1 x 8” poplar material on the outside and faced the edge with 1 x 2 poplar. I attached a 1 x 4 pine on the inside of the supports. Then I added spacers between the two to provide additional support and nailer for the trim.

(At this point the cove crown is just “propped up”…not attached.)

My “best laid plan” was to use crown between the outside board and the inside board….

Okay, here is the problem and where my “plan” completely fell apart.

I was THINKING I would just take plan ole’ crown and “cope” the inside corners. Works on a ceiling, right?

Right…but on the inside corners of a wall/ceiling, you have two pieces of crown joining in the corner, both laying “horizontal.” On the inside corner of this fireplace, you have one piece laying horizontal and one piece laying vertical.

Now, you might not think that is a big issue.

Well it evidently is. I googled, I cut, I made mock ups…I spent an entire day trying to make this work. Evidently this is not a “doable” thing…at least not what I could find.

This might explain why ALL my inspiration pictures were stone or masonry.

I think the reason it worked a bit with the cove crown ( I say a bit, because there were still gaps I had to sculpt with putty and caulk) was because it didn’t have the “fancy” profile of a crown. Smaller cove molding will cut on a 45 on inside corners without coping. The larger cove molding had minimal “gaping.”

If you know anything about cutting trim and coping you know exactly what I am talking about. If you do not, do a TON of research before attempting to trim inside corners…or you too will learn the hard way!

Soooooo….best laid plans.

I rarely just give up, but…..

Time to punt.

I found another “inspiration” that appeared to be “less decorative.” I decided to give this look a shot since it would entail using basic 1x material vs. crown.

Truth is, this is one of those “happy accidents.”

I like the look more than I did the original plan!!!!

I used a 1 x 4 material, then stacked on a 1 x 3 material, then a small cove molding…LOVE.

Moving forward….it was time to attach the large cove crown.

First issue. In all my inspiration photos, I really like the “one piece” look. Since again, they were all stone, the material adjacent to the fire box was the same as the surround. If I recreated that look I would have to use painted wood adjacent to the fire box, and I just didn’t feel comfortable with that. Not that this box gets terribly hot, but it does get a tad warm.

Soooo….what to do. I really wasn’t loving the look of high contrast tile between the box and the surround.

When I was looking at tile, I found a split face travertine tile I really liked.

If you remember the Lankford house den fireplace I installed split face travertine…and I LOVED it. I still do…so I went with it.

Now, travertine is not “all the rage.” So this is a prime example of doing something I LOVE vs. doing the in thing.

Since I decided to go with tile, I used a 1x material for the inside of the cove crown to sit on…just to give it some lift so that the tile wasn’t butting up against it’s 1/4” edge. I glued and nailed 1 x 4s on the wall, then installed the cove crown on top of that.

Second issue…since the cove crown is “polyurethane” and not wood, I couldn’t attach it using a trim nailer. Trust me, I tried. I had to use construction adhesive, then tape it and constantly “press” it until the mastic finally set up. Pain.

Once all that was done, I caulked all the joints, puttied holes, gave it a little sand and then painted it BEFORE I installed the tile surround.

I used a latex paint because my research said that latex is a better product to use in areas where “heat” might be a factor…I guess it has a tad more flexibility. Makes sense.

Don’t forget the Floetrol…makes a world of difference in your paint finish.

After the paint had cured, I installed the tile. Again, there are amazing tutorials out there for installing tile…find one that makes sense to you! Installing tile around a fire box is NOT a difficult DIY project. But you want to make sure you have the right tools (wet saw, properly sized trowel, etc) and that you use a thin set or mastic that works with the type of tile you are using and is heat resistant. RESEARCH!!!!!!

There were a couple of scuffs and marks on the black fire box from scraping the old mastic off. I used a black Sharpie to cover those…works like a charm.

And presto, bingo….a new fireplace surround.

I like it much better than the old one. Bigger but simpler. Not quite so “traditional” looking. Again, I like it much better with the “stacked edge” than I would have with the crown. See, no mistakes, just learning as I go. A lifetime of doing this stuff and I am still learning!

I am EXHAUSTED (just look back at all the projects in the last few months) so I doubt I will be starting any new major projects anytime soon. Course I say that and I am already eyeballing and sketching a few things I have been thinking about starting. Hum….

So until next time…

The newest swing pergola....

One of the first things I did before moving in was paint all my doors black. It just made our new house feel like “home.”

One thing about my old house I have aways missed…the swing pergolas.

I had one in my front yard and one in the back. I loved them and I used them all the time!

Working on my neighbor’s deck gave me a “bug.” I have wanted another swing pergola and now I want to do a little manual labor outside.

Okay, so I didn’t REALLY want to do manual labor. My poor old body was still recovering from the deck build. But like everything else, I want what I want and I know to get it I have to put in a little time and labor…and sweat and tears and pain and agony.

HERE I posted a pretty good tutorial for building a swing pergola. And as I said HERE, if you want one, JUST DO IT!!!

I have built a few of these so for me it was a labor intensive breeze. I will say I use to be able to build these for around $200…thanks to inflation, this one cost upwards of $350 (not including the swing). And it was 8x4 vs the 8x6 I usually build.

But again, I wanted it, so I built it.

And if you want one, I know you can build it!

So a few pictures…..

I just love it…THIS is a link to the swing. Super comfy, perfect for napping!

One major change from my other swings.

Usually I put flagstone under the swing. Quite an expense…roughly $150-200 just for this little space.

Last year the City of Lowell tore out an old one-lane bridge near a house I built and we lived in when my boys were young. They removed HUGE 2” thick 16’ wood planks. My son managed to wrangle a few of them, cut them down to manageable (relative term) 8’ lengths and brought me a few. They have been stacked behind my shop…just waiting on inspiration.

And “inspired” I was. I used the planks to create a “deck” beneath the swing.

I put it down just like I would rock. I excavated about 4” of soil, put down a 2” sand base, then cut and laid the boards just like I would rock. I filled the gaps with sand and soil.. The boards are “rough” and that is okay…gives it character.

The flower pots are ones I have had for eons…they use to be “teal” when teal was all the rage. I spray painted them black and filled them with flowers. Lovely.

i am contemplating staining the pergola black. I have seen a few pictures of black pergolas and I really like the look. Fortunately treated wood needs time to “dry out” before you stain or seal, so I have a few months to mull that over.

In the meantime I have a perfect spot to sit and ponder!

That was last week’s project…this week’s was my living room fireplace. I mention HERE that I wanted to make changes. The changes are made and I am very happy with it. I had to make a few “design changes” due to issues I’ll discuss in the reveal.

So until next week when I HOPE to have the fireplace reveal….

Another fireplace makeover....

It is time.

Time to give the fireplace in the living room a little facelift.

Like the fireplace in the den, I have known from day one the living room fireplace would someday get a little makeover.

Its not totally offensive…it’s just…well…I just don’t like it much.

(I didn’t have to tear out what is there to get a good visual like I did in the den).

So the first thing I did was “find my inspiration.”

I did what I usually do…scoured Pinterest and the webisphere and dropped pictures I liked into a computer file….

In it are pictures of fireplaces that have at least one element I like.

I would post all the pictures of individual ones that really struck my fancy but again, I am HORRIBLE at keeping the original source to link back to…but this is my inspiration file.

This is one I like best…

SOURCE

You may notice this is a “stone” fireplace surround…but I think I can make something similar out of trim and paint it.

One thing I know for certain…I want “more formal” than the rock and walnut mantel I put in the den but less that the formal froo-froo in more formal living rooms. Simple but with a little class.

The den, kitchen and living room are all “open space.” The den is our “casual” space and the living room is the more “formal” space…and since you can see both fireplaces from just about any spot in all the rooms, it is important that they be different to reflect their individual purposes but not clash.

Does that make any sense at all?

So, I found my inspiration…or at least 20-30 I can combine to get the look I want.

The next step is to “make a plan.”

To do that, I measured the space (wall width and height, floor to bottom of TV, firebox) and drew it out on graph paper. That way I know exactly what my measurements are.

Again, most of the “inspiration” pieces I like were stone…but those are super expensive and I really think I can achieve a similar look with wood trim.

I haven’t yet decided on what tile I want between the fire box and surround. Or if I even want tile at all…I like the solid look. I think I may have to wait til I get the surround up to get a good visual.

This is definitely one of those “fly by the seat of your pants” deals.

Again, I know I do not want a hearth. This is a gas log firebox enclosed in glass….so no “need.” There isn’t one now so I know we can live without it. Since I went with the stone and natural wood in the den I’m pretty sure I am going to stick with painted.

So…inspirations in hand…check. Measurements taken…check. Set plan…well that is still a work in progress. I ordered the large concave (cove) crown and I will take a piece of that and build around it to find a look I like. I believe this is what they call a “fluid” plan.

This week the ladies in the neighborhood are building a deck. MAJOR chore…but by goshy we are getting it done! It is part of my “give what you have” plan for my life. I get to share a skill set, the ladies are learning something new and the fellowship is wonderful. So far, so good!

Hopefully next week I can get started on the fireplace!

Giving what you have....

The last two weeks have been a booger.

Two weeks ago our city was hit by a F3 tornado.

The damage to our community was pretty bad but we, personally, were very fortunate…it missed us…by about TWO BLOCKS.

I can see the country club from my front porch. They sustained a lot of damage…HUGE trees down, damage to the clubhouse.

I can see the neighborhood to our north. It took a direct hit and was heavily damaged.

As much damage as the community has, we are blessed. Injuries but no deaths.

I was without power for a day and internet for several. Minor compared to the losses some will have.

Last week I had to have a tooth extracted and a bone graft. No biggy you say. HA! Not only do I look like I was punched in the jaw but this sucker hurts like the dickens! Fortunately I am on the mend and now I just have to wait patiently for this to all heal so I can get an implant.

So an eventful two weeks.

No major projects so I have worked on a few little things.

The quilt project. Still chugging along on this. I have three at the quilters and I finished up the last three throws this week. Those will go to the quilters this week. HUGE check off my list. I still want to make a few pillows and such but at least the big stuff is done!

This is the time of year when I start prepping the yard for spring planting. We cleaned out the flower beds and pots and put down mulch. I promised to share the new “grind stone pathway.” Still not quite finished but when I do get it done I will share. This is a prime example of “changing things up” from the original plan…I love it!

I find myself looking around the house for projects and find that for the most part it is exactly what I love. I still want to do a few little things…the tile in the pantry (like the laundry room I shared HERE!)

I want to do a “sunrise mirror” in the guest bath…a “sunrise mirror” you ask? Yep…like this….

I LOVE this look and I found a great tutorial HERE.

I shared my guest bath makeover HERE and I knew eventually I would want to do something with the wall mirror.

When I saw this sunrise mirror, I knew I had found my inspiration. I will do one long shelf and two round mirrors.

Someday.

I also want to reface the living room fireplace. It’s just not quite right…..

I love the fireplace makeover I shared HERE in the den….

Someday….

And a few other things here and there.

The struggle to “find something to do” since I semi-retired almost two years ago has been real. So many think “I CAN’T WAIT TO RETIRE.” But trust me when I say that retiring can be a real challenge. I went from busting it every day to waking on Monday morning with a sense of “no purpose.”

Think about ALL the things you want to accomplish. Organize the garage, paint the guest room, make a quilt out of old Christmas pajamas.

Now calculate how long getting ALL that done will take.

Or maybe you have a favorite hobby…golf, sewing, fishing, etc.

Can you do you favorite hobby 7 days a week, 12 hours a day.

Do you have enough projects to last you 10-20-30 years?

It is a challenge to go from having a definite purpose…a place to be every day…work to complete…to…what?

One way I have dealt with this challenge is the “power of positive thinking.” Rather than “what am I going to do with myself this week” I say to myself “I DESERVE this.” I worked my rear off for 30 years to build a business…all the risks and heartaches and struggles. I worked hard to get to the point in my life where I no longer have to work hard…I should be able to sit around til 10 in my pajamas drinking coffee and watching FoxNews without feeling guilty.

The most important thing I have done is identify the gifts and talents I do have, skills I have learned over the years, and sharing them with others. Giving back.

i love projecting…but as I noted I have completed MOST of the major projects around here.

My friends and neighbors…there are others around me who need my “gifts and talents.” Is it a “talent” to be able to change out an electrical outlet? Well, it was for my neighbor whose bathroom outlet didn’t work. It was for another neighbor who needed all new outlets in her kitchen. I saved those women hundreds of dollars just by doing something as simple as changing out electrical outlets.

Another neighbor wanted some type of screen for her hot tub to block the neighbor’s security light.

She was going to pay someone thousands to build it. Between the two of us we managed to build it in two days for around $300. She loves it and I love the fact that I was able to share my “gifts and talents” with someone else.

Today all the neighborhood ladies are gathering to start tearing out the deck of one of our neighbors. We are going to tear out what is there and build a new one. A bunch of every day housewives and retirees are going to learn how to swing a hammer and build a deck. How much fun is that!!!

What “gift and talent” do you have that could benefit someone else? Can you sew…maybe someone you know needs a pair of pants hemmed or a shirt mended. Can you cook…maybe you have an elder neighbor who can’t manage in the kitchen any longer and would appreciate a home cooked meal or fresh cookies. Can you do basic accounting…maybe a friend or neighbor needs help with their finances and bookkeeping. Can you clean a bathtub…bet there are elderly people in your life who can no longer bend over to scrub their bathtub or clean their floors.

You may take “what you do”….you talents and gifts…for granted, but there are those around you who could use your knowledge. Help doing things they can’t do that you do in your sleep.

Finding purpose by giving what you have.

It only took me two years to figure this out…

Sheetrock repair.

I posted a very helpful tutorial on repairing sheetrock HERE almost 9 years ago.

I decided to post another tutorial because I have two small sheetrock repairs…the result of removing security system control panels. (And a son who pointed out that I spent a fortune remodeling this house and left the worthless control panels)

Yes, I am removing a security system. It is the original hardwired system that was probably installed when the house was built 22 years ago and we have never even attempted to use it.

Why? Well, first we have a HUGE dog, an Anatolian Shepherd, that is quick to alert us to all boggy persons, delivery people, squirrels, unfamiliar cars, etc…day or night. And God help you if you tried to enter this house. She is the sweetest dog in the world…if she knows you or I am here to tell her all is okay. But I have no doubt she would make a meal out of you if she didn’t know you or she thought I was afraid.

No worries…we have a precious lab puppy who would be quick to clean up any mess Cleo makes…or give you puppy kisses if you are distressed. Typical lab. Not the best guard dog.

Second, everything is wireless these days. Our current security system is wireless. So an old hardwired security system is kind of useless.

I have found very little evidence of a hardcore security system. Basically there were two control panels, one in the bedroom, one in the laundry room…

…and two motion sensors in the ceiling. I removed those and covered the small holes with new smoke detectors…you can never have too many of those! (I also just noticed the doo-dads on a few doors…will have to deal with those eventually.)

When I removed the control panels in the bedroom and laundry room I found 2” x 2” holes in the sheetrock.

Curses.

So, here is another tutorial for repairing sheetrock without having to install backer boards or tape. I have used this method to repair 2” x 2” holes, door knob holes and even large sections when I removed walls (HERE)

Here are the supplies you will need to repair sheetrock….

*Scrap piece of sheetrock (you can buy this at Lowes or “repurpose” scraps from a new construction job site)

*Sheetrock mud

*Spray texture (my walls are orange peel texture…buy the texture appropriate for your wall texture)

*Broad knife

*Utility knife with a sharp blade

*Measuring tape

*Pencil

First, use a utility knife and make the hole square/rectangular. My holes were 2 x 2 inch squares so no worries.

After you have cut a decent "square" around any damage, measure the width and the height.

Then mark the scrap sheetrock, adding about 3" to that measurement! My sheetrock piece was 5” x 5”…that will leave about 1 1/2” on each side for “tape.”

Sheetrock has a paper backing on each side so it is very easy to cut...basically all you have to do is "score" the back side (usually the side that is brown) with your utility knife then just "snap" it. Then take your knife and cut through the paper on the other side.

After cutting a piece 3" larger than your opening, you will want to mark the actually opening size on the back side of the sheetrock, leaving 1 1/2" on all four sides. (This is where a little "square" tool or ruler will come in handy!) I always make my mark and cut about 1/4" smaller than my actual measurements just to give myself some wiggle room!

After scoring, "snap" one side at a time and carefully peel the "core" (the chalky inside) of the sheetrock and backing off the paper on the front side. You will do this on all four sides.

(Yes, I know I need a manicure.)

After you are all done, it should look like this.....

I also take my utility knife and make a "miter" cut at each corner...just a little slit from the corner of the board to the corner of the paper.  

Basically, what you have done here is create a patch with built in sheetrock tape...so there is no need to tape the gap around the patch and no need to try to put backing behind the board where you are patching...it is "ALL IN ONE!"  Nifty, huh? 

Before putting joint compound in and around the hole, "dry fit" your cut piece and make sure it will fit in the hole. If it seems to stick, you can shave a little off the edges with a utility knife. If you cut the piece about 1/4" smaller than the hole, it should fit right in.

After you make sure your cut piece will fit properly, mud the edges of the hole and the wall about 2" around the hole.

Set your cut piece into the hole and use your broad knife to smooth out the paper and push the excess mud out from underneath the paper edging with your broad knife so the paper lies flat. Then put more mud on your broad knife and lightly coat the entire piece.  "Feather" the edges where the new mud meets the wall. Coat the new mud a few inches onto the wall.  The less mud you leave on the patch and the wall, the less you have to sand! It is okay if you can still see the paper and board through the first coat...no biggy!

HINT:  Some mud can be pretty thick.  You can mix it with a little water and thin it down a bit...makes it easier to work with...but don't make it too runny! 

I usually let this first application dry overnight.  Remember, there is a bunch of mud along the edges that is basically "glueing" the patch in place.  You want to let that dry well before you start sanding. 

After this first coat of mud dries, sand it as smooth as possible.  Don't panic if you sand into the paper coating the sheetrock...it happens!   It really doesn’t matter what the sandpaper grit is at this point.

I always wrap my paper around a sponge sanding block...it helps you sand flat. Sand it as smooth as possible and make sure you "feather" the edges so that you don't have any heavy mud lines showing. Don't panic if you feel like you have sanded "too much"...you really can't.

FEEL the area with your bare hands...if you can feel the lumps and bumps and lines, you are going to be able to see them...so sand away!! (I can not stress this enough...SAND IT SMOOTH...CLOSE YOUR EYES AND FEEL!!!!)

After sanding it REAL smooth, put another coat of mud over the area.  Again, the smoother you coat it, the less sanding you have to do!   Be sure to feather the edges by mudding 2-3" around the repair area.  This is where a wider broad knife really comes in hand!

After this second coat dries, sand again....sand it as smooth as you can.  Again...if you can FEEL lumps, bumps and lines, you are going to be able to see them...so sand it smooth and make sure you feather the edges. This really is the "trick" to getting a good repair!

I can usually get by with two coats of mud...and that should be plenty.  If you feel you have had to sand down too much and need to add a light third coat, go for it.   Just make sure you let it dry well and sand BEFORE moving on to the next step.

After the patch and the surrounding area is really smooth, it is time to put on the spray texture.  

If needed, I usually wait to tape off the surrounding area until AFTER I sand the patch.  Joint compound will clean off easily with a wet towel but the spray texture is pretty tough stuff. So lay down a drop cloth (or newspaper) under the patch and tape off any trim BEFORE applying the spray texture.  

Most wall textures these days are what we call "orange peel."  But you might also have "knock down."  If the texture on your walls is just kind of bumpy, you probably have "orange peel."  If you have heavy blotches, you have knock down.  

You can buy cans of texture at Lowe's and they come in both orange peel and knock down. FOLLOW THE DIRECTIONS ON THE CAN CAREFULLY! And make sure you shake the can well!

(If you have never used spray texture before, I would suggest experimenting on a scrap piece of board or drywall…play with it a bit until you feel confident your application matches your wall texture. )

 If you have orange peel you will just spray it on the patch and surrounding area (using a circular motion to eliminate "lines" and spray "outside" the patch area)  If you have "knock down" texture, you will have to spray it on the patch and surrounding area, let it sit per the cans instructions and then take your broad knife and "knock down" the new texture after it has dried a bit.   Follow the directions on the can for proper application and dry times for both!   

Lighter is better....this stuff dries rather quickly, so if you think the texture is too light, go back over it AFTER the first coat has dried.  It is always easier to add a little texture than to deal with texture that is too heavy....so go light and reapply if necessary.

If you feel like you have totally botched it, just take a damp paper towel and wipe it off the wall while it is still wet. Then either practice a bit more on your scrap or try again.

If the spray texture appears a little "bumpier" than the wall texture, you can always take a piece of sand paper and LIGHTLY run it over the new texture AFTER IT HAS DRIED and before you paint.

ONCE YOU PAINT IT WILL BE REAL TOUGH TO MAKE ANY ADJUSTMENTS TO THE TEXTURE SO DO IT BEFORE YOU PAINT!!! Not impossible but more difficult.

DO NOT PAINT UNTIL THE SPRAY TEXTURE HAS DRIED COMPLETELY!!!!!

Now this is where that can of leftover paint you stored away will come in handy! Seriously, I can not stress enough how important it is to keep "spare" paint....store it somewhere in the house, clearly marked! You may have to match the paint color the best you can and then paint the entire wall. And this is not an issue at all if you are repairing walls before you repaint.

You will probably need 2-3 coats of paint to cover the patch since you are painting over "raw" sheetrock and texture.  I used a little 4" sponge roller and brush.

If you sand well and applied the texture properly, you shouldn't even be able to tell where the patch is!   

This does take a little practice.  After owning apartments and raising teens, I've had a LOT of practice.  But if you take your time, use the proper tools and really pay attention to details you should be able to do this little DIY project yourself!

I hope this gives you the confidence to finally tackle that sheetrock repair that has been bugging the heck out of you.

Accent wall tutorial...

I shared HERE how I found inspiration for the accent wall in my office.

I shared HERE the office after everything was done. (Well, everything for NOW!)

At first glance, the accent wall may seem somewhat intimidating.

This is actually a wallpaper. I like the dark wall with lighter accent stripes. I think it gives the wall “depth” and makes a room look larger.

You could easily replicate this entire look with paint…just paint the wall then paint the stripes.

I kind of did the opposite…light walls, dark stripes. I knew from day one I wanted a pink accent wall and decided to make the stripes out of walnut. My office is a big room with tall ceilings…it can take an accent wall that makes the room APPEAR smaller.

Now if you have followed this blog for any amount of time you know I have a deep love for walnut.

I made my fireplace mantel out of walnut.

My kitchen cabinets are walnut….

I made my living room shelving out of walnut…

And most of my furniture is walnut. If it is any other wood there is a good chance I will paint it if need be…but not walnut!

So, pink wall, walnut stripes.

The first thing I did in this room, after a good purge and reorganization, was paint the walls.

The accent wall was painted pink and the three other walls and trim where painted white (BM Chantilly Lace…closest I can find to a TRUE white without an undertone.)

They were ready to go….

So here is a little tutorial for doing any accent wall.

Print off a picture of your inspiration wall…as large as you can get it on a full size piece of paper. I printed off the picture above.

Measure your wall then draw the wall to scale on a piece of graph paper. For me, this is a must any time I am doing a room makeover. I need to know the scale of the space I am working with and how each element fits in that space…on paper.

Since I wanted the accent stripes to be centered between the ceiling and the top of the baseboards, I measured and graphed from the top of the baseboard to the ceiling. I did NOT measure from floor to ceiling.

Identify and mark your center point on the wall…from there you will work out from center to left and from center to right.

I had to figure out the “scale” of the stripes. I did this by making the assumption that the longest stripe in the inspiration picture (#1) was 4” from the ceiling…just a guess. When I measured that with a ruler on the printed picture, it measured 1/8”…that became my scale…1/8” = 4”. The distance between the stripes measured 1/4” on the picture, so I determined the distance between stripes would be 8” (I actually did 8” on center (OC)…which means I drew my stripes 8” apart then centered the 1” strips of wood on that mark.)

All this information gets transferred to my scaled drawing.

I counted the number of each of the different sized stripes. The inspiration wall had 4 different sized stripes…so I assigned each size a number, 1-4. There were 5 #1s (the longest)….4 #2s…5 #3s…3 #4s (the shortest) that would fit on my wall, spacing 8” OC apart.

By using my 1/8” = 4” scale, I determined that each stripe was 24” shorter than the next (12” from the top, 12” from the bottom).

So #1 is 107” (top of baseboard to ceiling is 115” - 8” (4” from ceiling and 4” from baseboard)…#2 is 83” (107” - 24”)…#3 is 59” (83” - 24”) and #4 is 35”. (59” - 24”)

If #1 is 4” from the ceiling, then #2 would be 16” (4” + 12”) from the ceiling, #3 would be 28” from the ceiling and #4 was 40” from the ceiling.

All this was drawn, to scale, on the graph paper.

Man, this sounds confusing….but it really is not. If you draw it all out on a graph paper to scale, it makes perfect sense…I promise.

Then it was all transferred, in pencil, to the wall.

It is so much easier to erase something that is wrong than it is to tear glued and nailed boards off a wall.

So, now I have the entire plan drawn out on paper, to scale, and I have the measurements of each stripe.

I decided to make my walnut stripes 1” wide. I also decided to give them a “3-D” affect by placing them on 1/2” furring strips. Walnut is a pretty expensive wood so I made the furring strips out of plain ole’ poplar and stained the sides to match the oiled walnut.

Matt and I used his table saw to cut the walnut in 1” strips. We cut the poplar into 1/2” strips.

Using the graph paper with the accent drawn to scale as my guide, I used a pencil and level to mark the wall where each stripe would go. After marking the wall, I attached the furring strips using Gorilla Construction Adhesive and my nail gun. I let that dry overnight since the nails did not hit a stud (impossible!!) so the construction adhesive is what really holds the furring strips to the wall.

While that was drying, I prepped the walnut strips.

After cutting each piece the length needed, I sanded, then applied Waterlox. I LOVE this oil. It is a clear oil. It is my “go-to” wood finish these days. I first used it on my kitchen cabinets a year and a half ago and it has held up beautifully!!!! So I used it on the mantel and shelving. No stain…just 3-4 coats of this stuff will make any wood shine!!!

I applied two coats…steel wool and tack cloth between coats…and then applied a third coat after I had installed the strips on the wall and puttied the nail holes.

I applied the walnut strips directly onto the furring strips. Again, I used the construction adhesive and nails.

MAKE SURE EVERYTHING IS LEVEL AS YOU GO!!!! I made sure each furring strip was perfectly level and then I made sure each walnut strip was level. I worked top to bottom…wood, especially narrow strips, will bend…so make sure each strip stays level all the way down.

After I puttied the nail holes with wood filler mixed with stain to match the oiled walnut, I wiped on one more coat of oil.

After all this is done, go back and do wall paint touch up. You will scuff up the walls with the wood strips and the level.

Beautiful!

Now, this may seem like a really tough project. It really is not. It is like any other DIY project…it all hinges on the “prep.” In this case, laying it all out on paper BEFORE you start buying materials and cutting wood.

Changes I would make? I wanted a “3D affect”…in other words I wanted the walnut strips to “stand out”…which is why I added the solid furring strips. I think if I did this again (which I won’t) I would want to use spacers to make the walnut strips stand out. The only downside to that would be that wood has a tendency to “move”…twist, bend, warp. By attaching the walnut strips to solid furring strips, the walnut will not bend or warp! So maybe the way I did it is best…who knows…I just think I would have liked the look of “floating stripes” better.

Other than that, I am pretty happy with the results.

I have some leftover walnut so I THINK, when it warms up a bit (we got 8'“ of snow last night and it is still snowing), I may make some floating shelves for this wall…

Again, I eventually want to make a few other changes to the room (rug, chair, credenza) but I love this accent wall.

As with all DIY projects, the key to success is the prep and planning.

This week I planned, prepped and prepared for board and batten in the breakfast room….

My plan is to install board and batten at chair rail height and paint it white.

I also finished this nasty china hutch…

I know this looks pretty ratty but I painted it and did a little tweeking on it and it turned out super cute. My plan was to sell it, but I think I will move it into this room and style it first…I may even like it well enough to keep it. We’ll see.

Hopefully next week I will have the breakfast room done and in order and I can share that as well.

Until then….

Laundry room floor tile reveal....

 One of the first rooms I shared in our home is the laundry room….I absolutely love it.

I love the storage…I love the window…I love the coffee bar. I just love this space.

I’m sure when I had a house full of kids and piles of laundry I wouldn’t have loved it as much but with just the two of us it is relatively easy to keep it in order.

I love it so much that I really haven’t minded the outdated floor tile!

Much.

Truth is, the stuff kind of gives me the willies. I know this tile is the original tile from 1998 because it is identical to the tile I personally installed in the apartments I built in 1998, 1999, 2000, and 2001. Yes, personally…THOUSANDS of square feet of this stuff. And then for over 20 years I had to scrub it and repair it and look at it covered in nastiness…auuuuggghhhh!

So yes, while I love the space, the floor tile did kinda make me growl occasionally. I knew I eventually wanted to replace it. I think the last time I shared this room I showed you the flooring issue that would need to be dealt with after removing a portion of a wall.

Let’s be honest…it’s just plain ugly.

But oh the work. Tearing out old tile is NOT for the faint of heart or weak in the back.

When we demoed the master bath in my last house we busted up the old floor tile. I have never been one to paint over wallpaper or tile over tile. Take it out and start fresh.

I have only “tiled over tile” one time and it was on a backsplash in a kitchen. Never a floor.

Busting out the old floor tile just didn’t seem like something I wanted to tackle. Tasha at Kaleidoscope Living recently updated one of her girl’s bathrooms and actually tiled over existing tile in a shower.

Hum….dare I?

Yes, I dared. After a TON of additional research. I googled “tiling over existing tile” and read every article and watched every video I could find on the subject. The general consensus was that it is certainly doable as long as the tile you are tiling over is solid.

Mine was.

One thing I could not get a firm consensus on is whether to prime the existing tile. Some articles and videos said prime, others didn’t even mention it.

I decided it couldn’t hurt and might even help…so I primed. I used this product…

… and after a whole three weeks of walking on the new tile I can attest that it works (three weeks people…this is not an endorsement for longevity!!!)

I will say it went on VERY easily…just rolled it on with a paint roller. It also dries quickly and has a low odor. It has kind of a “gritty” feel to it and I felt confident it would give a good base to the new thin set and tile.

Choosing the tile….I did what I always do. I went on Pinterest and looked for “inspiration.” (This is important because sometimes I THINK I want one thing but when I see it in other's spaces I realize I really don’t like it.)

Then I went to the tile store, picked up 4-5 samples, brought them home, laid them on the floor and easily made my decision. This is important when choosing ANY element in a room…tile, paint, curtains…because the lighting in your room may alter what you see in the store.

Here you can see I first moved out the washer and drier, removed the base trim, tiled, grouted, reset and painted the trim, them moved the washer and dryer back and proceeded with the rest of the floor. Much easier than trying to wrangle two big appliances into another room!

I love the new tile!!! Now I don’t growl at the floor anymore!

I did small grout lines (I think that is the “in” thing now and so much more practical) and dark grout. It will make it easier to keep the floor “clean looking.” Except dark floors show fuzzies which is common in a laundry room…but oh well.

Tiling, whether it be a floor or a backsplash, is not a terribly difficult DIY project. A wet saw is a must so if you don’t have one, borrow one or rent one. Watch TONS of how-to videos and make sure you follow EVERY manufacturer’s instructions, even if it doesn’t make sense.

Personally I would leave wet areas like tubs and showers to the professionals. There are special “water proofing” products and techniques that will prevent future leaks…and trust me you don’t want water issues around a tub or shower. If you feel like you want to tackle a tub or shower area, make sure you do a TON of research!

TIPS!!! Pay attention to transitions between the new tile and other flooring and the bottom of the doors. Will adding an additional 3/8” make you have to cut down a door or add a transition piece?

Neither is difficult but you need to plan! I was fortunate in this space. Adding the additional tile did not affect those things. The existing tile actually sat a good 1” below the wood floors in the breakfast room and the new tile butted up to the existing transition piece nicely.

I always carefully remove the existing base trim, repair if necessary, prime and then reinstall it on top of the new tile after I have grouted. Some people add base shoe. If that is the plan make sure it will work with the existing trim BEFORE you install the tile.

I use an oscillating saw (or you can use a special trim saw like THIS one) to cut the casing around the doors at the floor. I lay the new tile down on the floor and use it as a guide to cut the trim. Do this BEFORE you start tiling because it will make a mess and you will want to vacuum or sweep well after cutting the trim. Then when you are installing the new tile you can just slip it under the casing and not have to worry about making tedious cuts!

Which reminds me…always do all your prep work (removing trim, cutting casings, etc) and then vacuum and clean the floors well before starting. I also keep a little hand broom handy just incase I need to sweep a bit while installing. DON’T TILE OVER CRUD!!!!

Remove any doors that swing into the space you are tiling…makes it sooooo much easier to move around!

Prime…I know I could not find a consensus on whether to prime, but I am going to say one should error on the side of caution. I don’t think it is necessary if you are tiling over concrete, but definitely over existing tile.

And again, ALWAYS make sure the floor you are laying it on is sound and solid. If it is not, fix it! DO NOT lay ceramic tile on a wonky floor.

If you are laying on a wood subfloor, I personally would lay down durrock, tape and mud the joints (with a mesh tape and thin set) and add the water proofing products (something like THIS). Again, maybe overkill but better safe than sorry!

Research what size trowel to use with the tile you are installing. It matters!

Research whether to use thin set or mastic with your new tile. My personal rule of thumb is regardless of the size of the tile, I always use thin set on the floor. I only use mastic on wall tiles (like backsplashes) and only if they are small tiles. If you are tiling around a fireplace, make sure the thin set or mastic you are using will withstand heat!

These are just a few of my personal tips. Before you tackle a DIY tile job, or ANY DIY project, do a TON of research online. Read articles, watch videos. Don’t rely on the kid at Lowes manning the flooring desk to give you advice.

So, another little project in the books. The old tile is still in my pantry and in the spare bathroom…maybe someday I will tackle those areas.

But for now, I am just going to enjoy my laundry room floor. It is pretty and makes me happy!

This week I begin tackling my home office. Stay tuned, it’s gonna be fun!


All-season room reveal...again!

Last week I shared the new cabinet I bought for the all-season room and the changes I made to it to turn it into a giant litter box. Brian was a tad miffed that I would buy something only to hack it up for the kitties, but if you have ever had a litter box and all the mess that goes with it, you certainly understand my attempts to corral it.

The litter box is hidden away and the critter food is stored in the drawers!

One week later, it is working perfectly!

The outdoor couch I bought for this space arrived Friday night. I am always amazed that such a large piece can fit into a relatively small box…until I unpack it and start putting it together. Geez!

If I have learned anything in 57 years it is FOLLOW THE DIRECTIONS. While they may not make sense, they make sense. When they say “hand tighten only,” hand tighten.

It is in place and I love it!

It’s not near as plush and comfy as our living room couch but it is an “outdoor couch” so I didn’t expect it to be.

I was a tad concerned about the fact that it is a “canvas white” and the cushion covers weren’t zippered for easy removal in a house full of critters. Our new puppy (oh yes, we got a new puppy! To tired to share that news just yet!) managed to christen it within the first 10 minutes…muddy paws. Fortunately it cleaned easily!

The coffee table LOOKS like teak wood, but it is actually metal. Kind of chintzy if you ask me so eventually I want to get something a little better quality and much smaller…it is just too big for the space.

I am still debating the height of the kitty cabinet…I THINK I want to cut it down but I am living with it for the time being. One day the bug may hit me and I will drag it outside and hack on it some more!

For now I have a space perfect for watching the leaves and snow fall. In the winter I put out corn and bird seed so this will be the perfect spot for critter watching as well.

A few months ago I put a kitty door in one of the windows between the living room and the all-season room so the cats can could come and go without having to leave the door open.

Since this has turned into the “cat room” they will LOVE watching the critters. And no, the cats never go outside so the critters are safe.

Hopefully we will use the space now that the changes have been made…the cats certainly do!