All-season room revamp...

I seriously love this room….

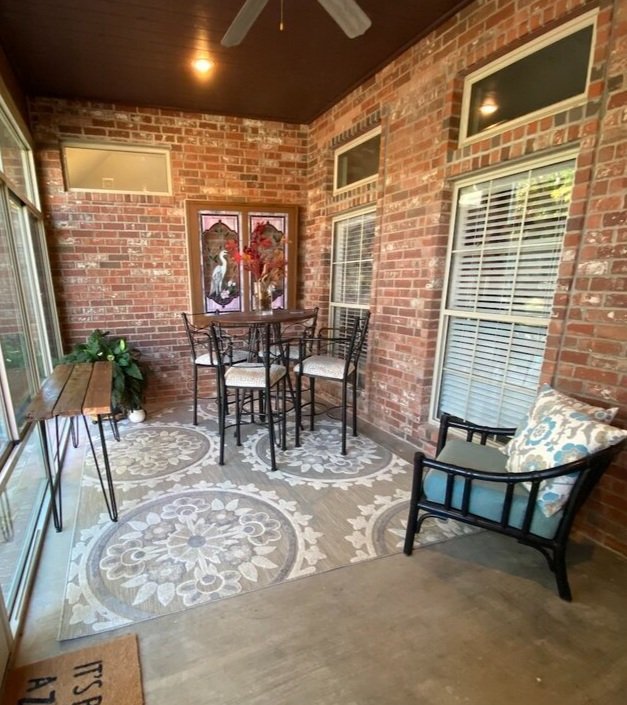
…it stays cool in the summer and relatively warm in the winter. I honestly thought we would spend a great deal of time here.

But we don’t.

When we want to sit “outside” for dinner or drink our coffee in the morning, we always sit on the screened porch.

The “all-season” room has become a place for the litter box and a dumping ground for all my outdoor critter food and seeds.

The rest of the room was still good, but again, we just never used the space like I thought we would.

So I am making a change….

Last week I ordered an outdoor couch. It should be here this week. I moved the big “bar table” to the screened porch, and I decided to corral the critter mess.

I searched Craigslist, flea markets and Marketplace trying to find a credenza/buffet/cabinet type thing I could convert into a storage/“kitty cabinet”….kind of like the one I made for our master bathroom.

I found this….

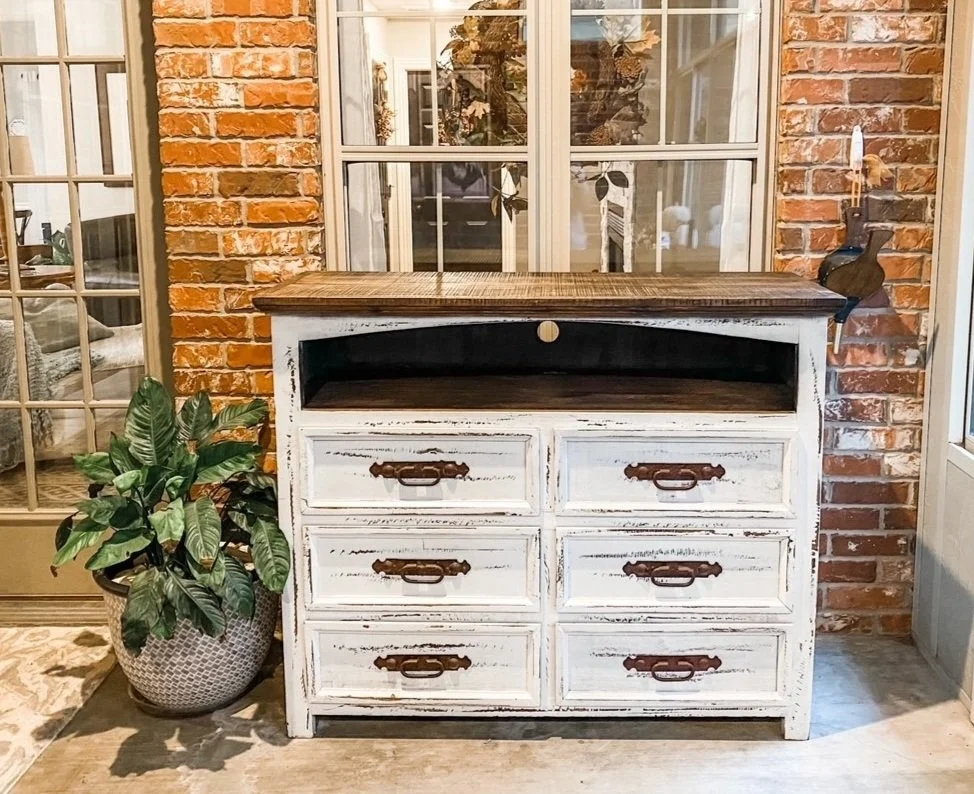
I like the “style” well enough in this space, but I am not sure about scale…seems kind of tallish so I may eventually cut it down and eliminate the void space. I think it is meant to be a tv cabinet and that space is for Blueray players or such. Who knows. Again, I kind of like the style for this space, I knew I could convert it for the kitty box and the drawers would give me storage for bird seed and critter food.

I decided to leave the bottom right drawer intact and just set the litter box in it. It fit perfectly after I cut the height down a bit and I can easily pull the drawer out to clean out the box. I trimmed the side of the drawer down just a tad using a jig saw. I used a skill saw and jig saw to cut a hole in the side for access….

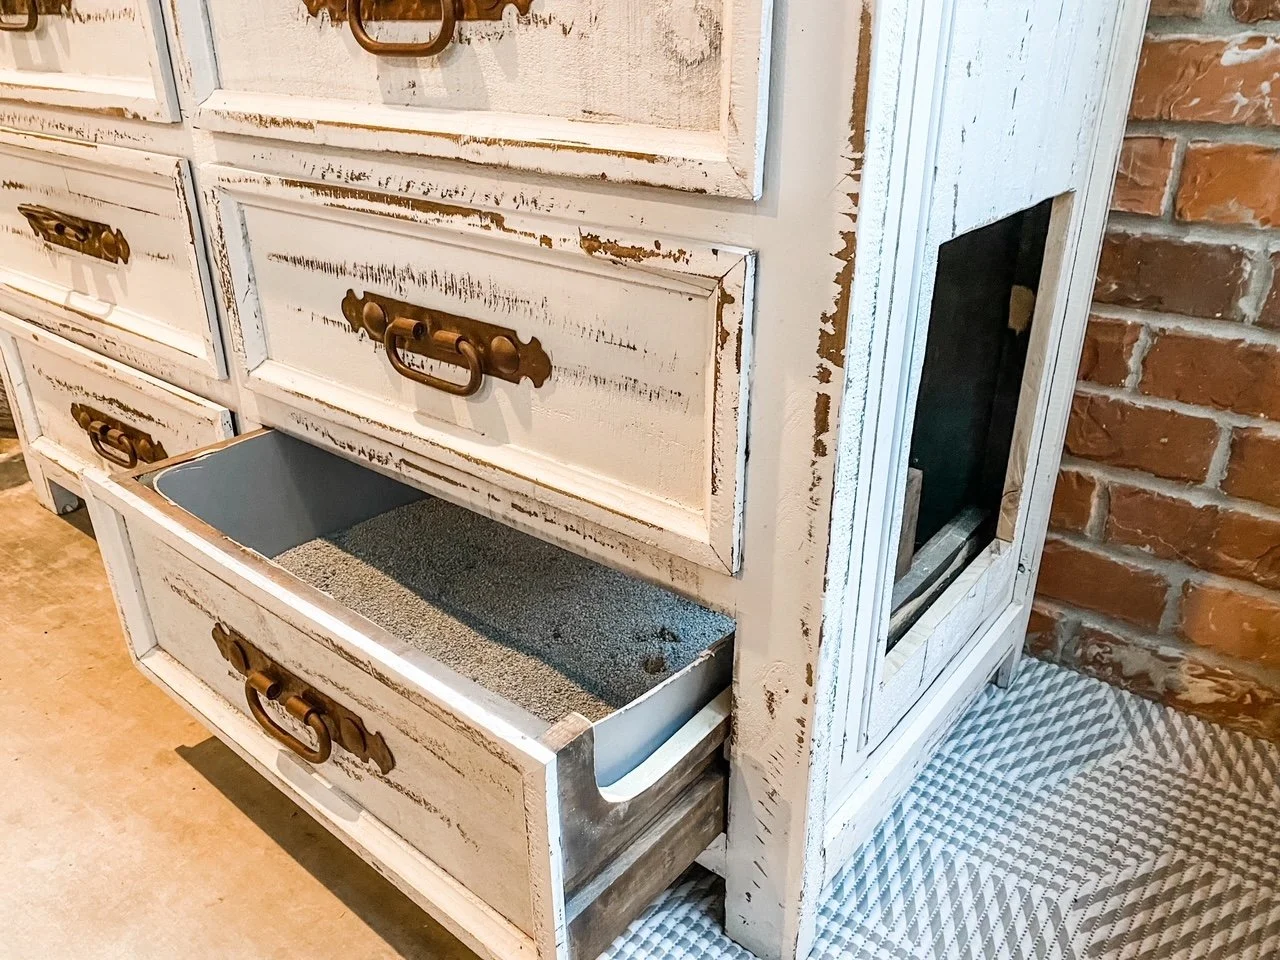
To give the kitties “head room” I had to remove the guts of the drawer above this one and then glue the drawer front back onto the cabinet…so it’s not really a drawer, it just looks like one.

TIP: To glue the drawer front back onto the cabinet, I applied wood glue all around the edges and put a blob of hot glue on each corner. The hot glue quickly sets up to hold the drawer front in place while the wood glue dries.

Again, not sure about the scale of the cabinet but all in all I am pretty happy with it. It sure beats the mess that was there.

Hopefully the new couch will be here this week and we can get the room completed. Again.

Sometimes you have to live in a space for a time before you know what you REALLY need.

Until next week…..

The fireplace makeover...Part 2...Airstone Faux rock.

The stone work is done….

…and I love it.

I highly recommend the Airstone product. At least as far as installation. It is a relatively easy product to install. Lightweight and exceptionally natural looking.

When we fire up the fireplace in a few months I will let you know how it holds up to heat.

This stone product would work well for a kitchen backsplash, fireplace face or a covered porch area. It SAYS you can use it for exterior application…I can’t attest to that since I did not use it outside.

I think this is a relatively easy DIY project.If you choose to install this product find a tutorial that works for you. More importantly though, FOLLOW THE DIRECTIONS!!!!

I do have a few tips.

Start at the top. Then the sides…them the bottom. That may seem backwards, but it is the way to do it. Start at the top by adding a temporary level brace….I just used some scrap 1x4. I let that dry over night, then did the same on each side, then the bottom. The Airstone mastic sets up fairly quickly.

IMG_2011.jpg

I used pennies as spacers between the floor and the stone. I do this because wood swells and moves and you don’t want the rock sitting on something that has movement. Same would apply if you were using it as a backsplash…don’t set any wall product (faux rock, tile, marble, etc) directly on a top or floor.

Use a tile saw to cut it. I have a wet saw so if you do not, rent one. Makes easy, precise work of tricky cuts.

Pay attention to how to apply the mastic…it’s like frosting a cupcake, not buttering toast.

The tub of mastic specific for the faux stone SAYS it does 30 s.f….it does not. Maybe I “iced” to thickly but I would suggest buying more than you think you will need…you can always return it.

Layout the rock on a template or floor before applying it on the wall and number each piece so you know how to property transfer it to the wall. Also, make sure you pull from different boxes…mix it up. Each box has several different “colors” and “textures”and each box may come from a different run…so you want to make sure you mix it up!

I used the “edge” pieces around the face of the fire box…I think it looks neat.

IMG_2025.jpg

I should have wrapped it around the entire bump out. I would have loved to take it to the ceiling. I am still debating on adding a hearth.

But the “coulda, shoulda, woulda” is always a brain worm until the project is finished.

I didn’t want to take it to the ceiling because I don’t want to remove the crown then have to paint the entire ceiling. I don’t think I want to add a hearth because this is a small space and I don’t want to crowd the space. I didn’t wrap it around the entire wall because, well, I just didn’t.

Hopefully when I get the mantle on, it will all come together.

So the mantel. I think I thought I knew what I wanted but now I not so sure.

My plan is to make a beautiful walnut mantel…smooth…perfect grain…low sheen. Now I am debating on a more “rustic” look with a lighter finish.

What to do, what to do.

As usual, I have searched Pinterest and found dozens of looks…I like them all!

This house style really does not lend itself to that “farmhouse/rustic” look so I think I am going to go with a more smooth, low sheen look. Sometimes you have to “read the room” when making decor decisions.

I bought some walnut boards (dang that stuff is expensive!) and specifically picked pieces with lots of grain and a few shallow knots. Just a smidge rustic but still the beauty of walnut. I know if I apply Waterlox (like I did here with my kitchen cabinets) it will have a dark finish. And I think I am okay with that. The stone is light and I think the dark walnut will be a nice contrast.

Now I am just waiting on my son to have a day we can work on his table saw. I shared HERE about my phobia of table saws. I bought him one for Christmas last year so I have one available and have a “saw buddy.”

Hopefully next week I will have a beautiful new fireplace to share!


Comment
Share

The fireplace project...taking it to base neutral!

As I mentioned when I first shared the den, one of my “eventual projects” was to reface the fireplace.

image-asset.jpg

But as I have said before, often “what is there” blinds us to “what can be.” So the absolute best thing you can do with any mentally blocked project is to take it to “base neutral.” Whether it be a room, a dresser, a fireplace….take out what you don’t want or paint it all white…and start with a blank slate.

After months of being mentally blocked, I took a hammer and crow bar and took it to “base neutral.”

IMG_2004.JPG

I love that this house has two fireplaces…and the one in the living room is fine ….for the time being….

IMG_2007.jpg

(Yes, fall puked in my house!)

But the den is a “less formal” space and I really want something less formal looking…like stone and a big beefy wood mantel.

I’ve dropped a few “inspirations” into a computer file…

Screen Shot 2021-09-27 at 2.49.47 PM.png

…and I have found several looks I like on Pinterest.

I like the look of stone or brick to the ceiling but that would entail removing the crown, which would then mean I would have to paint the ceilings throughout the entire space…kitchen, den and breakfast room. And that is just not a project I want to even think about at this time.

My plan is brick or stacked rock and a big beefy wood mantel…preferably walnut. I have been researching the Airstone product (sold at Lowes) and if I go with the stone look, I may give it a shot. But I also like the brick look so I am looking at brick tile as well….

That’s the plan…I think…maybe…

I don’t know. What I do know is it will be much easier for me to visualize what can be now that what was is gone.

I better get to visualizing because as you can see, I will need both mantels for stockings in about two months!!!

static1.squarespace.png
Comment
Share

DIY and Cinderella...

At this moment I am sitting in my “all-season” room drinking my coffee and watching it rain.

IMG_0254.jpg

Heaven.

There is so much I love about this house and honestly, I can’t t think of a thing I don’t. We have spent a great deal of time the past few weeks working outdoors and many of our neighbors have stopped to tell us how wonderful it is looking. (Probably more a testament to how badly the place looked to begin with.)

Making a home beautiful after years of neglect, for me, is like the Cinderella story. Abused, neglected, mistreated…until someone who cares comes along and waves a magic wand and makes everything beautiful again.

Simple analogy…seriously, who waves a magic wand and makes a home beautiful. Truth is, it takes a lot of work to turn an abused and neglected home or piece of furniture into something beautiful and useful.

My blog friend Cristina shared a chair she recently transformed. Abused, neglected, dated and something no one really wants in their home anymore was completely transformed into a piece of furniture fit for a ball!

A super simple project for someone like her and me and not so difficult that someone with minimal DIY skills couldn’t tackle. The hardest part would be the sanding and staining, but just a simple KSTP treatment (Kilz, sand, tack, paint (search on this site for examples) would completely transform this simple chair. How cute would it be paint lavender for a little girl’s room. Or bright royal blue for a little boy’s room. (Yes I am a “gender snob”…raised 4 kids like that and they are killing it…so get over it)

After sitting and watching it rain for a few hours I finally decided to tackle the trim and cabinets in the laundry room. As I mention I am painting all the trim a whiter-white…BM Chantilly Lace. Not so “yellow”…just a pure white.

I have drug my feet on the laundry room because I really dreaded painting the cabinets. But I did and they are now done. All except the new hardware and that should be here next week. The only other thing I want to do in that room now is replace the dated ceramic tile. That chore is WAAAAY down the bottom of the list.

Still waiting on the master bath windows. Built a dining table and bench for Brandon and Taylor’s new house…just waiting on the legs we ordered. Waiting on a few final touches before I FINALLY share my shop transformation. The glass for the pantry door should be here today. In other words, lots going on to share…just nothing quite ready.

Cinderella may have transformed with the wave of a wand…unfortunately most DIY projects take a little more time and patience. But the result is often the same…magical!

static1.squarespace.png
Comment
Share

Master bath reveal!

I KNOW! I have been MIA for a while now….there is just soooo much going on right now that I can not share! I promise, in due time.

In the meantime, AGAIN, I want to revisit one of my all time favorite “makeovers.”

I revealed my master bath makeover almost two years ago and I can honestly say I STILL love this bathroom. Love it! I don’t missed the tub at all and the walk-in shower is still my favorite addition to this house!

Head over to this post and check out the transformation and MAYBE next week I’ll have something new to share!

Making cabinet doors shut!

This is a super simple DIY “home improvement” project.

I would never give it a second thought had my neighbor, Carolyn, not been looking for a fix for her cabinet doors that seemed to be possessed. No matter how well she shut them, they would open. To solve for the problem she bought sticky velcro….a novel fix for a simple problem but they do actually make little magnet thingies to solve this problem.

Truth is, I have several cabinets that have the same issue…no matter how much I adjust the hinges (and it usually is a hinge issue) the doors never want to close all the way.

I told Carolyn about the little magnet thingies so she bought a few and it took us all of about 5 minutes to put two on the offending cabinet doors.

Which made me wonder why I haven’t done this on MY cabinet doors. Seriously.

So this week while I was in Lowes I picked up a few of these little “cabinet door magnets.”

Super simple to install…you can either place them at the top of the cabinet or at the base…personally I say place them where they are least noticeable.

Walla! Cabinet doors will now stay firmly closed but are still super easy to open with little resistance.

Such an easy fix for a simple problem!

It only took me 20 years to do it.

Making a lamp out of a candle stick...

Next week I hope to share my entire dining room makeover…just waiting on a rug and the chairs I ordered.

This week I want to share one tiny element.

In my quest to make a few improvements to my dining room I decided to change up the buffet vignette…specifically get rid of the floral arrangement and style it a bit differently.

(You can check out the buffet makeover HERE! )

So off to Home Goods and At Home I went. One element I wanted to add to the buffet was a tall lamp but I couldn’t find the one I had in my mind. I found some candle sticks I liked…only problem was I didn’t really like the tallest one as a candle stick…but when I stuck this little lamp shape on it I decided I kinda liked the look of it as a lamp…

Hum?

I THOUGHT the candle stick was ceramic or resin…I also thought it was hollow. So I THOUGHT I could drill a hole in the top and a hole in the base with a masonry bit, thread in some lamp cord, add a little socket and presto-bingo…a lamp.

What is the old saying about “best laid plans.”

Yeah…well…some things just don’t work out the way we THINK they should…this, my friends, is more the norm in DIY. Things often don’t go as planned….

So the first thing I discovered was that it is wood…not a biggy.

I can just drill a hole from the top to my bottom hole with one of my really long drill bits…right? Wrong. Because the drill hit metal…turns out the candle stick is actually made up of three different sections…with screws AND glue between each. Impossible to take apart so I ended up cutting the sections with my chop saw.

Fortunately it was a tad easier to drill through the individual sections than to drill through the entire tall candle stick.

Whew…that was a booger…but after that was all said and done, it was time to “repurpose” the whole thing into a lamp.

To make anything into a lamp, you will need a socket and a lamp cord…fortunately you can buy both of these things at Lowe’s.

To use the little top socket, I just removed the little screw on the side of the base…

… and drilled a hole in the top of the candle stick big enough for the base of the socket to sit in (1/2”).

To thread the new electrical cord through the stick, I threaded a thin wire (floral wiring works well) through the stick sections. Then I wrapped the thin wire around the end of the new electrical cord and pulled the wire back through.

Once the new electrical wiring was threaded through each section, I easily attached it to the new socket, set the socket into the 1/2” hole I drilled on the top section and hot glued it in.

Then to reconnect the three sections, I applied wood glue and a dab of hot glue just to hold it all together while the wood glue set up.

Presto-bingo…a lamp made out of a candle stick.

I like it.

Unfortunately I don’t think the existing art work will work with the candlestick/lamp…curses. For now I think I will just leave it be.

I took a few sprigs of the greenery from the old floral arrangement and stuck them in a little ironstone creamer…one of my little birdies…a stack of old books I had stashed away.

Trying to keep it simple for now but really looking forward to having a buffet to decorate for the holidays!

I THINK I will like the new rug and chairs I ordered…we will see. I already have one rug in the garage ready to go back to “At Home”…didn’t like it. My plan was to go with a tad more color but this rug has me second guessing that decision.

I am also contemplating curtains…I’ve had blinds for 20 years…we’ll see…one thing at a time.

It is coming along…


Another MCM dresser makeover!

This is not a dresser…this is a chest of drawers. I think there is often confusion, and I am the world’s worst at referring to a chest of drawers as a dresser.

There is a difference!

But seriously who cares…lol!

Regardless of what you call it, it was A MESS! But oh the potential.

My very first love…MCM pieces. It would take a month of Sundays to link to all the MCM pieces I have refinished…just search MCM or mid century on this site. Truth be told I would have kept every one of them if I didn’t have a fear of being featured on Hoarders. So I find pieces I love, give them a good little makeover and am sincerely happy when someone else gives them a good home.

In spite of all it’s flaws, I loved this piece. It had the normal wear and tear, a seriously cruddy finish, a chipped wood handle (aren’t those wood handles AMAZING!!!!) and what I THOUGHT was some stains around the hardware on the top drawer…turns out it is a beautiful wood inlay. But you couldn’t really tell because the finish was so icky. (The missing knob was in the drawer…yipeee!)

Let’s be honest, we will all have a pretty worn finish after 60 years on this earth!

My first thought was to paint the wood handles an accent color so I could repair the chip. My daughter suggested I just strip them first. So glad I listened to her. I used this process to strip the drawer fronts, handles and legs…the old stain came off the wood handles and revealed a beautiful white wood (oak, teak? Couldn’t tell)….LOVE!!! I sanded the chip down…and you know what, I can live with it….it is obvious it isn’t the way it is suppose to be but HEY…this is a vintage piece and vintage pieces are going to have a few boo-boos!

The drawer fronts and base were stripped and oiled, the cabinet was given a KSTP treatment (Kilz, sand, tack and painted with white high gloss enamel)

(After I took the pictures, I saw the VERY fine over spray on the top drawer…curses…a little mineral spirits cleaned it right off!)

Personally, I love the high contrast of the wood handles and walnut veneer. The Lane Acclaim tables I collect have the same stark contrasting wood detailing when I refinish them…LOVE!

Often vintage pieces would have been stained and finished so all the differing woods and the entire piece had a “uniform” look and the grain detail was toned down a bit. I say LET IT SHINE BABY!!! If you are a “purist” and want vintage pieces to reflect their original state, you probably don’t want to use the processes I use to refinish pieces!

I am all for exposing the grain and the natural color of the wood.

And I am all for bringing the old pieces back to life!

Comment
Share

Just another little makeover....

You are probably asking yourself “WHY?”

Why would she even mess with something so hideous?

Because I knew I could make them pretty…that’s why!!!

Truthfully these pieces didn’t have a lot going for them…but what drew me to them was the really cool hardware and they are pretty sturdy. Ugly, but sturdy!

The hardware is obviously “reproduction”…made to look like the hardware of years gone by.

They aren’t REAL flush mount ring pulls, but they are real brass so I knew with a little scrubbing, they would shine right up!

The top…fake leather…ewww!

But it was in good shape!

The front of the cabinet and drawers were solid wood but the sides were particle board…and it had some minor “water issues.” Some of the particle board had started chipping and “bubbling.”

Rather than use wood filler I decided to add a little trim piece to the bottom. Glue and trim nails…simple!

The trim covered the chipped areas and beefed up the base a tad. The minor “bubbling” on the particle board sanded smooth.

The bottom of the drawers had that “fake print” thing going on but they were in great condition. Ugly, but solid and sturdy.

I decided to disguise the “cheaponess” with paint.

First I removed all the hardware and spend a few hours scrubbing it. Again, I have no deep dark secrets for easily removing years of tarnish on brass. SOS pad and brass cleaner…and a lot of elbow grease!

I Kilzed the entire dresser…even inside the drawers.

Sanded everything smooth.

Tack cloth…always!!!!

I painted the inside and sides of the drawers with a sample pot of latex navy blue paint. (I recommend priming and painting the inside of drawers if they are “cheapos” or if you can’t remove offensive smells with a good cleaning and vinegar!)

Again, I am kind of obsessed with the white lacquer finishes especially with bright brass hardware.

The repaired sides painted beautifully!

Told you I could make them pretty!

Remember the MCM chest of drawers I featured here? I finally got the brass cone hardware from China…worth the wait!

Comment
Share

Modifying a cabinet...

When I first remodeled my master bathroom, I loved it...honestly, I still do! But someday soon I want to make some major changes just for practical purposes. Specifically, I want to remove the whirlpool tub (seriously, I think I have used it 3 times in the last 20 years!) and add a walk in shower.

As much as I love the existing tile, I know that will mean picking new tile for the shower....which means I will want to go ahead and replace the floor tiles...you know, while there is already a mess! But picking a tile that will carry me through another 20 years is tough for me...I know people say this or that is "timeless" but I can assure you NO home decor is timeless.

This will all happen as soon as I can find the perfect tile person to construct the shower. I do not want to hire someone who isn't VERY experienced because one of the worst things that can happen would be a shower that leaks! 

There is one other tiny detail that kinda bugged me...the "medicine cabinet."

While I love the look, it just wasn't practical. Why? Because everything in the back half of the cabinet goes there to die! Seriously, I found a bunch of products and pills that had expired years ago.

I cut down my kitchen pantry several years ago and have never regretted losing that extra 12" of space. I like how the smaller cabinet opens up the kitchen a bit! And again, everything in the back of the cabinet had a tendency to expire before I got to it. (No, I don't have a picture of the pantry before I cut it down...that was "preblog!")

So I knew cutting down the depth of the cabinet in the bathroom was doable! 

The first thing I did was take EVERYTHING out of the cabinet and took inventory. Major purgefest! I made sure that what was needed or wanted would fit comfortably if I only had 6" of depth. Yep, all but the basket of old prescription medication and most of it had expired. 

Once I knew that cutting down the cabinet wouldn't pose a logistical problem, I removed the cabinets from the wall, cut them down, rebuilt the back and reinstalled them. (Did I take pictures of this process...of course not...who knew I would share something so mundane!)

Sounds easy...honestly, it wasn't. There was an electrical outlet to deal with and the trim detail and then of course there was the exposed sheetrock boo-boos from the old marble backsplash...curses. I always think a project will be easier than it is!

But again, it was doable, and after a day of cutting and cussing I had a smaller cabinet.

The sheetrock boo-boo was an easy fix...mud, sand and retexture. Since I am good about keeping old paint for touchups...no biggy. Except it had been so long since I painted the bathroom, the paint had hardened. So I got to repaint the entire bathroom! Yippee!

Fortunately I had a couple of left over gallons of paint from when I painted my living areas...

Now I am eyeballing my kitchen again. I am a sucker for the "power of suggestion" so when I read that big ole' hulking over-the-range microwaves are now a kitchen "faux pas" I decided I want to remove the microwave above the stove...which means I have to find a place for a smaller microwave. The counter is not an option since I have a small kitchen and limited counter space. Hum...the pantry...maybe I can put it in the pantry. Well, I could if it weren't so stinking shallow...remember I cut it down so now no microwave more than 13" deep will fit. Thank goodness for the internet...I spent days researching microwaves. Fortunately, I found a few that would work so that's one hurdle! Small little things but honestly the only thing I use a microwave for is to boil water, warm coffee and melt butter.

Hurdle #2...can I afford to loose shelf space in the pantry? Again, I pulled everything out and start measuring cans of beans and moving shelves around. 

Doable! Keep in mind we are now a family of two and I don't need the food storage space I use to!

Hurdle #3...when I take down the over-the-range microwave...what then?

Honestly, I didn't know.

And then I found a solution that changed my whole plan...

A compact over the range microwave by Whirlpool!

I would post a picture but the site won't let me steal the pictures so just go look at it!

How cool is THIS! It's only about 10" tall so I won't feel like I have a big ole' hulking appliance hanging above my head while I am cooking.

I ordered the black stainless even though my stove is black.

I hate to buy new appliances when they work perfectly fine so I thought I would live with my old black stove for the time being.

(Fortunately for me the ignitor went out on the oven this week. Yippeee! Perfect excuse to order the new black stainless stove I drool on every time I go to Lowe's! God forbid I fix it with the $30 part!)

Now I don't have to give up pantry space or counter space. I guess it is still technically a "kitchen faux pas" since it is an "over the range microwave." But you know what...I'm okay with it. I'm probably one of the few who hasn't painted my kitchen cabinets, I have no shiplap in my house and while I would love to retile my entire kitchen and dining area with beautiful, light travertine tile, it's not happening...so I'm okay with bucking the decor trends!

The only problem I have is the space that will have to be tiled after the big ole' hulking microwave is removed. Fortunately, I am a pack rat and kept all my scraps from when I retiled the kitchen backsplash! Yea me! Thank goodness because that stuff was E.X.P.E.N.S.I.V.E!

So when I get the new microwave and stove are installed and the tile work done I'll share...can't wait!


Comment
Share