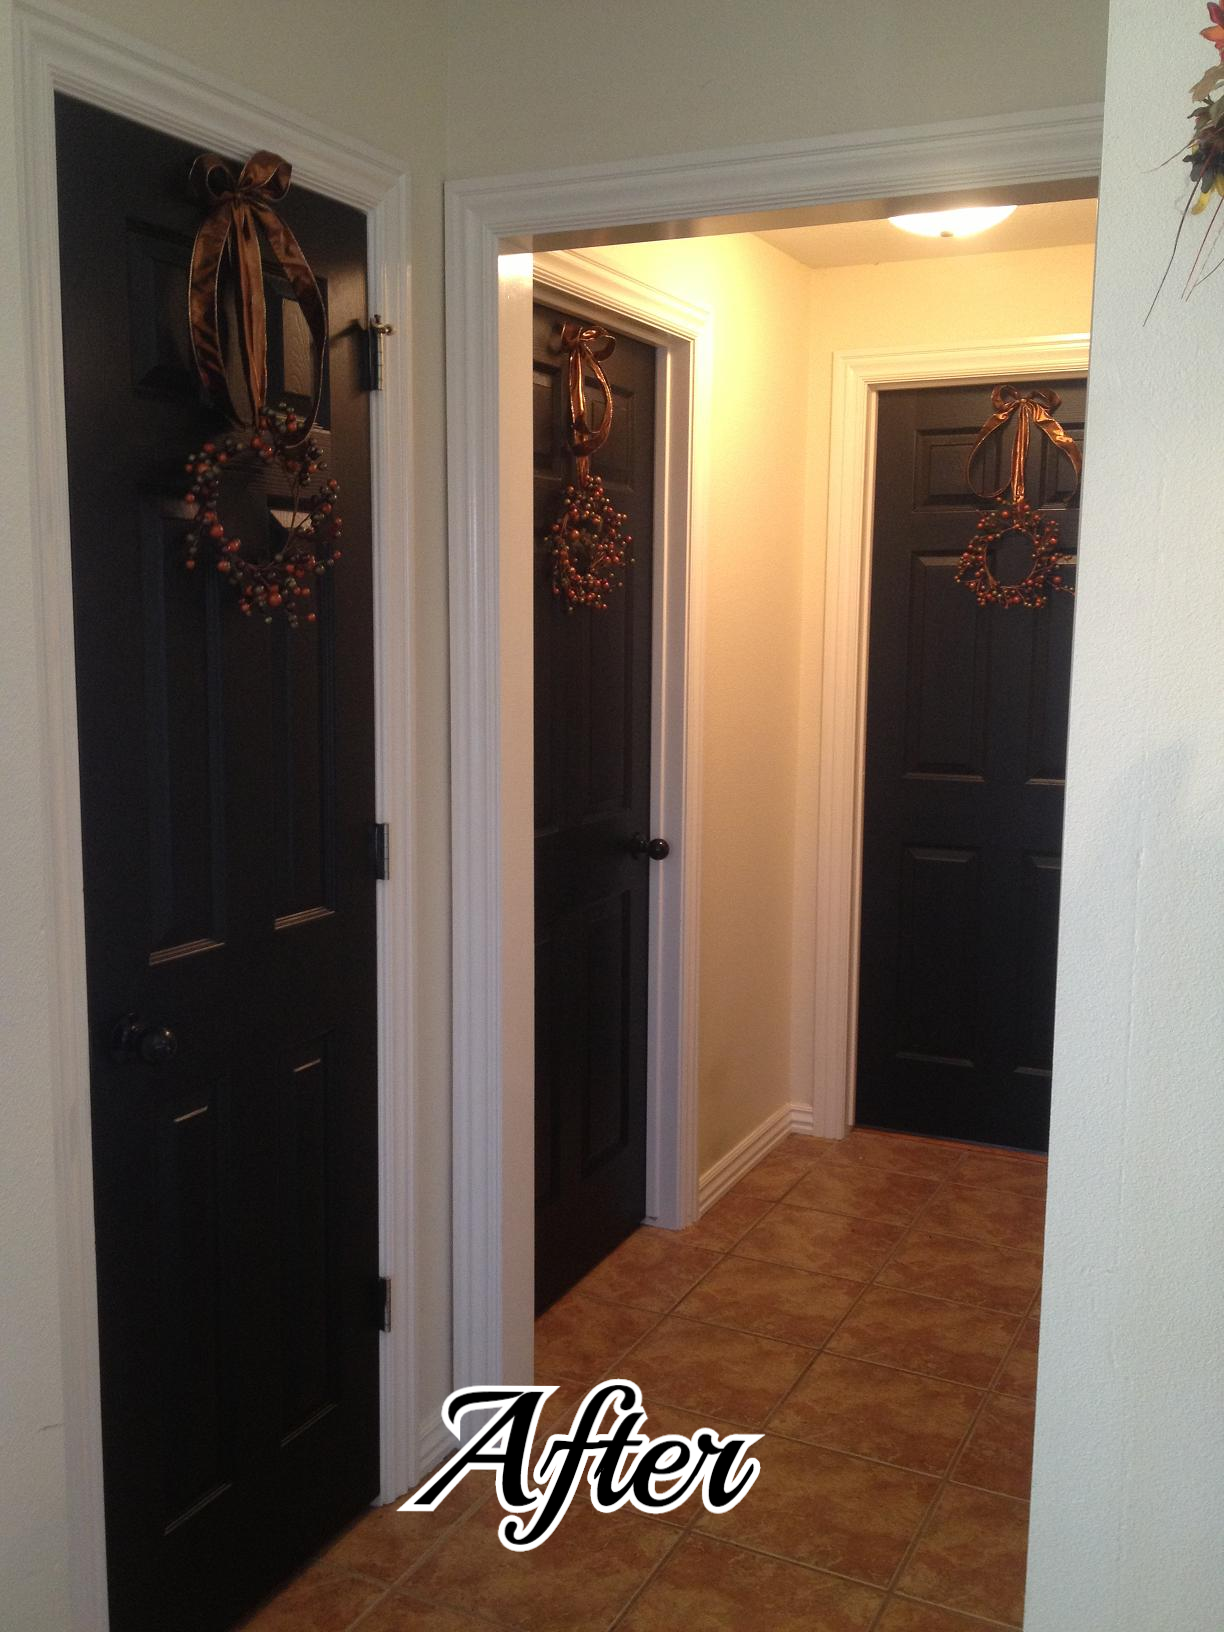
Black doors...

todolist.jpg

​As you see from my "to do" list, I have a few things I need to get done around here.  Today I am finishing up the nasty dresser I brought home last week (not even on my list) and I am finally making the pillows that have been piled on my dining room table for a week.  So later, maybe tomorrow, I will post about those two projects...for today I thought I would post the project I STARTED last fall...by that, I mean I still have the entire upstairs to do, but ohhhh what a difference it made downstairs.

Just Google "interior black doors"!  Oh. My Goodness.  Beautiful!​

hall before.jpg
after.jpg

Last fall I saw a thing on Pinterest about painting door knobs.  Thirteen years ago, brass was fab...not so much now and at $20 a pop, I wasn't about to change out all my interior door knobs.  So I took them all off, primed and painted them black with spray paint.  Looked pretty cool...

....until I saw some pictures of ALL black interior doors.  Now THAT is cool!​

entry before.jpg
office before.jpg
entry after.jpg
office after.jpg

Painting ALL your doors may seem like a daunting task.  So start out slow...do one room at a time.​

All my doors were already painted with a good quality oil based trim paint (AKA alkyd paint)....so I choose to use oil base when I painted them black. If your doors are already painted with latex, use latex. Again, latex paints are MUCH better than years past!  (Word of advice, if you are every changing the "type" of paint, make sure you prime FIRST! You can "tint" your primer so you only have to do one coat of the actual paint) Black is a VERY difficult color to mix, so I bought a premixed black in SATIN finish at Sherwin Williams.  I used a foam roller and high quality paint brush.  I made sure to tape off all the hinges and knobs.  ​ Also, trust me...the first coat will look beyond AWFUL!  Patience...paint a second coat before passing judgment...one coat of black on white WILL NOT cut it.  

Regardless of what kind of paint you use, always put paper (newspaper works great!) or a drop cloth under the door....trust me, black oil based paint is TOUGH to get off any type of floor (which is why I have black speckles under my doors....grrrr)​

Both the boys (yes my adult boys still "claim" their rooms!) want their closet doors red....I think it will look awesome, so I will do all the upstairs bedroom doors in black and their closet doors in red...someday...maybe.  I am kind of hoping this fad passes before I actually get to it.  After all, the only people who go up there are the kids....I only go up to retrieve dishes and dirty clothes...and that's only because I run out of dishes and don't want to get hit with 10 loads of laundry all at once!​

Off to finish pillows and the dresser....busy day!  ​

This is the first time in three months I haven't been busting it every day at the apartments....nice to finally have a little time at home to get some things done!!!  ​

Comment
Share

Type A personalities should not blog......

It's not that I haven't been doing DIY projects for decades, it's that I have SOOOOO many I want to do and share NOW.  So I am going in 50 different directions trying to get a dozen little projects done so I can post them.​  A dresser, an ottoman, an old office chair, pillows, the 3 legged table, ANOTHER table I picked up at Goodwill today (it has all it's legs intact), cork boards...you name it, I've got it going on here.  It's madness and my house is a disaster....NOT a good thing!

Seriously, I think I have a few years left in me....I mean honestly, eventually I'll run out of things to post if I try to do it all right this minute....typical "type-A" personality.  ​

IMG_8544.JPG
red before.JPG
IMG_8649.JPG

But I did get one project finished today....thank goodness.​

About a month ago my son asked me to spend a Saturday at an auction with him....I LOVE auctions but more than anything I love spending time with the kids when they actually WANT to spend time with me! And it was a cabinet shop going out of business...fun fun!!  Ask me how much of the stuff I bought I REALLY needed....ummm...probably NONE of it.  But I picked up a huge stack of cork board....and of course that stuff is not cheap and who doesn't need a cork board?​

So I set out searching for old frames...any interesting frame I could find.  Found most of them at Goodwill for next to nothing!

Pop the picture and glass out, cover the backing with cork board and paint the frame....PRESTO!!! Nifty cork board!

The large one is for Matt's girlfriend, Kaitlyn.  She is the mother of my grandpuppy, Beau.  Did you ever read "Marley and Me" or see the movie (OMG, if you want a good cry....)  That is Beau....silliest dog in the world but I just adore him.​

Anyway, when I went back to Hancock Fabrics today to buy the other THIRTY BOXES of pearl and bead strands (seriously, who could pass them up at 90% off....I just didn't realize they had soooo many left!) I found these nifty little 2 1/2 x 3 1/2 magnetic picture frames on clearance for .40....paint them up and they are cute as a bug on the cork board.  ​

IMG_8650.JPG

Now, here is where I ran into a "design" problem.  When you run into a design issue, or your "best laid plans" aren't panning out, do what I do....wing it.   My PLAN was to put a strip of magnetic tape across the board, cover with the cute houndstooth ribbon and then stick the magnet photo frames on it.  No dice.  The magnetic tape was crap and NOTHING would stick to it and the magnets on the frames weren't any better.  To top it off, I soon found out that hot glue is NOT a good medium for cork board.  ​

So, I used regular glue to attach the ribbon onto the board, glued 3 super powerful magnetic "dots" on the ribbon, hot glued magnetic dots to the back of the frames, and PRESTO....we have take off!!!  Or at least we have some cute little frames that can easily be changed out from time to time!​

There are soooo many things you could do to spruce up a cork board.  Cover the cork in fabric, attach vinyl lettering or even paint on the cork, cover with ribbons and bow....just so many ideas...Google cork board imagines and you will be surprised at the ideas that are out there. ​

I have some old window panes I took out of an old house...they have three divides in them and I am going to put cork in one, metal for magnets in one and chalk board in the one....I'll post that if I ever get to it....but before I do that project, I am bound and determined to get some of the others completed!​

Comment
Share

Ode to Joel....

I try to come up with clever post titles....Lindsey at Betterafter.net ​always has the most clever titles for her blog posts.  Just too much brain effort on my part.  Sometimes I am funny, but it is just because I say and do stupid things...not because I am necessarily "witty."   Besides, if you aren't over the age of 45, you wouldn't get the title of this post.  (Ode to Billy Joe....not so great song...even worse movie)

Anywho, it was one of those days I had a million errands to run, one of which was to Hancock Fabrics to pick up some piping for the pillows I am making (another post for another day...if I ever get around to it!) Always on a hunt for a bargain, (i.e. digging around on the back shelves)​ I found some 90% Christmas clearance.  CHRISTMAS IN MARCH!!! LOVE!!!   I love Christmas...I love decorating for Christmas.  And every single year I proclaim "THIS IS IT!!!  Not another thing!"  But then I find the bargains....

IMG_8640.JPG

Seriously, who wouldn't love boxes of ornaments and gingerbread cookie cutters for .59 and strings of silver beads and pearls for 1.49 a strand!!!  And those cute little metal trees for 1.69!  Seriously, who wouldn't love finding this stuff in MARCH!!??? If I didn't love spring and fall so much I would be antsy for the Christmas holiday!!!

Anywho, taking this picture reminded me of how much I LOVE MY UNDER COUNTER LIGHTING....which brings me to my "Ode to Joel."  My FAVORITE son in law in the whole wide world.  Now, he will be quick to remind me that he is my ONLY son in law, but honestly, that is not the point.  He is my favorite.​

And not just because he is an electrician who is gracious enough to work during his visits.  See, I always have some electrical issue that is just a tad over my head...or rather one that I know would take him 4 hours to complete when it would take me 2 DAYS!  And who has time for that during the holidays...seriously! ​

So for YEARS I have wanted to put can lights in my kitchen.  I just thought they were so cool looking AND my kitchen felt a bit "dark" and "smallish" because of the lack of decent lighting.  But the "in" can lights right now are a little pricey and I knew I wouldn't be happy with the ones like I  have in my den...because, after all, those are not the "in" lights right now.  The "in" can lights are like the ones Joel installed in ​my bathroom last summer...that I love...but rarely turn on because you could land a jet in there now when both the vanity and can lights are on!

So last fall,  I went to Lowes (again, my fav) and started looking at lighting options.  I have never been a fan of the little "pot" lights that go under cabinets...kind of thought they were silly looking...but I did like the LED strip lighting they had...and while an 18" strip was around $60, I only needed three!  ​And they last "a lifetime" and you never have to change the bulbs.  Hum....that is right up my alley. 

So that is what we bought.  Long story short, we created a new switch next to the disposal switch (that required adding a larger box and second switch and some unanticipated tile repair....good thing I keep spare everything!) The lighting was hardwired to the switch and Joel was able to run the wires behind the microwave and refrigerator so the wiring wouldn't show.  ​

Oh, My. Goodness!  I swear my kitchen doubled in size!!!​

IMG_5011.JPG
IMG_5009.JPG

It is just sooo difficult to appreciate what a difference this makes with pictures.  Joel installed them the day before Thanksgiving last year, and I swear my kitchen prep space doubled in size!  It made a huge difference in my usable space because the two corners were just always so dark and impossible to use as prep space. ​

Again, he only installed three...one over the coffee pot (far left), then ran the wiring behind the microwave to the left corner cabinets and installed one there, then ran the wiring behind the refrigerator to the corner in the right.  AMAZING!!  ​

I installed new granite counter tops two years ago (talk about the steal of a lifetime...for another time!) and these new lights just made them POP!!!  Seriously, it has "sparklies" in it I didn't even know were there.  Like little pieces of quartz all through it...I knew it was beautiful granite...but with the added lights, it is breathtaking...seriously! 

But the biggest difference, again, was the amount of usable counter space, which in a small kitchen is a huge plus!!!!​

So....Ode to my SIL Joel...not only is he a wonderful husband and father...but he is a pretty handy dude to have around when there is some serious electrical work to be done!  Is this a "DIY" project?  Yes...it very easily could be and I have no doubt I could have done it myself.  But honestly, he did it in a quarter of the time it would have taken me to do it, at a time when I was a bit busy making pies and stuffing.​

So in my book, that makes him the BEST SON IN LAW IN THE WHOLE WIDE WORLD!!!​

IMG_1204.JPG
Comment
Share

Little house projects...

When you get your miter saws this year, let me know and we will start on the bookcases and fireplace surrounds.  I built all these over the years and have NO doubt you can whip one up in a matter of days....lol!  Just kidding...I would never expect the average person to tackle this size of a project...but my point is, if I can do THIS, you CAN do the smaller, simpler projects! 

And I will let you in on a little secret...when I had to do the "inside corners" of the large crown molding on the den fireplace, I went over to a house being built down the street and paid the trim guy to do it.  I know there is a trick to cutting inside corners on crown molding...something about backwards, upside down, stand on you head...but I haven't ever gotten the hang of it.  Outside miter cuts on crown...no problem.  So when I do the tutorial on building up your door trim, not a problem.  But maybe we can get a "guest"  to help us learn the art of cutting inside corners on crown molding!  Or better yet, I'll just teach you how to build those cool little corner doodads that look so classy!

In the next few days, I will post some pictures of my staircase...stripped the carpet and put in new treads and risers...seriously, it isn't THAT hard.  And when you get your new tools, you CAN do it.  I will also posts pictures of my master bath...with just a teeny effort, you can completely change the look of your bathroom.   And I promise to show you before and afters on my kitchen under counter lighting...seriously, you can't imagine the difference it makes in your kitchen!  

Until then....

My den...I painted this wall 12 years ago when I built this room...perfect example of "paint it a color you love and you will always love it!"  It is true!  I've never had any desire to change this color!   Now the TV stand...that's another story and a project I look forward to doing in the VERY near future...just have to find a piece that speaks to me...


IMG_5015.JPG

I built these built-in bookcases in my living room when the house was under construction.  Originally, there were just two walls with weird windows.  Had NO idea how to place furniture or decorate around them so I did the next best thing...just built some bookcases around them! Perfect spot for the Christmas tree, and I love decorating the arch window in the fall and at Christmas!

IMG_5021.JPG

Can you tell I read...A LOT...these are just a few!     

IMG_5025.JPG

Someday I MIGHT get around to putting up curtains...they are all the decorating rage. For now, I just enjoy waking up to the view...and the sun, if it is up before me...rare! 

Comment
Share