Please sir, may I have some more pillows....

I'm telling you, even when I try to be clever with my post titles, all I do is show my age...grrr.

Pillows....LOTS of pillows. And for a reason, not just because I LIKE to sew...because honestly, I REALLY dislike sewing.  I can do it...and IMO everyone should know how to do the simplest things on a sewing machine. Sew a hem, make a decorative pillow, make curtains.  Simple stuff...not necessarily make a tailored jacket or Easter dress, but simple stuff.  My mom had me take sewing lessons when I was a teenager.  Didn't necessarily like them, but I am grateful I can use a sewing machine now.  If you can't, sign up for a class at your local craft or fabric store and learn.  Buy the cheapest, simplest sewing machine and learn how to use it. My machine basically sews straight stitch and zig-zag.  I think it does button holes too, but I don't...

So back to WHY I had to make a bunch of pillows. First, last year I decided I didn't like the big fluffy cushions on my couch.  Haven't really liked them since I bought the couch.  But they were expensive and filled with down fill.  If you have ever bought stuffing for pillows, you know it is expensive....not something to waste.  So I bought some inexpensive white cotton material, measured out 19 x 19 and 13 x 21 squares for pillow forms ( allowing for a 1/2" seam all around), sewed them together and stuffed them with the down stuffing from the too fluffy cushions.  I think they call that upcycling now....much better adjective than cheapo. I ended up with 5 oblong and 5 square ones....wow!  he reason I made and stuffed forms, is because as you may know, some down feathers are "pokey."  Having the form in the pillow helps protect your guests from being speared by a feather.  If you are just using plain old "fill" (without feathers) no need for the forms. Just make the pillows and stuff them!

Once I had all these pillow forms, I started digging through my leftover material from past projects.  Mostly upholstery projects.  I found enough to make these pillows....

IMG_8672.JPG

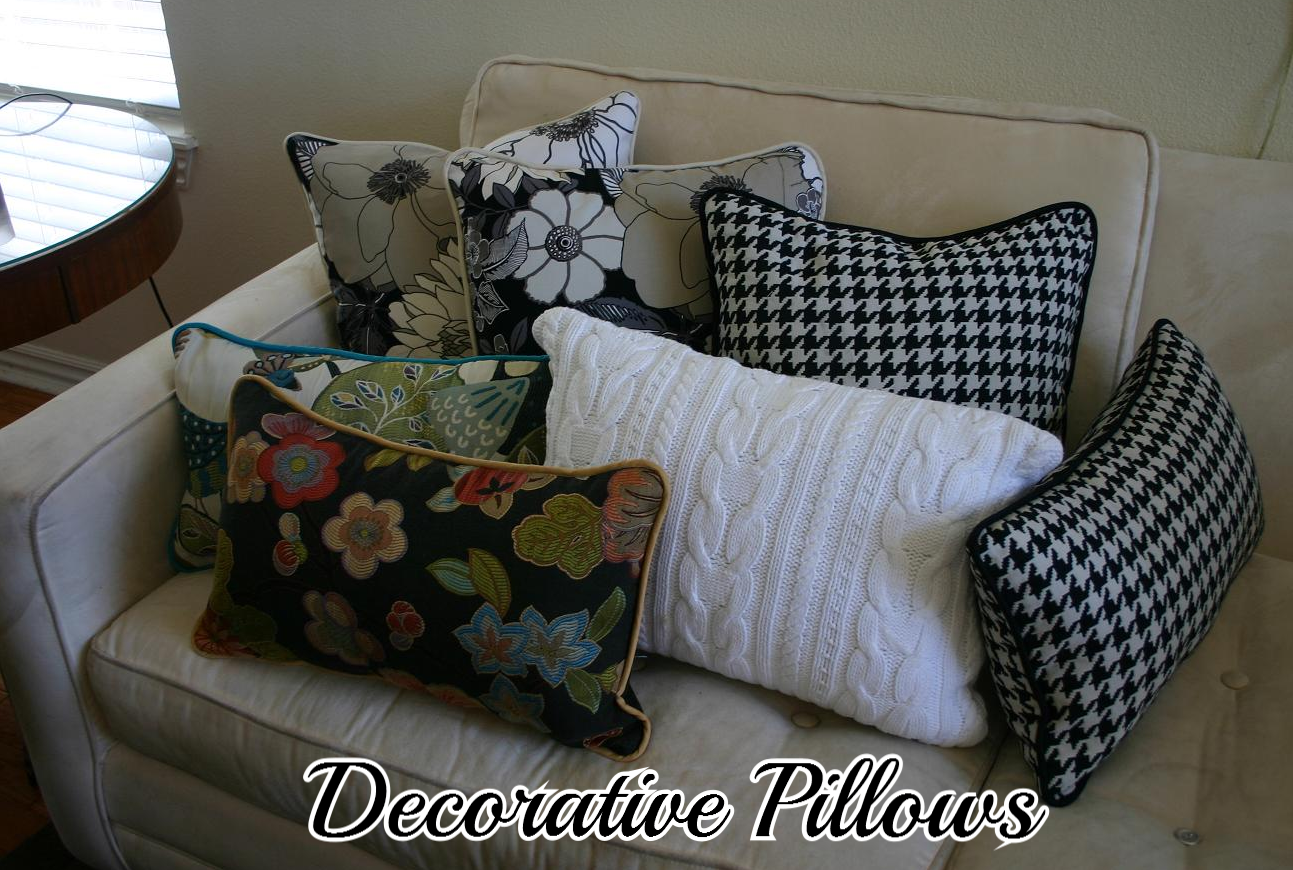
I had material from the dining room chair recover, the peacock chair, my wingback chair and my daughter's houndstooth chair.  The white cable knit is actually a sweater I bought at Goodwill for $2, and used to make a pillow!  ​

Depending on the amount of material I had, I cut some 19 x 19 and some 13 x 21.  Two for each pillow.  ​

I trimmed all of them (except the cable knit) with piping.  YOU DO NOT HAVE TO DO THIS!  I just like the way it looks...start simple and forget the piping if this is your first attempt!

Now piping CAN be tricky.  You can buy it already made and ready to sew into your pillow....but that is a tad expensive....they have some inexpensive premade but they also have some really nifty ones with beads and all kinds of stuff!  If you have enough material, you can actually make your own piping.  But most people don't understand that piping material MUST be cut on the bias....which means it has to be cut at a 45 degree angle across the material or it puckers reeeeal bad...which means you have to have A LOT of material to make the bias for your piping.  Confusing, I know. 

Easiest, and by far the cheapest, is buy "premade" bias tape and cover piping with it.  It comes in all colors and you are sure to find one to accent any pillow you are making!

Just iron the bias tape flat, fold in 1/2 and sew in the piping with your zipper foot (seriously, learn to sew a straight line!) and then sew it onto one side of your pillow....then pin the other side of the pillow, face down, and sew again...leaving an opening to stuff the pillow form or batting.  Then just "whip stitch" the opening. Seriously, NO biggy if you can do the basic stuff on a machine!  ​(Seriously, take a lesson or have a friend teach you!)

God knew what he was doing when he decided I would not have a lot of money.  He knows I am a creative person and would miss out on the joy of learning to do things like refinish furniture, painting a room, and designing and building if I had money to PAY someone to do it.  And honestly, if I won the lottery tomorrow, I would still do those things because I enjoy them.​

But I probably would never sew again....I just really don't enjoy it.  But I do enjoy having nice thing...little treasures throughout the house...and decorative pillows are little treasures. ​

So I sew......​

Comment
Share

Black doors...

todolist.jpg

​As you see from my "to do" list, I have a few things I need to get done around here.  Today I am finishing up the nasty dresser I brought home last week (not even on my list) and I am finally making the pillows that have been piled on my dining room table for a week.  So later, maybe tomorrow, I will post about those two projects...for today I thought I would post the project I STARTED last fall...by that, I mean I still have the entire upstairs to do, but ohhhh what a difference it made downstairs.

Just Google "interior black doors"!  Oh. My Goodness.  Beautiful!​

hall before.jpg
after.jpg

Last fall I saw a thing on Pinterest about painting door knobs.  Thirteen years ago, brass was fab...not so much now and at $20 a pop, I wasn't about to change out all my interior door knobs.  So I took them all off, primed and painted them black with spray paint.  Looked pretty cool...

....until I saw some pictures of ALL black interior doors.  Now THAT is cool!​

entry before.jpg
office before.jpg
entry after.jpg
office after.jpg

Painting ALL your doors may seem like a daunting task.  So start out slow...do one room at a time.​

All my doors were already painted with a good quality oil based trim paint (AKA alkyd paint)....so I choose to use oil base when I painted them black. If your doors are already painted with latex, use latex. Again, latex paints are MUCH better than years past!  (Word of advice, if you are every changing the "type" of paint, make sure you prime FIRST! You can "tint" your primer so you only have to do one coat of the actual paint) Black is a VERY difficult color to mix, so I bought a premixed black in SATIN finish at Sherwin Williams.  I used a foam roller and high quality paint brush.  I made sure to tape off all the hinges and knobs.  ​ Also, trust me...the first coat will look beyond AWFUL!  Patience...paint a second coat before passing judgment...one coat of black on white WILL NOT cut it.  

Regardless of what kind of paint you use, always put paper (newspaper works great!) or a drop cloth under the door....trust me, black oil based paint is TOUGH to get off any type of floor (which is why I have black speckles under my doors....grrrr)​

Both the boys (yes my adult boys still "claim" their rooms!) want their closet doors red....I think it will look awesome, so I will do all the upstairs bedroom doors in black and their closet doors in red...someday...maybe.  I am kind of hoping this fad passes before I actually get to it.  After all, the only people who go up there are the kids....I only go up to retrieve dishes and dirty clothes...and that's only because I run out of dishes and don't want to get hit with 10 loads of laundry all at once!​

Off to finish pillows and the dresser....busy day!  ​

This is the first time in three months I haven't been busting it every day at the apartments....nice to finally have a little time at home to get some things done!!!  ​

Comment
Share

Type A personalities should not blog......

It's not that I haven't been doing DIY projects for decades, it's that I have SOOOOO many I want to do and share NOW.  So I am going in 50 different directions trying to get a dozen little projects done so I can post them.​  A dresser, an ottoman, an old office chair, pillows, the 3 legged table, ANOTHER table I picked up at Goodwill today (it has all it's legs intact), cork boards...you name it, I've got it going on here.  It's madness and my house is a disaster....NOT a good thing!

Seriously, I think I have a few years left in me....I mean honestly, eventually I'll run out of things to post if I try to do it all right this minute....typical "type-A" personality.  ​

IMG_8544.JPG
red before.JPG
IMG_8649.JPG

But I did get one project finished today....thank goodness.​

About a month ago my son asked me to spend a Saturday at an auction with him....I LOVE auctions but more than anything I love spending time with the kids when they actually WANT to spend time with me! And it was a cabinet shop going out of business...fun fun!!  Ask me how much of the stuff I bought I REALLY needed....ummm...probably NONE of it.  But I picked up a huge stack of cork board....and of course that stuff is not cheap and who doesn't need a cork board?​

So I set out searching for old frames...any interesting frame I could find.  Found most of them at Goodwill for next to nothing!

Pop the picture and glass out, cover the backing with cork board and paint the frame....PRESTO!!! Nifty cork board!

The large one is for Matt's girlfriend, Kaitlyn.  She is the mother of my grandpuppy, Beau.  Did you ever read "Marley and Me" or see the movie (OMG, if you want a good cry....)  That is Beau....silliest dog in the world but I just adore him.​

Anyway, when I went back to Hancock Fabrics today to buy the other THIRTY BOXES of pearl and bead strands (seriously, who could pass them up at 90% off....I just didn't realize they had soooo many left!) I found these nifty little 2 1/2 x 3 1/2 magnetic picture frames on clearance for .40....paint them up and they are cute as a bug on the cork board.  ​

IMG_8650.JPG

Now, here is where I ran into a "design" problem.  When you run into a design issue, or your "best laid plans" aren't panning out, do what I do....wing it.   My PLAN was to put a strip of magnetic tape across the board, cover with the cute houndstooth ribbon and then stick the magnet photo frames on it.  No dice.  The magnetic tape was crap and NOTHING would stick to it and the magnets on the frames weren't any better.  To top it off, I soon found out that hot glue is NOT a good medium for cork board.  ​

So, I used regular glue to attach the ribbon onto the board, glued 3 super powerful magnetic "dots" on the ribbon, hot glued magnetic dots to the back of the frames, and PRESTO....we have take off!!!  Or at least we have some cute little frames that can easily be changed out from time to time!​

There are soooo many things you could do to spruce up a cork board.  Cover the cork in fabric, attach vinyl lettering or even paint on the cork, cover with ribbons and bow....just so many ideas...Google cork board imagines and you will be surprised at the ideas that are out there. ​

I have some old window panes I took out of an old house...they have three divides in them and I am going to put cork in one, metal for magnets in one and chalk board in the one....I'll post that if I ever get to it....but before I do that project, I am bound and determined to get some of the others completed!​

Comment
Share

My nasty little secret....

I have a nasty, dirty little secret...my friends and family know nothing about this and I never share.  It is embarrassing and something I try to ignore...once a year, I try to deal with it. Just minimally...but honestly, nothing has solved my problem. 

For a person with a touch of cleaning OCD, this is a distressing thing to have to admit.​

The tops of my kitchen cabinets are NASTY.  I don't mean "a little dirty"...I mean greasy, dirty, nasty.  And honestly, usually around the holidays I make an effort to take all the stuff down, clean it or run it through the dishwasher, and wipe down the tops.  But the gunk and grime is so bad I usually just say forget it and put the clean stuff back up on the nastiness.  Gross, I know.  Now keep in mind, I am the kind of person who pulls my stove, fridge and dryer out every so often and sweep and scrub beneath!  Seriously!  (The washing machine is a front loader...that sucker doesn't budge...God knows what is under there!) But the tops of my cabinets...well, lets just say...oh, what can I say to defend myself....nothing really.

​So when I saw a nifty little tip on Pinterest, I said to myself (and my cats) "Hey, I can do THAT!"  Clean and put down WAX PAPER!  And every so often, just change out the wax paper and the grime is gone!  SWEET!

The PROBLEM was getting the serious coating of grime OFF the cabinet tops before I put down the wax paper.  That took rubber gloves, straight ammonia, a mask, several rags and some serious elbow grease.  But I'm pretty sure I got 99% of the grime (and scorched my lungs) before I put down the wax paper.  ​

(BTW, being a "couponer," I bought several jugs of ammonia at Target for .12 each...yep, you read right... TWELVE CENTS.  Target's website has Target coupons...right now you can print a $2 off 2 Up and Up cleaning supplies.  Print one, make 4 copies and take it to Target.  Their jugs of ammonia are only $1.12.  So you can buy 8 jugs with your 4 coupons for .96!  Sweet deal...especially considering it took well over a jug just to clean my cabinets!! I don't use ammonia a lot, but when I need something to cut some serious grime, it's my go to..... ​)

Anywho, here are a few pictures.  Honestly, it took me less than an hour....and I know it will save me some embarrassment in the future. (I have this fear that my family will find this stuff when I die and think poorly of me...it is one reason I make my bed EVERY day...God forbid I have an accident and my house is a mess when the family comes in...forget clean undies...seriously, who's really going to notice that! But a dirty house...oh my!)

IMG_8635.JPG
IMG_8636.JPG
IMG_8638.JPG

Seriously, the camera flash does not do justice by the dirt on the rags...it was seriously nasty!​

IMG_8639.JPG

How pretty is that!  And when the holidays roll around and I climb up on the counters to get my turkey platter (ohhhh, I forgot to put that in "my favorite things"...it was my great grandmother's and we use it every year!) or the crystal tea pitcher, I will just take up the dirty wax paper, put down some clean and PRESTO...I am good to go!  ​

Come to think of it, I might even have one of my kids climb up there to get the stuff...just so they can see what a clean person Mom is  ;)​